Autodesk Fusion add-in · Windows and macOS

Sheet Metal & Press Brake icon

Sheet Metal & Press BrakePress Brake Bend Order, Back-Gauge & Setup Sheets for Autodesk Fusion (Fusion 360)

From the Fusion flat pattern
to the press brake.

Pick a sheet-metal part and get the bend order, the punch and die, the back-gauge X and the handling for every hit, checked against your own tools in 2D and 3D. The operator gets one bend sheet; the setter no longer works out the sequence at the machine or finds a collision in a test bend.
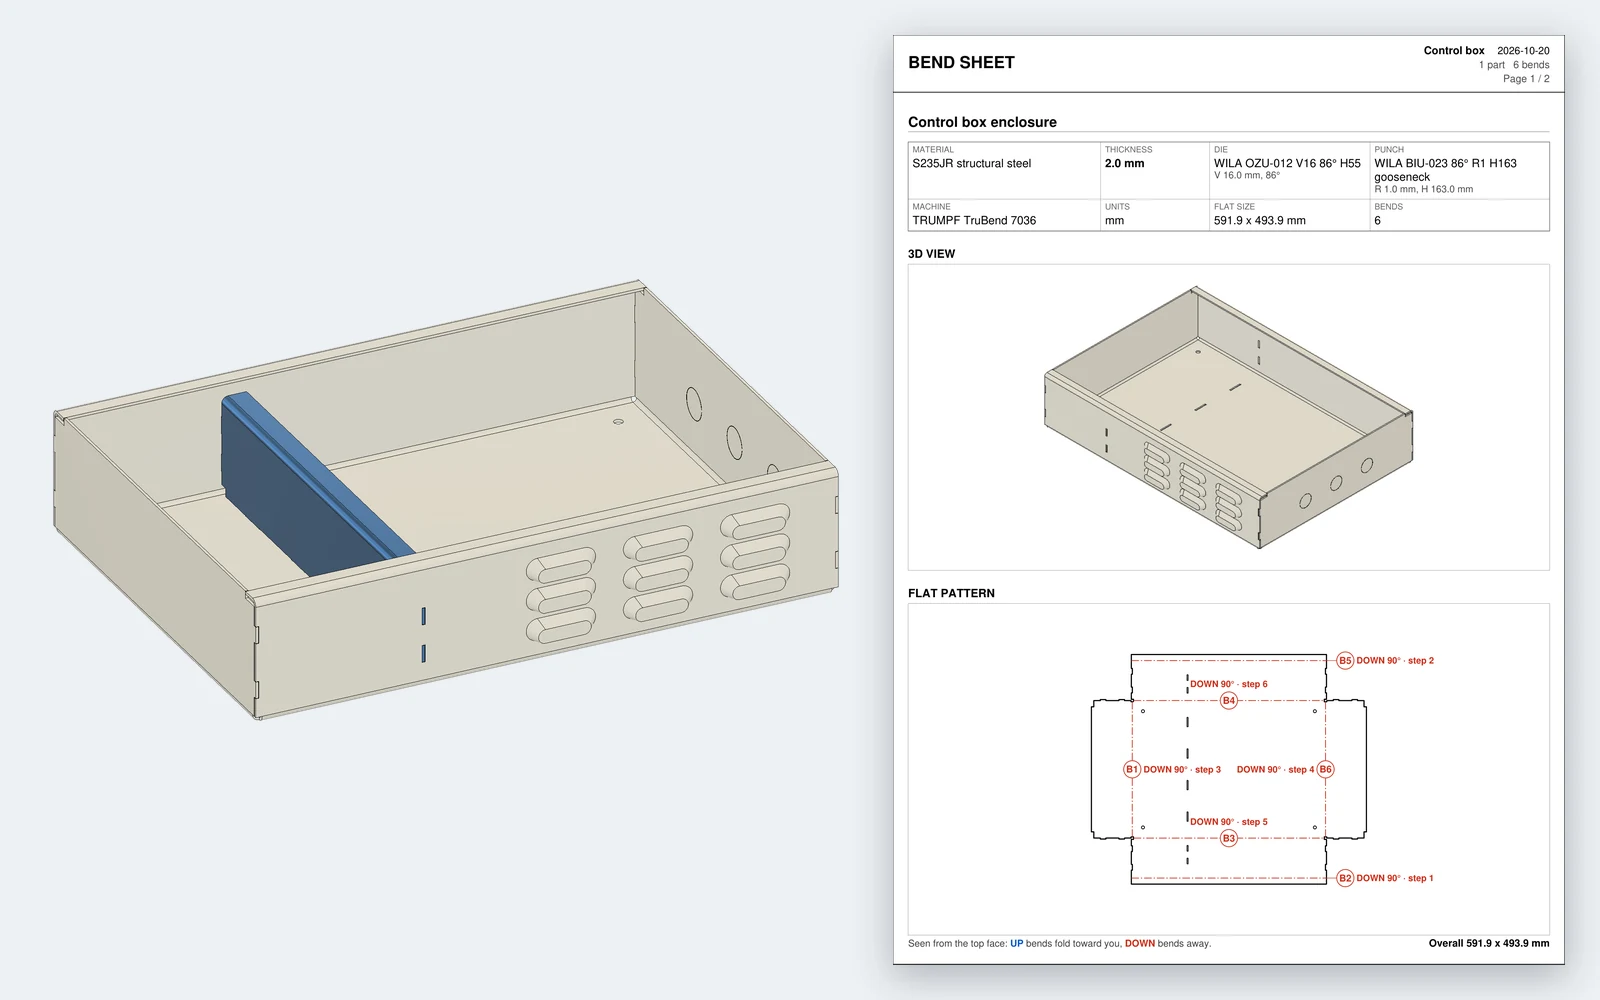
A Fusion sheet-metal enclosure with louvers, knockouts and a mounting plate next to page one of its bend sheet: setup block, a 3D picture of the enclosure taken in Fusion and the flat pattern with six numbered bends

A 2 mm control-box enclosure modelled in Fusion and the bend sheet the add-in wrote for it.

Videos

Every bend checked in 3D, then one sheet for the brake

The whole add-in on the control-box enclosure, a 15-bend part with its order set by hand and all its steps played, then bump bending, spring-die hems and the library.

Fusion 360 Press Brake Simulation – Check Every Bend in 3D
Tab and Slot and forms on a sheet-metal enclosure, then Bend Sheet: the bend order and back gauge, every step played in 3D with a collision in red, the bend sheet PDF, the press-brake library, a test-bend calibration and Manufacturing Export.
Watch on YouTube →
Fusion 360 Press Brake Simulation – Pre-Bends and Bend Order for a 15-Bend Part
A hat channel with a V bead and an offset: the bend order set by hand, bends taken to 45° first and finished in the die, every step watched in 3D with the collisions in red, and the bend sheet PDF.
Watch on YouTube →
Press Brake Bend Sequence Simulation in Fusion 360 – All 17 Steps in 3D
The same hat channel, all 17 steps played in 3D with one click: each stroke, then the part flipped over or turned end for end for the next step.
Watch on YouTube →
Fusion 360 Press Brake Simulation – Bump Bending, Hems and Spring Dies
Calibrate from a test bend and the Press Brake Library, then Bend Sheet: an R40 radius bump bent in 8 hits from the far end toward the back gauge, and two hems pre-bent and closed in a WILA spring hemming die.
Watch on YouTube →

What it does

Fusion draws the flat. The brake needs more than that.

Fusion unfolds the part, draws its bend lines and exports the flat. Which bend comes first, where the back gauge goes for each hit, how the part is turned and whether a flange hits the punch are left to the shop: that is what this add-in plans.

Switching CAD or planning bends at the machine

Coming from Inventor Bend Order, SolidWorks Sheet Metal, or manual press-brake setup?

Bend sequence (bend order) & part handlingNative Fusion by handBend callouts numbered by hand on a drawing; no flip or turn planWith the add-inAuto tools + order searches your library for a clear sequence and writes the handling of every hit
Backgauge X (back-gauge stop)Native Fusion by handWorked out at the machine or in offline CAMWith the add-inBack-gauge X and gauge reference (edge or formed flange) for every step
Punch, die, upper beam & box-wall collisionsNative Fusion by handFound at the brake, in a test bendWith the add-inA section check on every plan and the real part refolded in 3D through the stroke
Checks before the first hitNative Fusion by handA flange that falls into the die or a punch angle too sharp, found at the brakeWith the add-inFlange length, tool angles, force against tool and machine ratings, holes and forms near bends, on the bend sheet
Hems, joggles & large radiiNative Fusion by handHits, tools and force worked out by the setterWith the add-inEach hit planned with its tools, X and force: hems (spring hemming dies too), offset hits, bumps, bottoming and coining
Tool data & sectioned stationsNative Fusion by handEach punch and die looked up and typed in; pieces picked at the machineWith the add-inA starter library from the makers’ catalogues with their outlines, and a station of your sectioned set for every step
K-factor & bend deductionNative Fusion by handAn assumed K-factor and radius typed into Sheet Metal RulesWith the add-inThe rule of the die and punch you bend with, or of your own test bend
Forms, punch press & Tab and SlotNative Fusion by handEach form and slot modelled by hand; up or down and the hit order decided at the turretWith the add-inForms checked against the tool makers’ limits, a punch-press plan checked hit by hit, the forms’ punch and die as STEP, and Tab and Slot joints
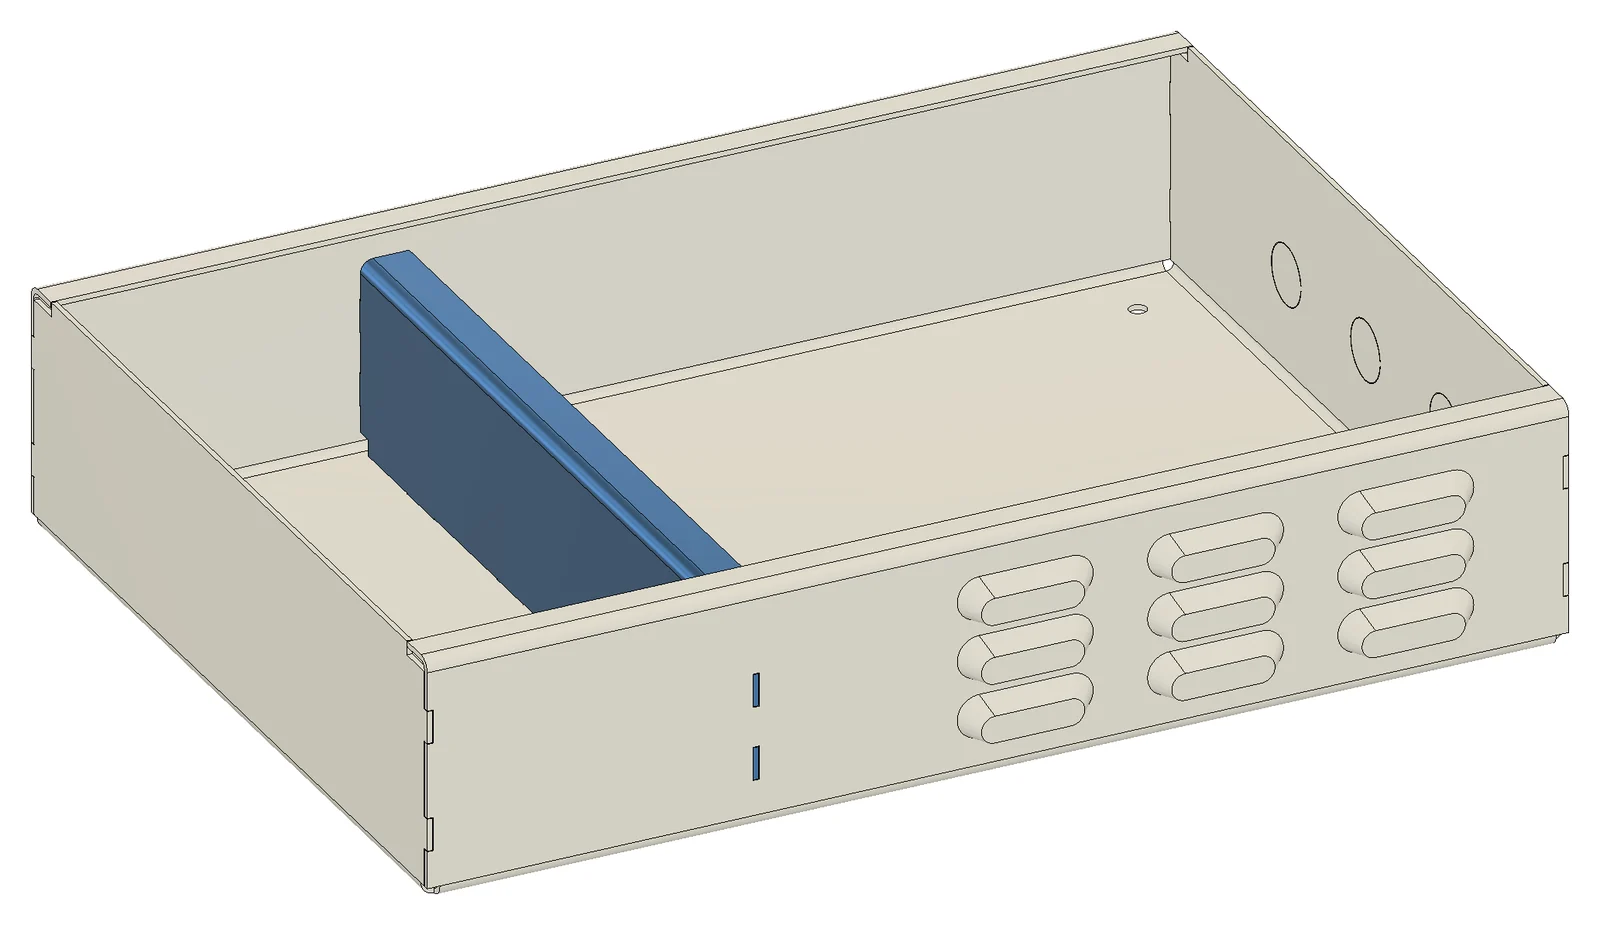
A 420 by 300 by 90 mm sheet-metal enclosure in Autodesk Fusion with closed, tab-locked corners, return flanges on the long walls, nine louvers in the front wall, three knockouts in the end wall and a blue mounting plate held in slots
The example on this page, as modelled in Fusion.

One real part, from start to finish

Modelled with Fusion's own sheet-metal tools: every picture of the enclosure on this page comes from this one design and the add-in's commands.

Part
Control-box enclosure, 420 × 300 × 90 mm
Material
S235JR steel, 2 mm
Corners
Closed: the long walls cover the end walls
Bends
6, including two 15 mm return flanges
Forms
9 louvers opening downwards, 3 cable knockouts
Joints
8 tabs hold the mounting plate, 8 lock the corners
Brake and tools
TRUMPF TruBend 7036; WILA V16 die and 163 mm gooseneck punch

Collision check

Collisions found in Fusion, in 2D and in 3D

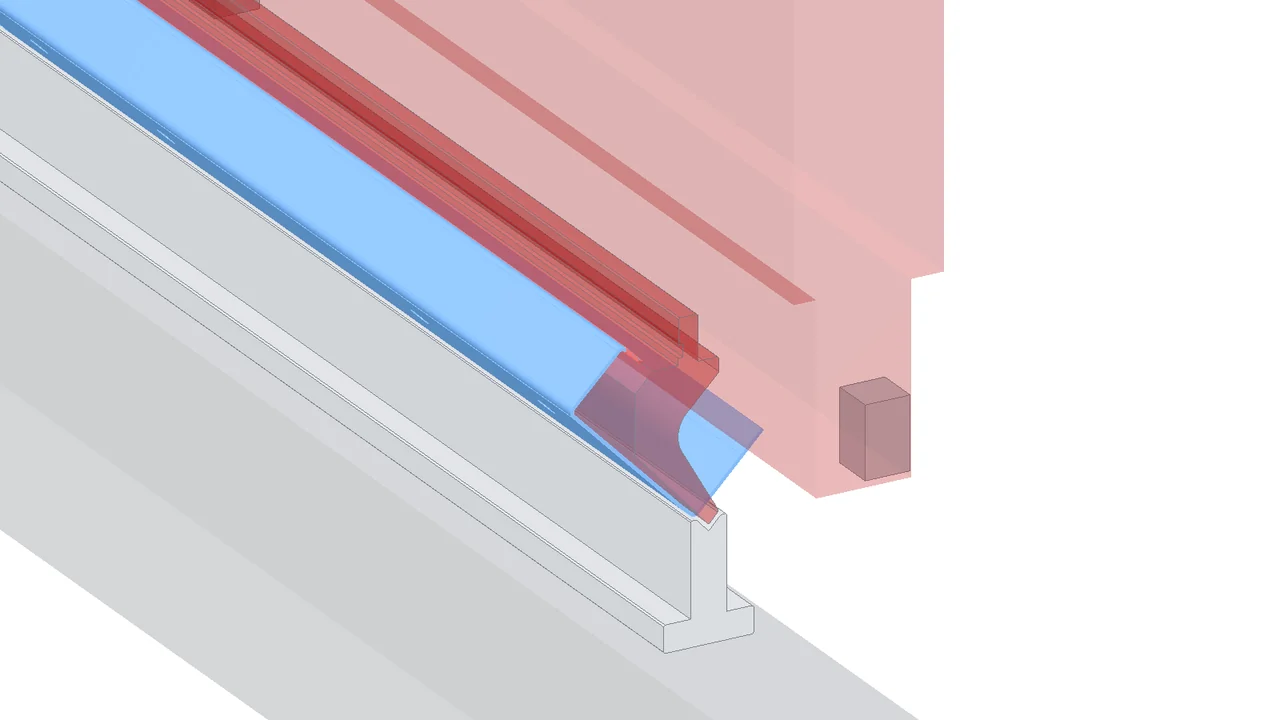
Every step is checked against the outlines of your punch, die, upper beam and back gauge, with the earlier bends formed: a flange that swings into the punch, a return over the end of the punch, a wall that leaves it no room.

Section check of every step

The section across each bend is swept through the stroke with the part folded as it is at that step, end walls and returns included. It runs on every plan; a tool that only marks the sheet's skin is a warning.

3D view of a step

Any step of the plan drawn beside your model, at any point of the stroke.

3D check of the plan

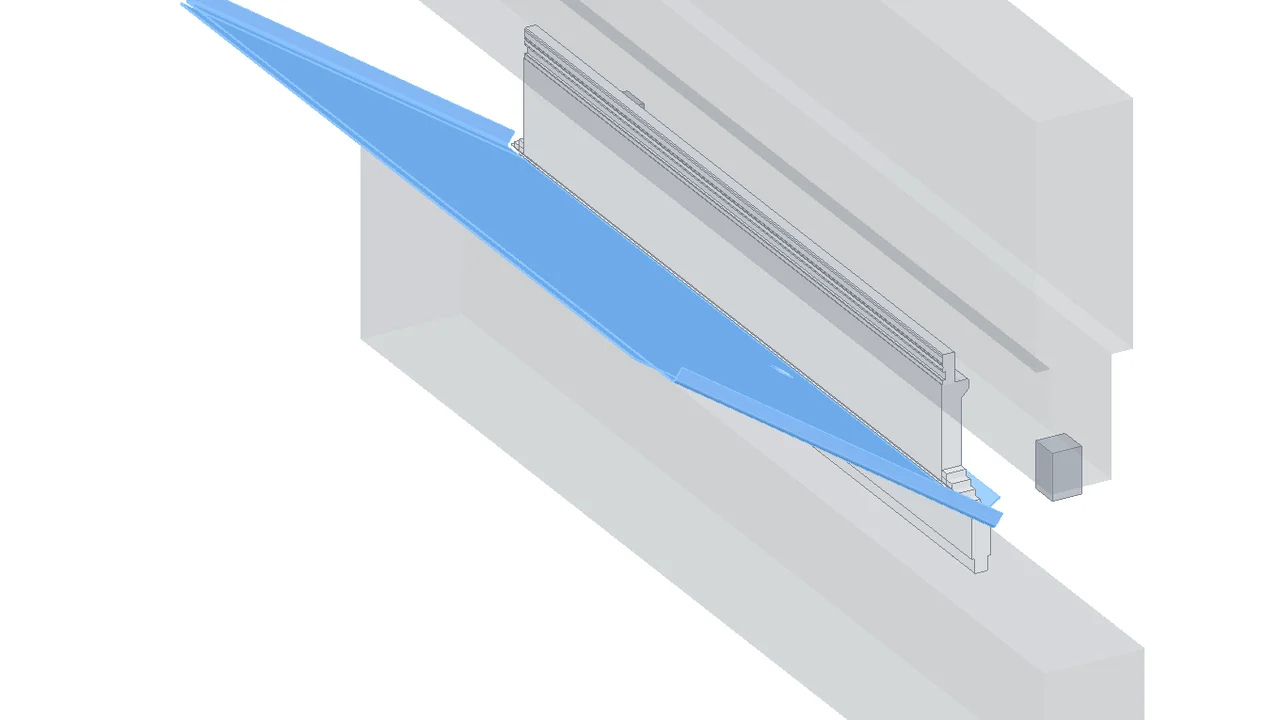
One button refolds the real part from its flat and checks every step of the plan in 3D, and the way the part comes out past the stations next to it.
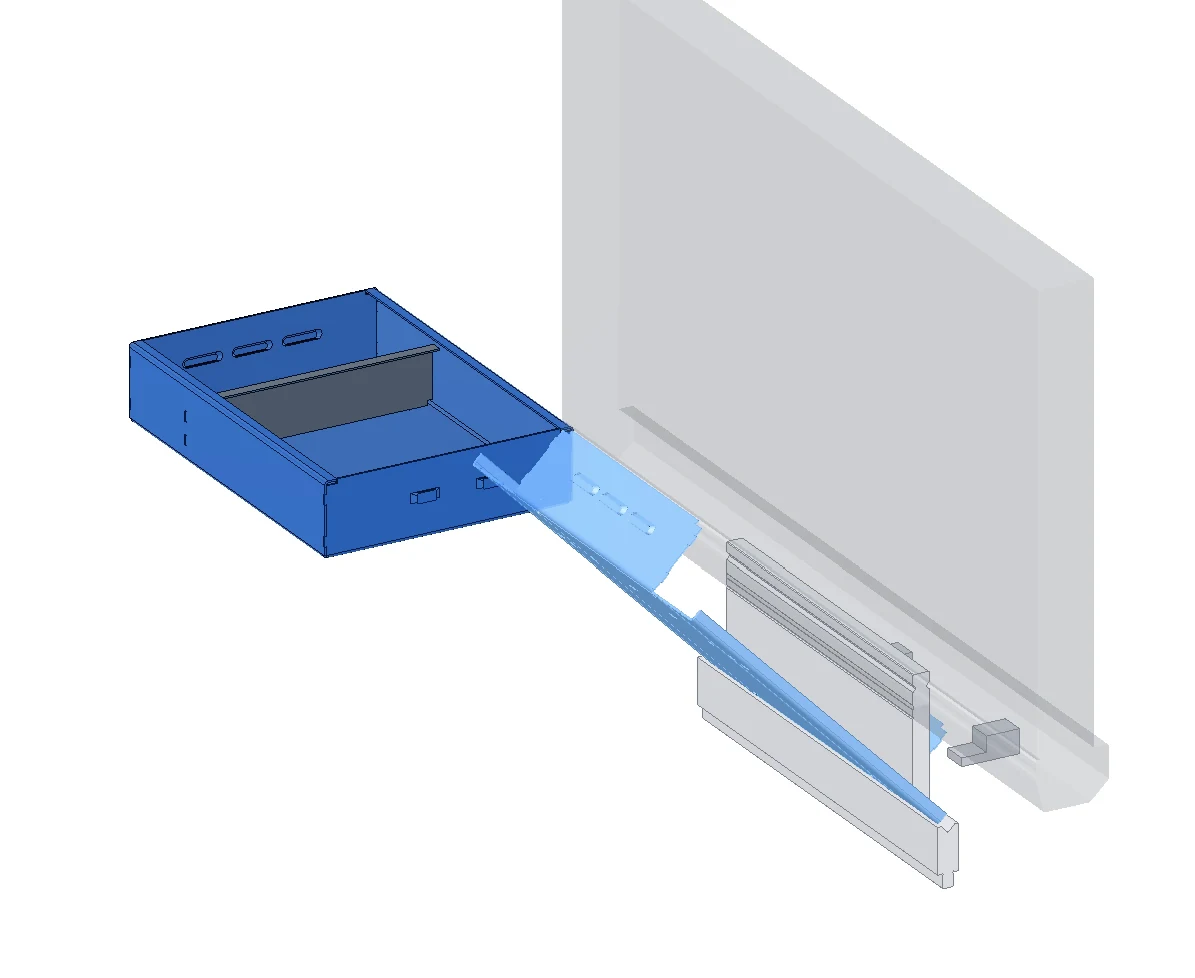
The enclosure on the press brake in Bend Sheet's 3D view at step 4, at the bottom of the stroke: the part refolded as it is at that step on the WILA V16 die, under the 120 mm punch and the see-through upper beam, with the back-gauge fingers behind
Step 4 of the enclosure at the bottom of the stroke: no contact.
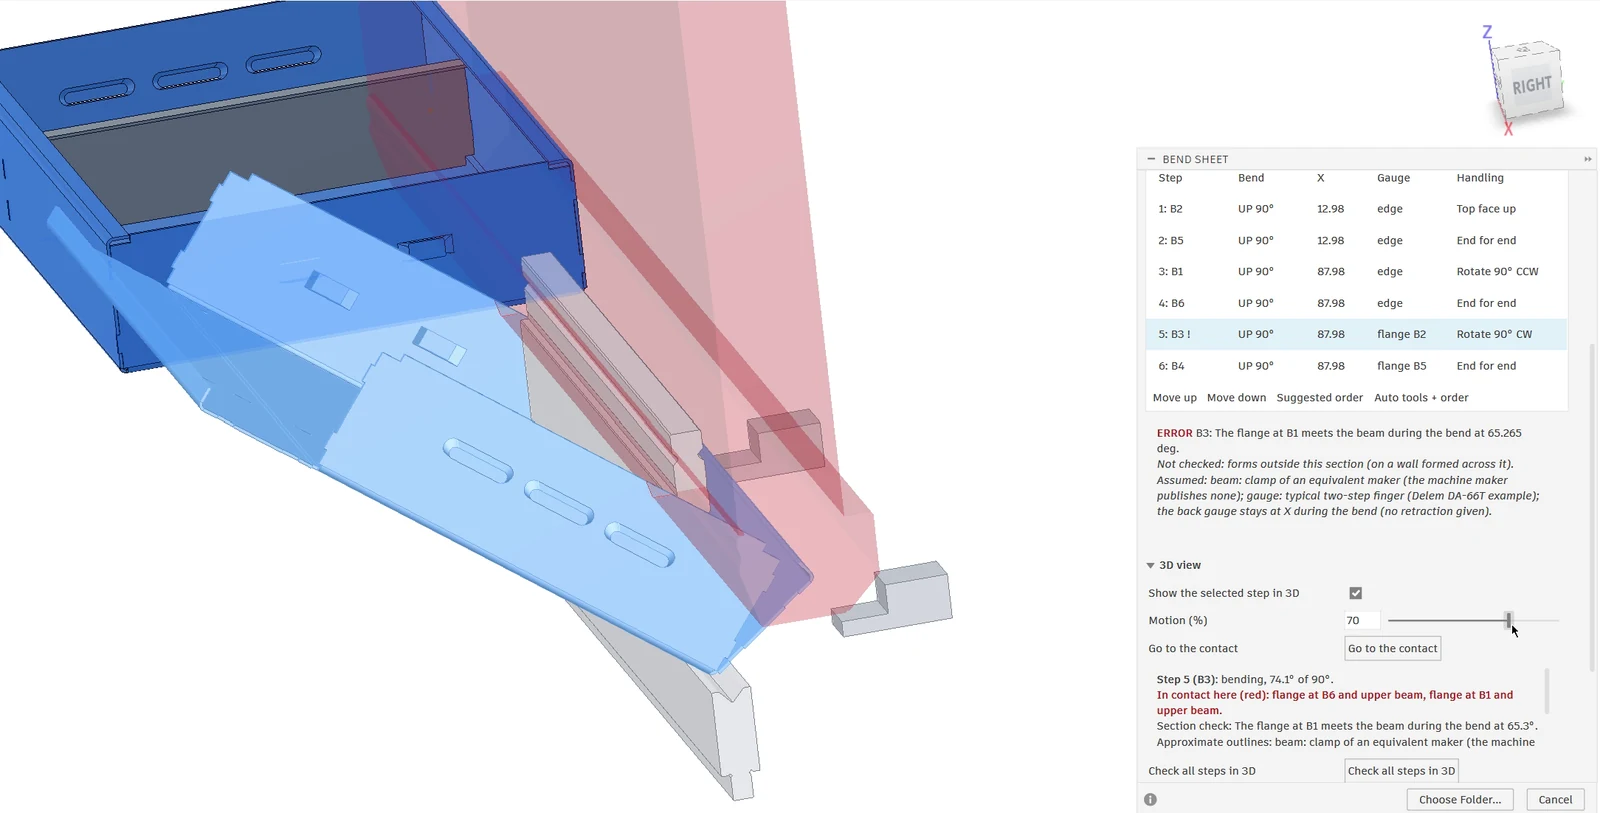
Bend Sheet in Autodesk Fusion with its 3D view on: the enclosure at step 5, 74 degrees into the bend, its flanges reaching the see-through upper beam, drawn red; the dialog lists the bend order and says In contact here (red): flange at B6 and upper beam, flange at B1 and upper beam
Step 5, 74° into the bend: the flanges reach the upper beam, drawn red, and the dialog names the contact.
Step 5 on a 120 mm gooseneck punch: the walls rise and both flanges touch the upper beam, drawn red.

Any step in 3D, every step checked in 3D

Show the selected step in 3D draws the step beside your model; drag Motion through the stroke, or Play all steps to watch the whole plan, the part flipped or turned between steps. A tool the part cuts into turns red.

Check all steps in 3D refolds the real part from its flat and tests every step against the punch, die and beam as solids, every 5° and through the withdrawal, then tries a lift, a pull and a tilt to take the part out past the neighbouring stations and the machine. Contacts go on the bend sheet and in the CSV; a way out it could not verify is marked as not checked, never as clear.
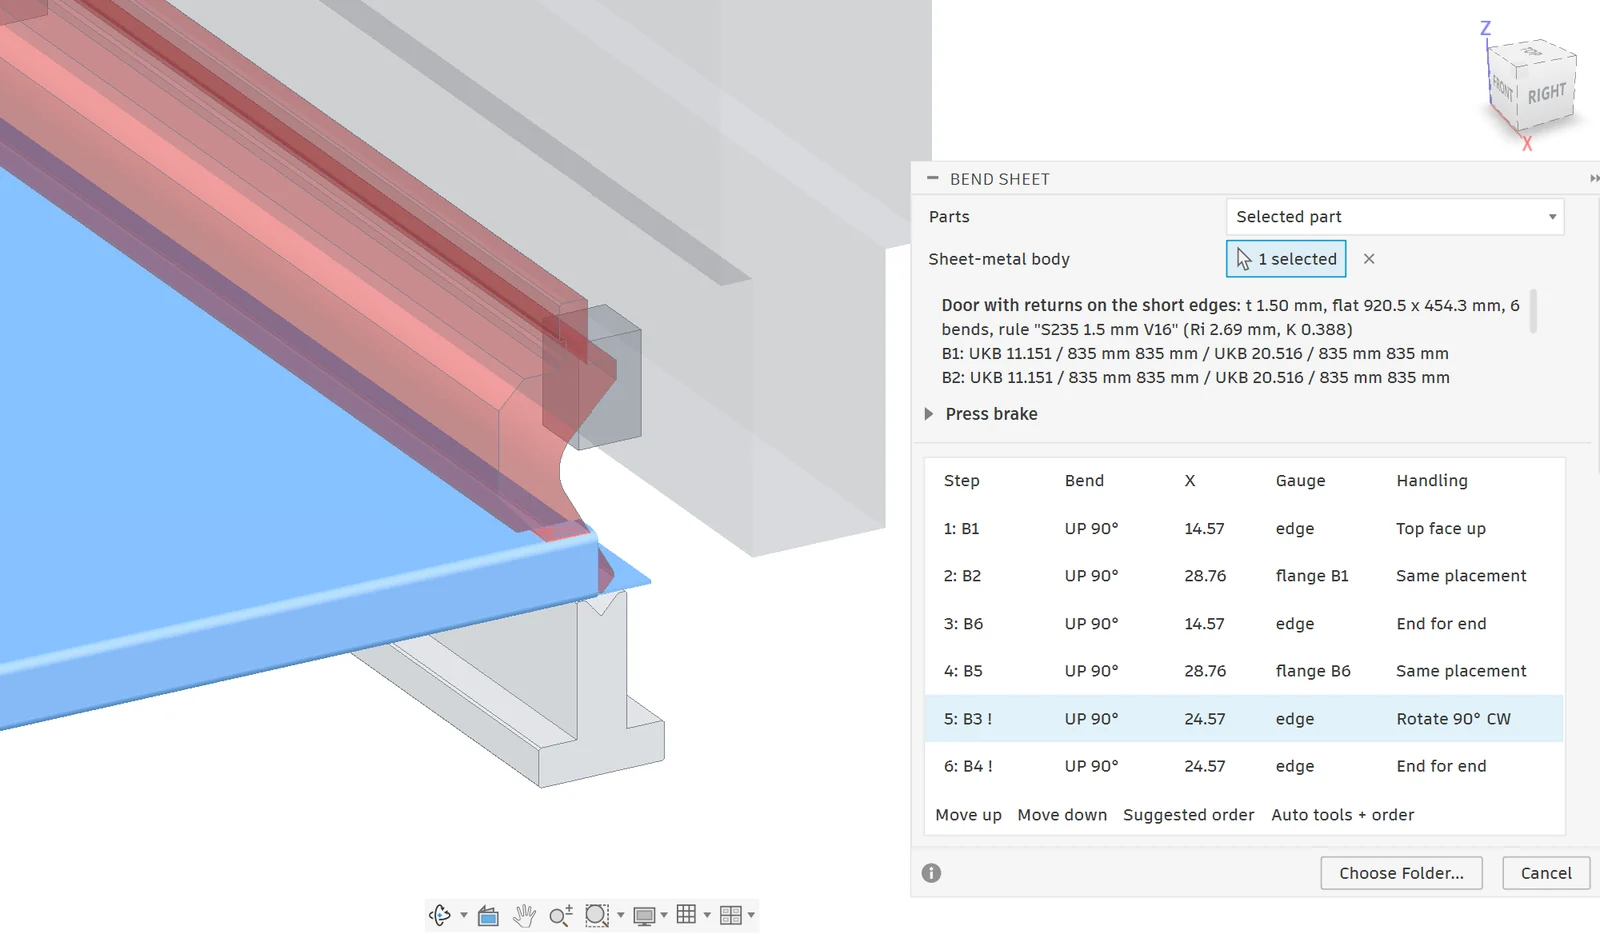
The Bend Sheet dialog in Autodesk Fusion with its 3D view switched on: a cabinet door lies on the die under a gooseneck punch drawn see-through red, the upper beam see-through grey behind it, and the bend table with steps 5 and 6 flagged
Step 5 of a door with returns on its short edges: the 3D check finds the end of the punch landing on a return.
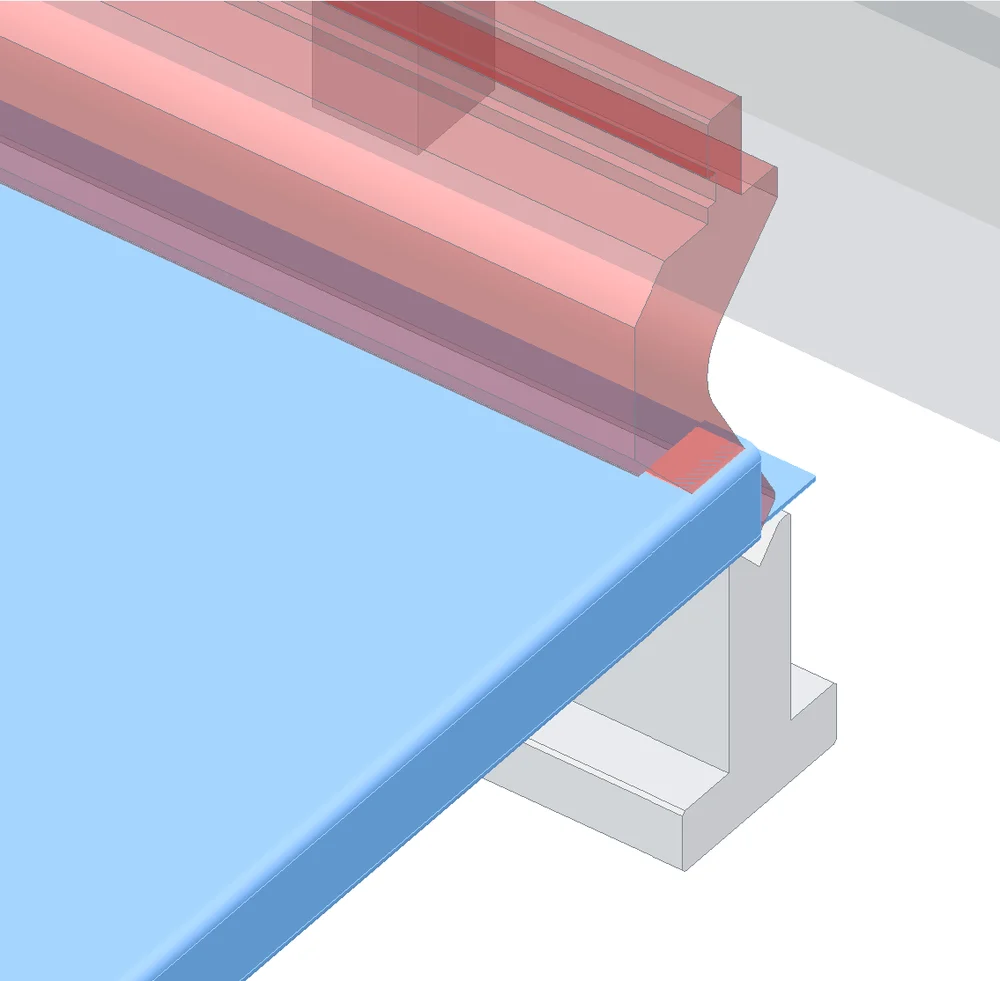
Close view of one end of the door on the press brake: the short wall with its return bent inwards at the top, the end of the gooseneck punch standing on the return, and the volume they share in solid red; the V die below
The end of the 835 mm punch lands on the return of the short wall (red).

A door whose returns lie over the ends of the punch

A 400 × 832 mm door in 1.5 mm steel, short walls bent first: their returns then stand over the ends of the 835 mm punch, which lands on them at the start of steps 5 and 6. The section through the middle of the bend cannot see it; the 3D check does. Auto tools + order bends the returns last, between the walls, on a 395 mm AMADA station: clear in 2D and 3D.

A narrow U channel: the first flange meets the punch in the second bend

After the first bend the 121 mm flange stands higher than the 104.5 mm gooseneck punch, and the section check finds it meeting the punch 29° into the second bend, drawn red on the bend sheet.
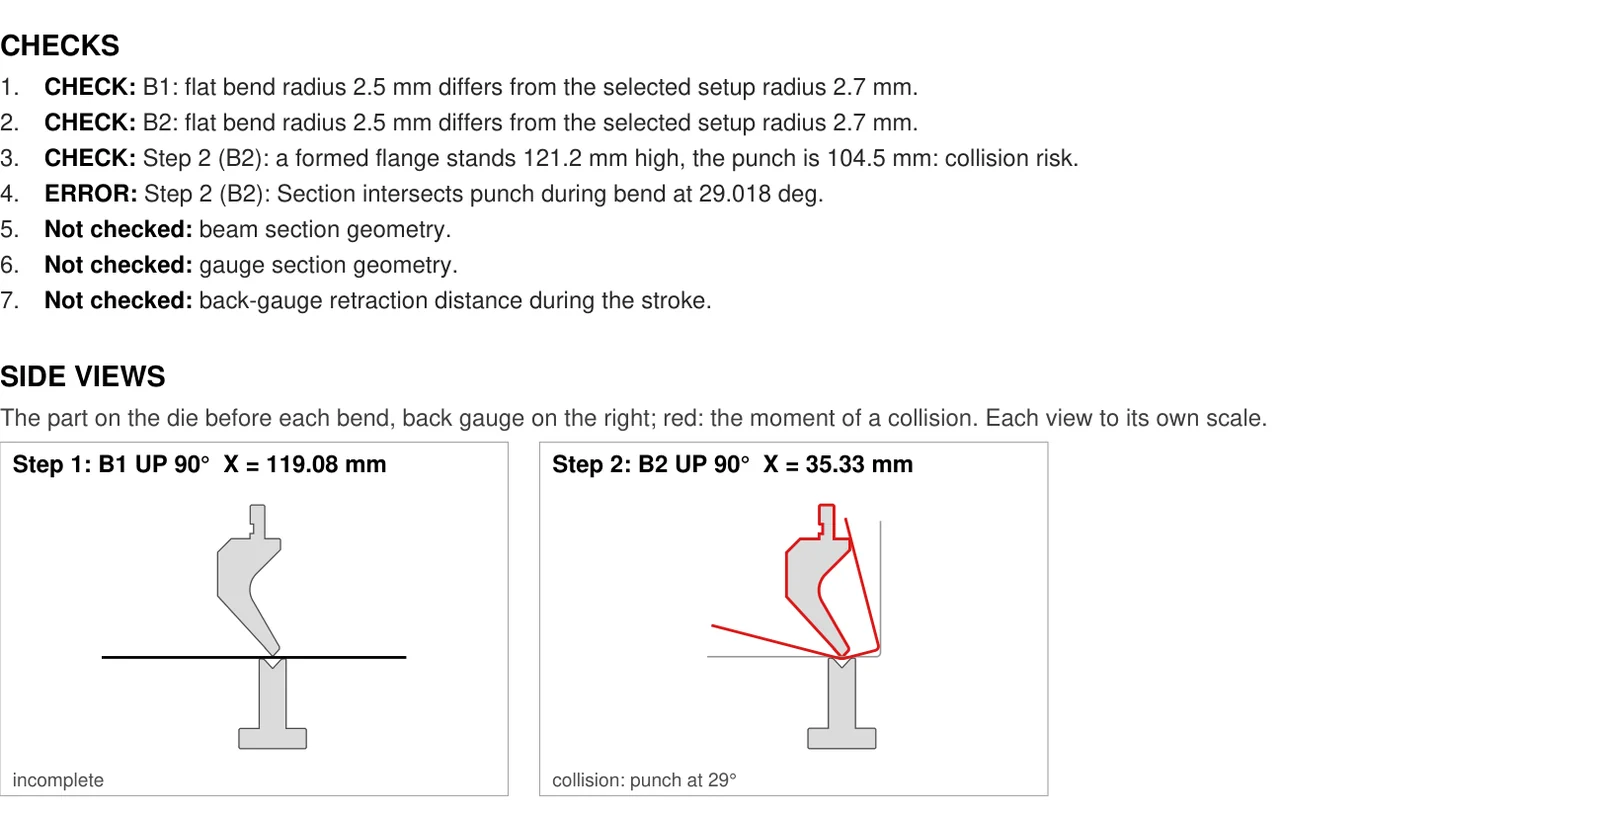
Checks of a bend sheet with an error that the section intersects the punch during bend 2 at 29 degrees, and two side views: step 1, and step 2 with the part and the gooseneck punch drawn in red at the moment of contact
From the bend sheet of the narrow U: the error, the warnings and the side views, the collision in red.

One button

Auto tools + order

  • Tries your punches and dies, only the ones you have when you mark them, both back-gauge sides and other bend orders, and keeps one punch and die for the whole part when the checks allow it.
  • Checks every plan with the whole part folded as it is at each step, then folds the plan it keeps in 3D, taking the part out past the stations next to it as well.
  • Usually seconds: 31 plans in 2.1 s for the lipped C channel under Example parts; a hard part stops after 40 s with the best plan it found.

It keeps your pre-bends and the steps up to the one you mark Keep for Auto. When full bends leave a problem, it tries one or two pre-bends of its own, at a half, a third or two thirds of the turn, and lists the ones it adds; when no plan clears every step, it keeps the order that went furthest and marks the steps left for you.
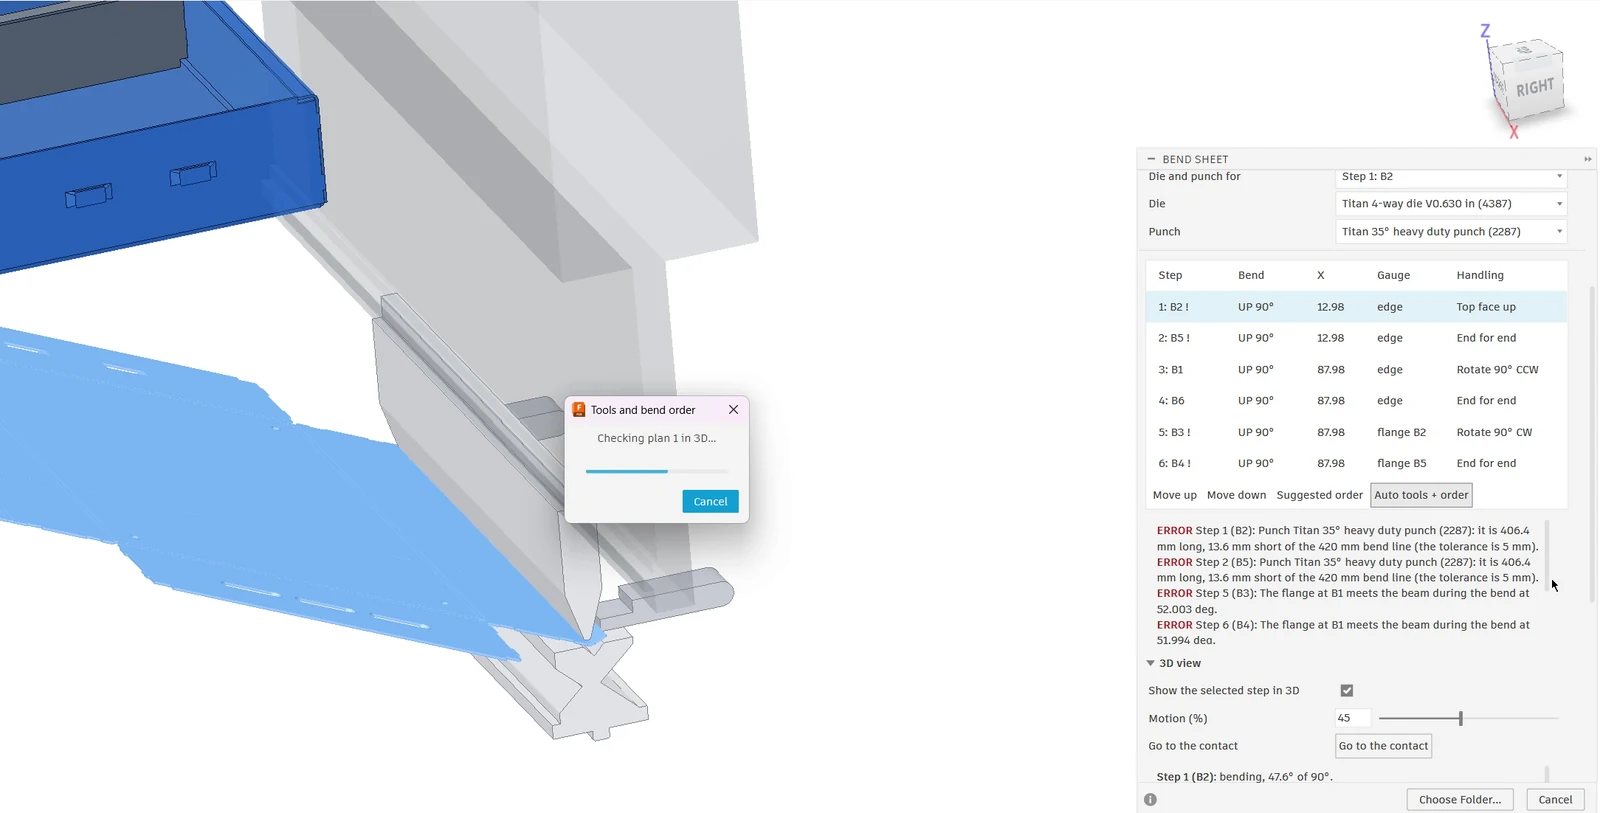
Bend Sheet in Autodesk Fusion on a machine with Titan tooling: the bend order lists four errors, the punch 13.6 mm shorter than the 420 mm bend line at steps 1 and 2 and the flange at B1 meeting the beam at steps 5 and 6; the Tools and bend order window says Checking plan 1 in 3D
Before: four errors with the Titan die and punch; Auto is checking a plan in 3D.
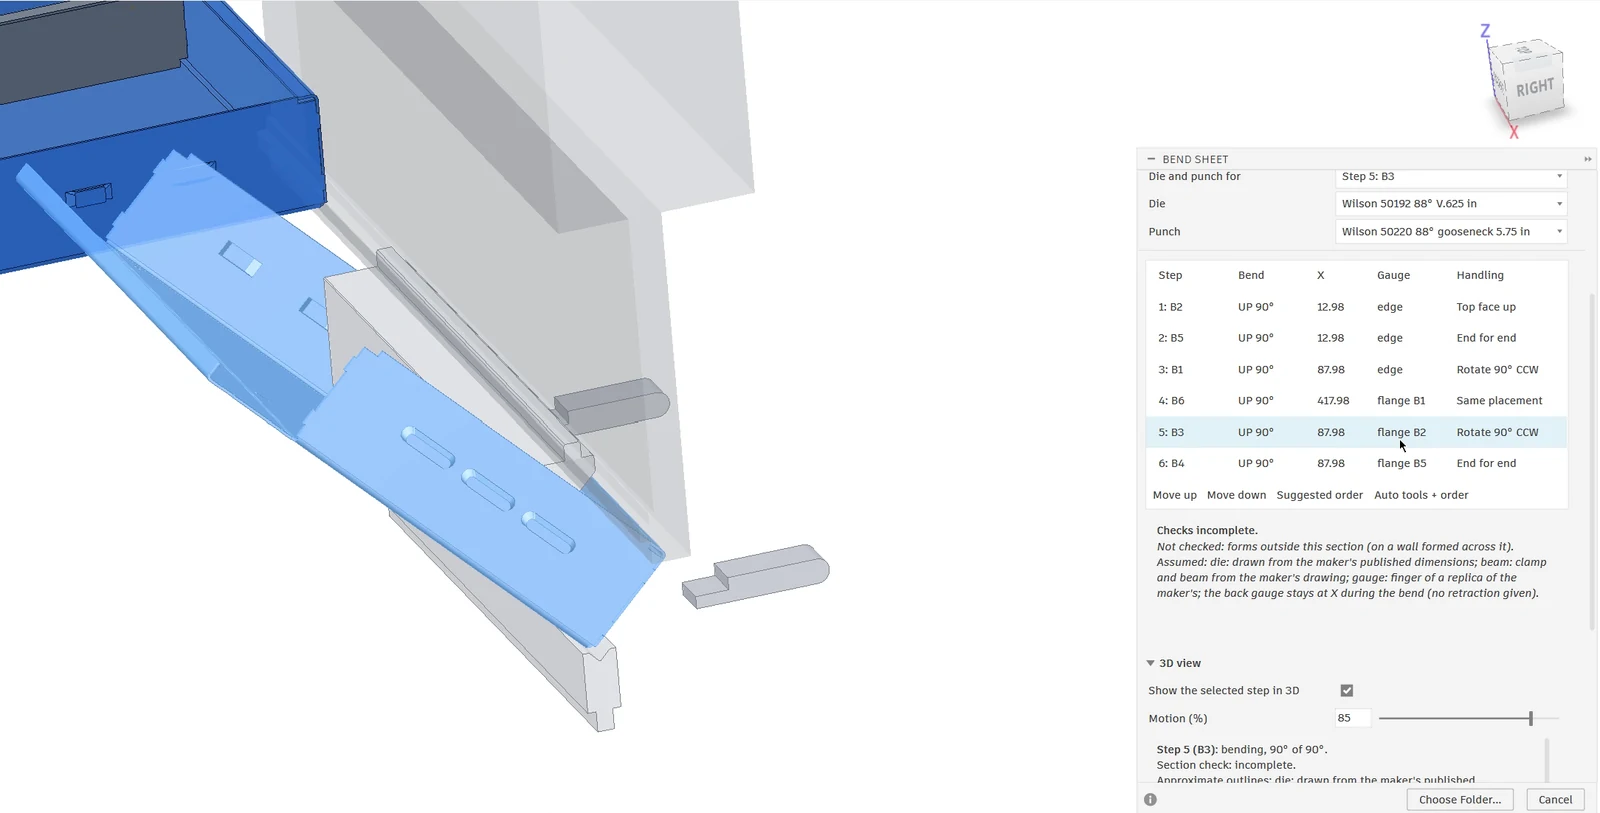
The same part after Auto tools + order: a Wilson 50192 88 degree V.625 in die and a Wilson 50220 gooseneck punch, step 4 gauged on the flange at B1, and no error in the checks; the 3D view shows step 5 at the bottom of the stroke
After: a Wilson V.625 die and a 5.75 in gooseneck from the library, and no errors.

Bend Sheet

Plan the part in Fusion, hand one sheet to the operator

Run Bend Sheet on one part or on every sheet-metal part of the design: it reads the flat pattern and the setup saved with each part, and lists every step with its back-gauge X, gauge reference and handling. Set the order by hand or with Auto tools + order, then write the files.
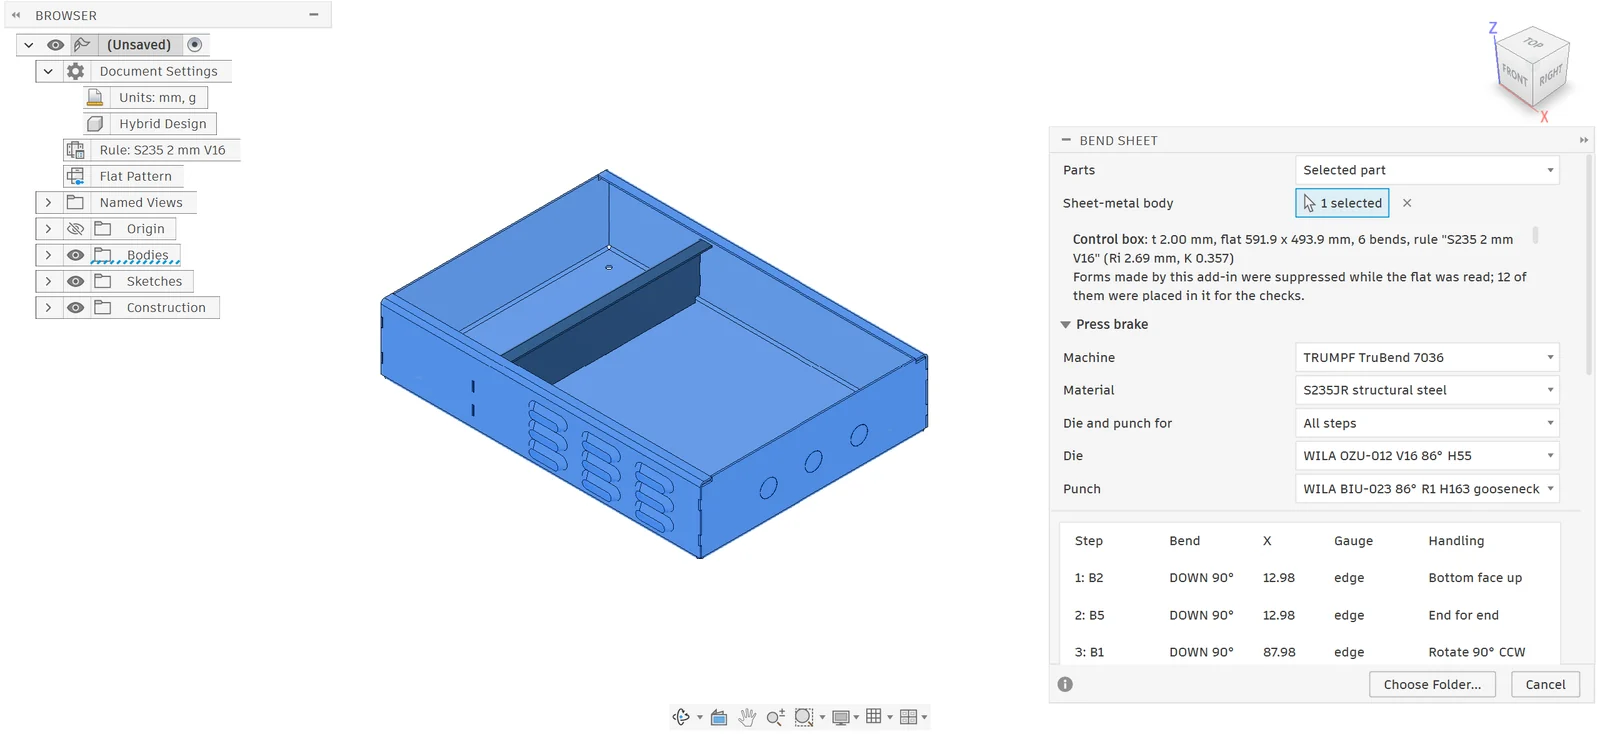
The Bend Sheet dialog in Autodesk Fusion next to the selected enclosure: part summary, press brake setup with the TRUMPF TruBend 7036, S235JR steel, the WILA V16 die and the 163 mm gooseneck for all steps, and the bend order table with back-gauge X, gauge and handling
The Bend Sheet dialog next to the selected enclosure.

What the operator gets

  • ✓The setup: machine, material, thickness, die and punch.
  • ✓A 3D picture of the part as Fusion shows it, and the flat pattern with every bend numbered, UP in blue and DOWN in red.
  • ✓The bend table in order: angle, inside radius, flanges, back-gauge X, what the part rests against, the handling and the force; pre-bends, hems, bumps and offset hits marked.
  • ✓The tools and station of every step, the checks, and a side view of every step.
  • ✓A bend-program CSV, and a flat DXF with CUT, BEND, ETCH and NOTES layers.
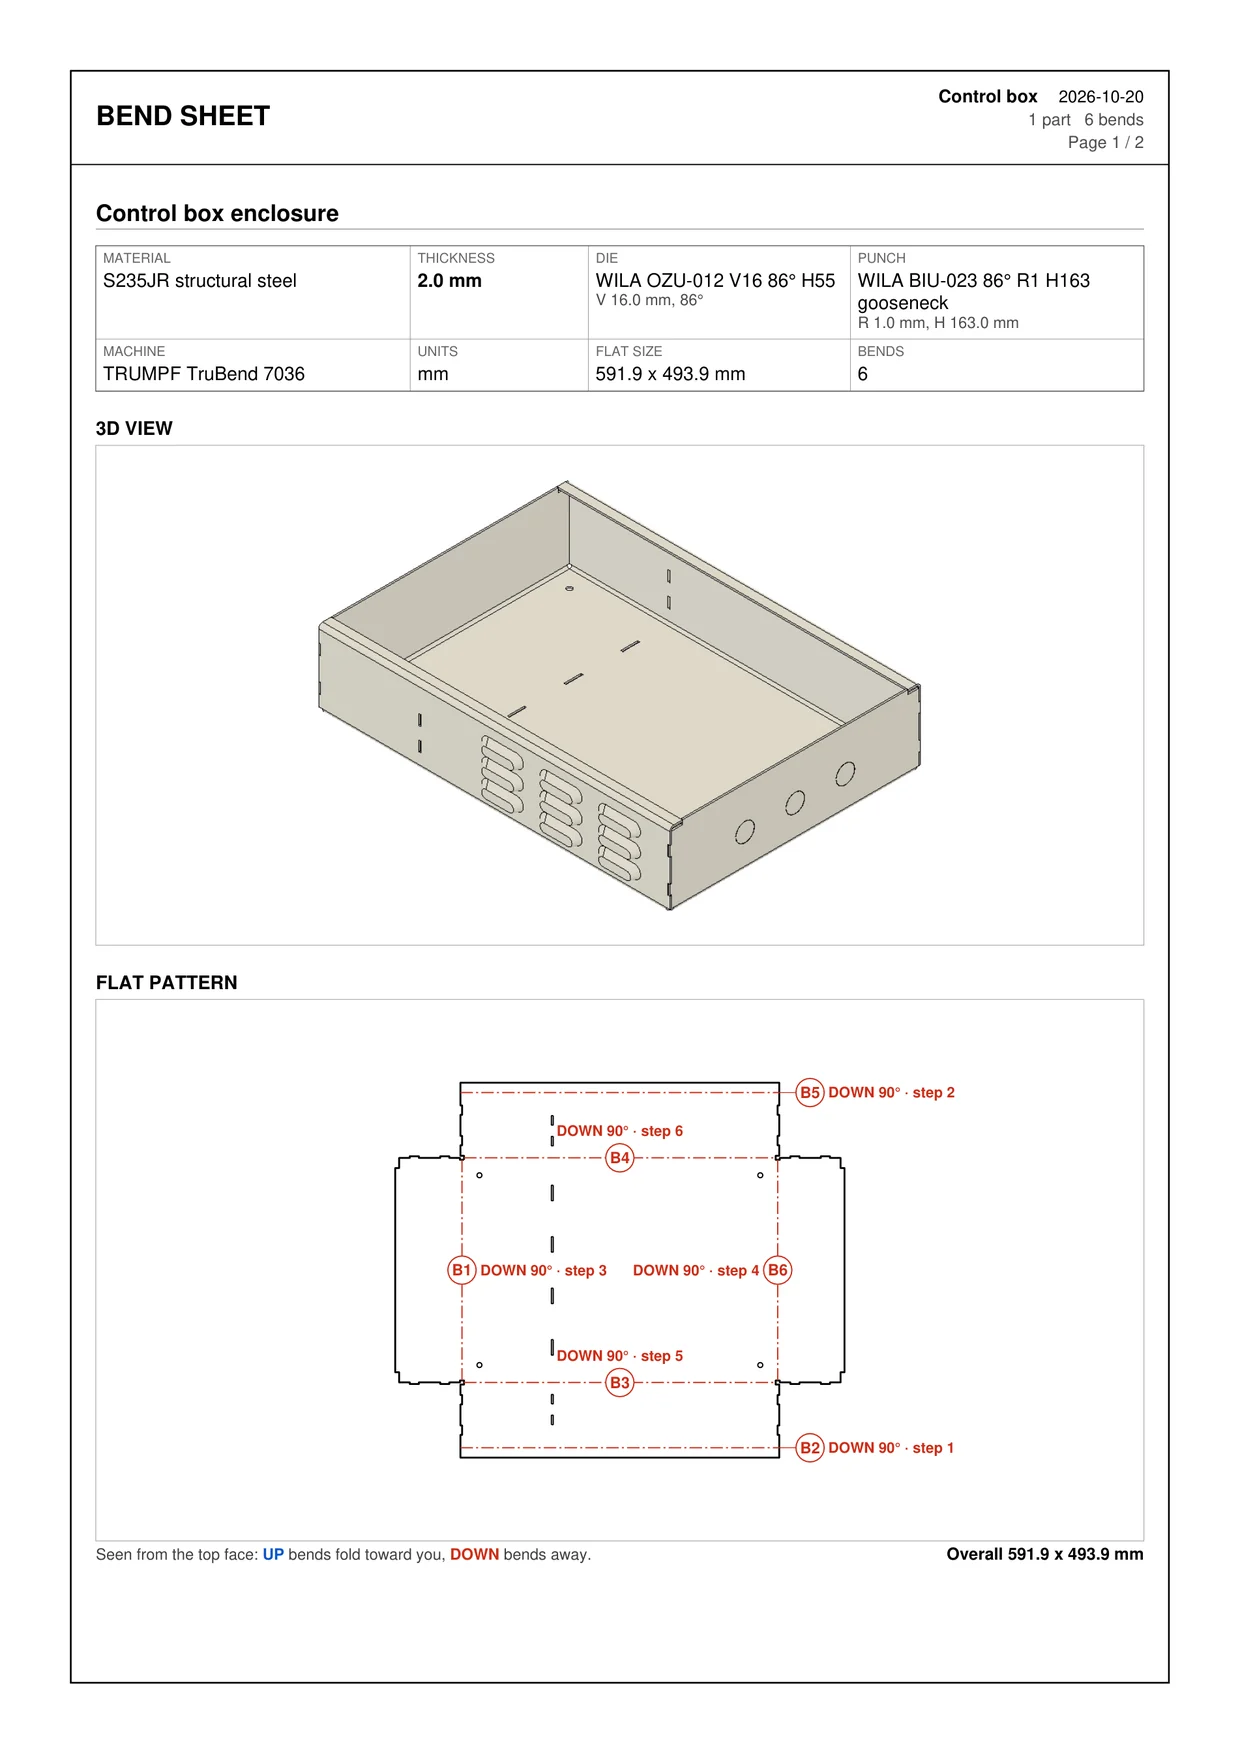
Page one of the enclosure's bend sheet: setup block with the WILA V16 die and 163 mm gooseneck punch, a 3D picture of the enclosure taken in Fusion, and the flat pattern with bends B1 to B6, each DOWN 90 degrees in red with the step that makes it
Page one: the 3D picture from Fusion above the flat pattern.

Control-box enclosure, 6 bends

On the TRUMPF TruBend 7036 with WILA tools: Auto tools + order bends the returns first and puts the 163 mm gooseneck on every step, all six clear in 2D and 3D.
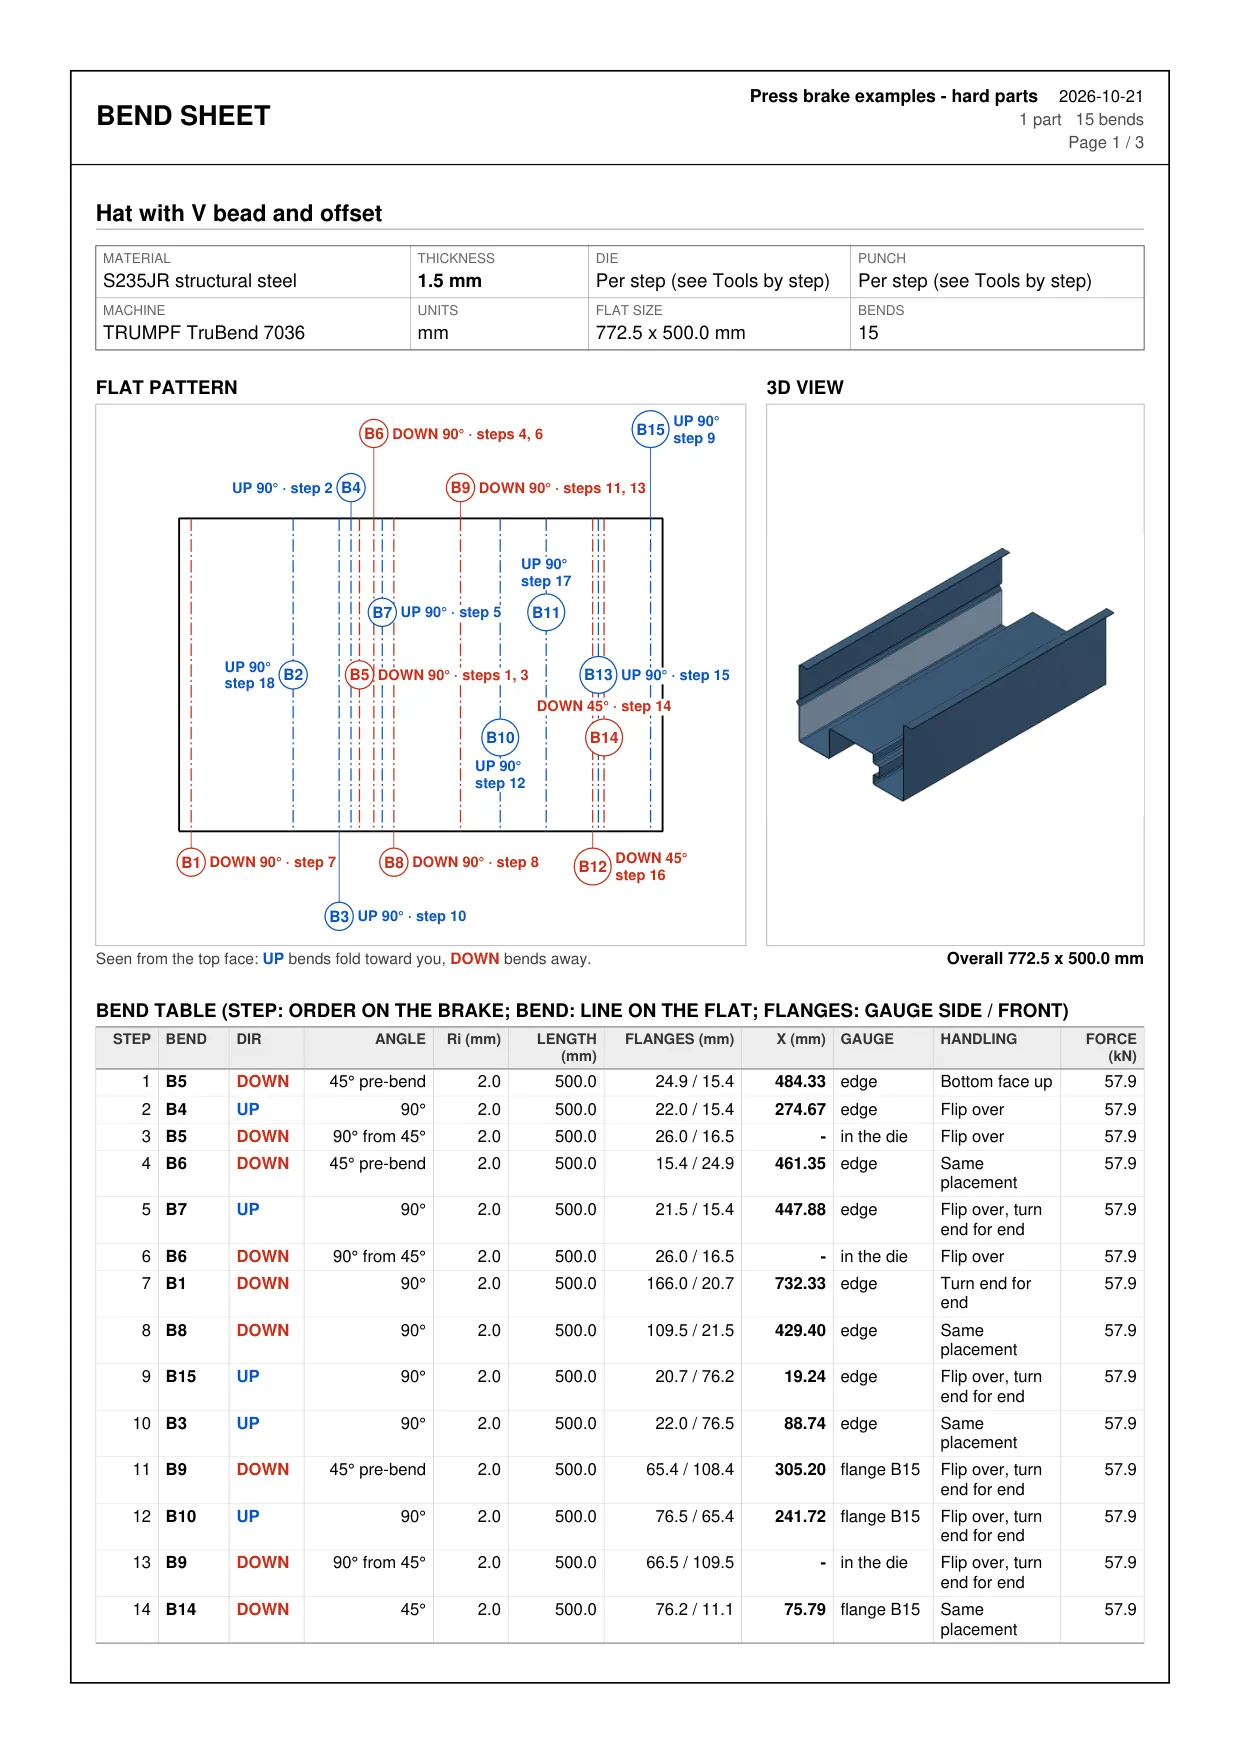
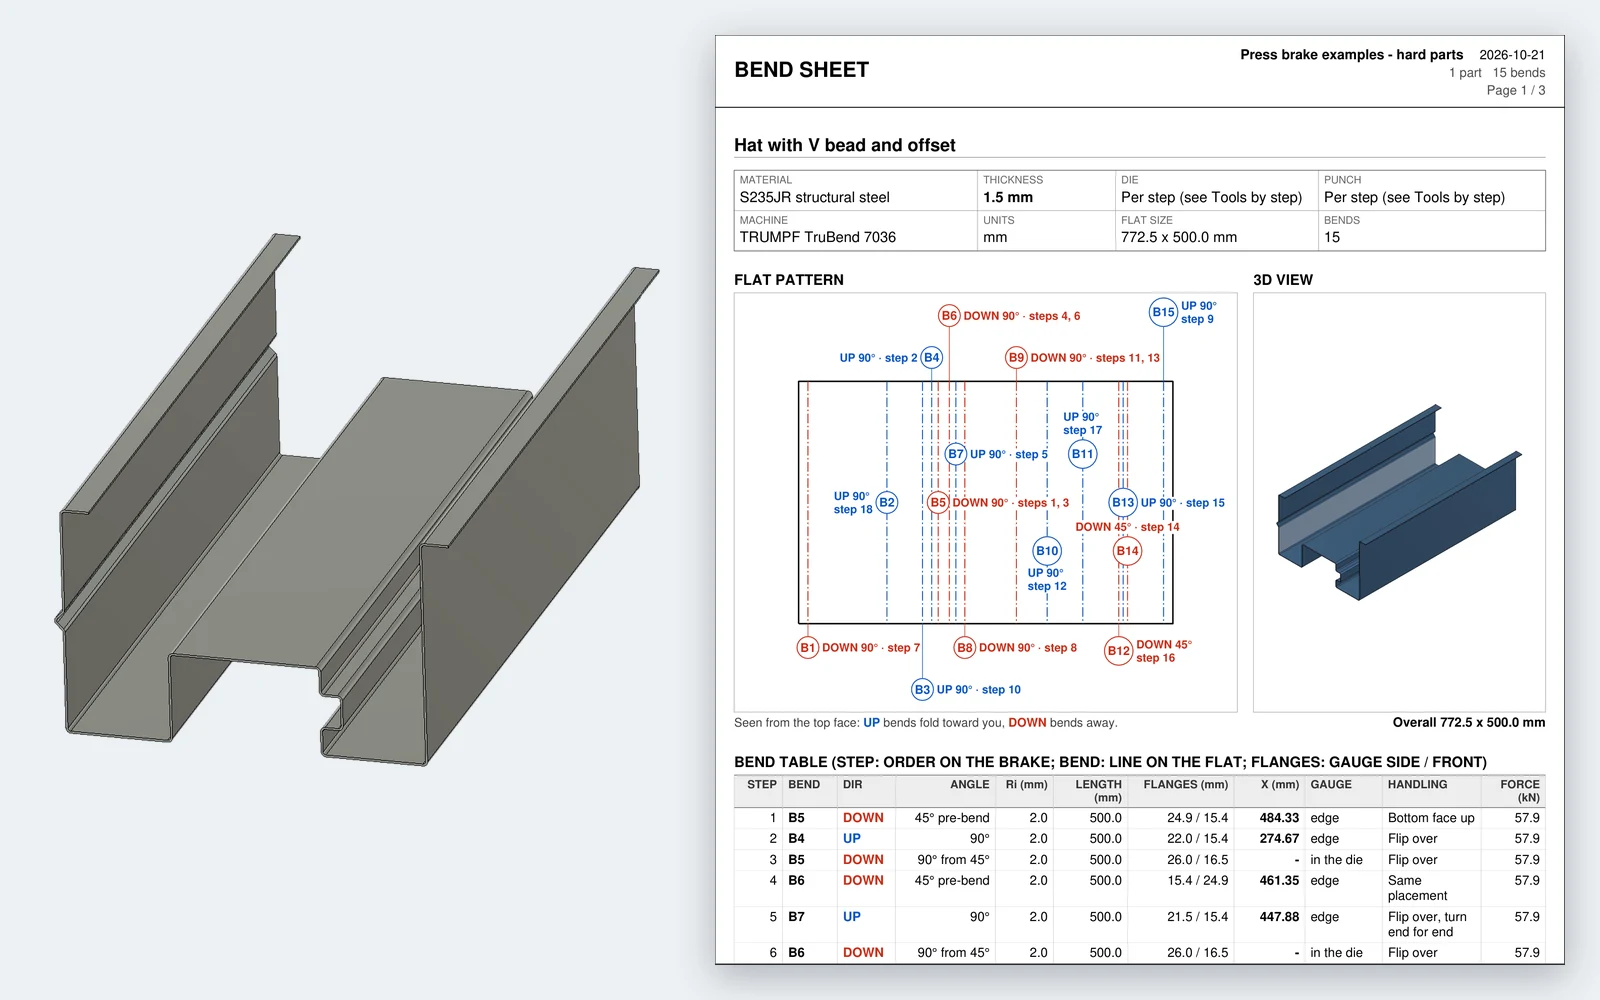
Page one of the bend sheet of a hat channel with a V bead and an offset: setup block with tools per step, the flat pattern with bends B1 to B15, each labelled with its direction, angle and the step or steps that make it, a 3D picture of the part, and the bend table with B5 at step 1 as a 45 degree pre-bend and at step 3 as 90 degrees from 45, in the die
Page one: the flat pattern, the 3D picture and the bend table with the pre-bends.

Hat channel with a V bead and an offset, 15 bends

The part of the second video: B5, B6 and B9 pre-bent to 45° and finished in the die, 18 steps, six of them with another tool from the catalogue; every step clear in the section check.

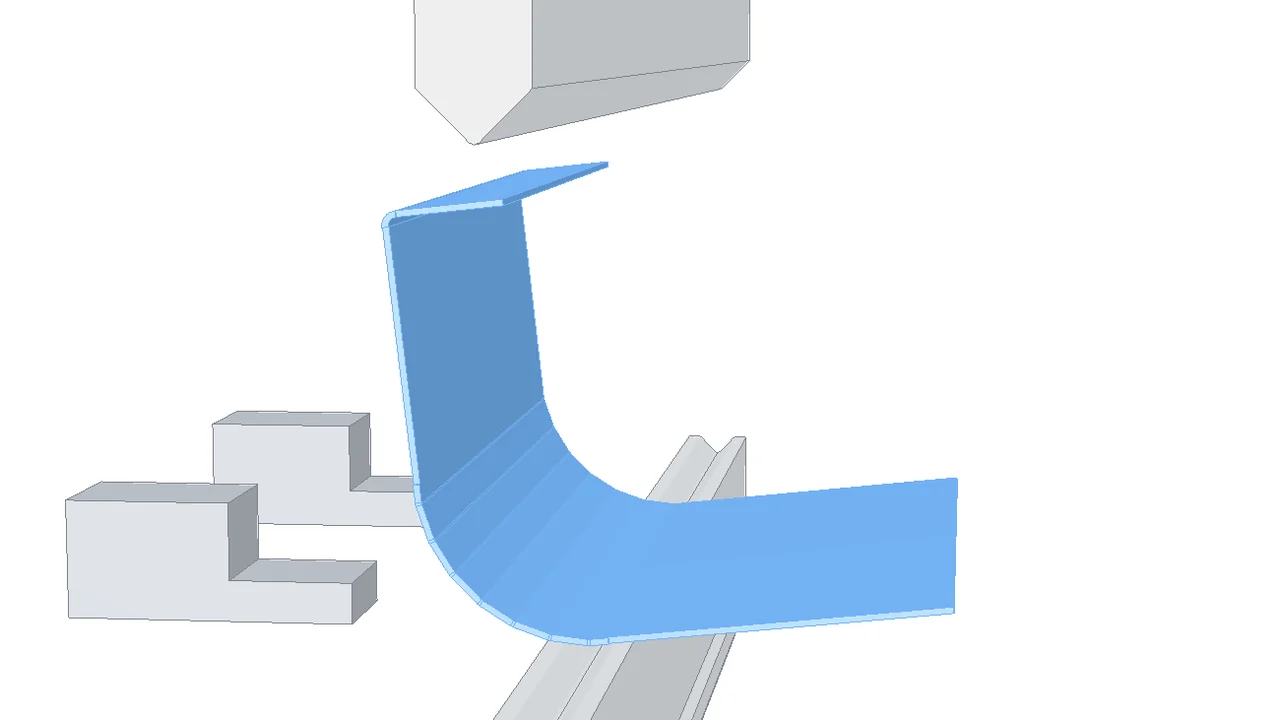
A side view of every step

The part on the die before each bend, with the earlier bends formed and the back gauge on the right.
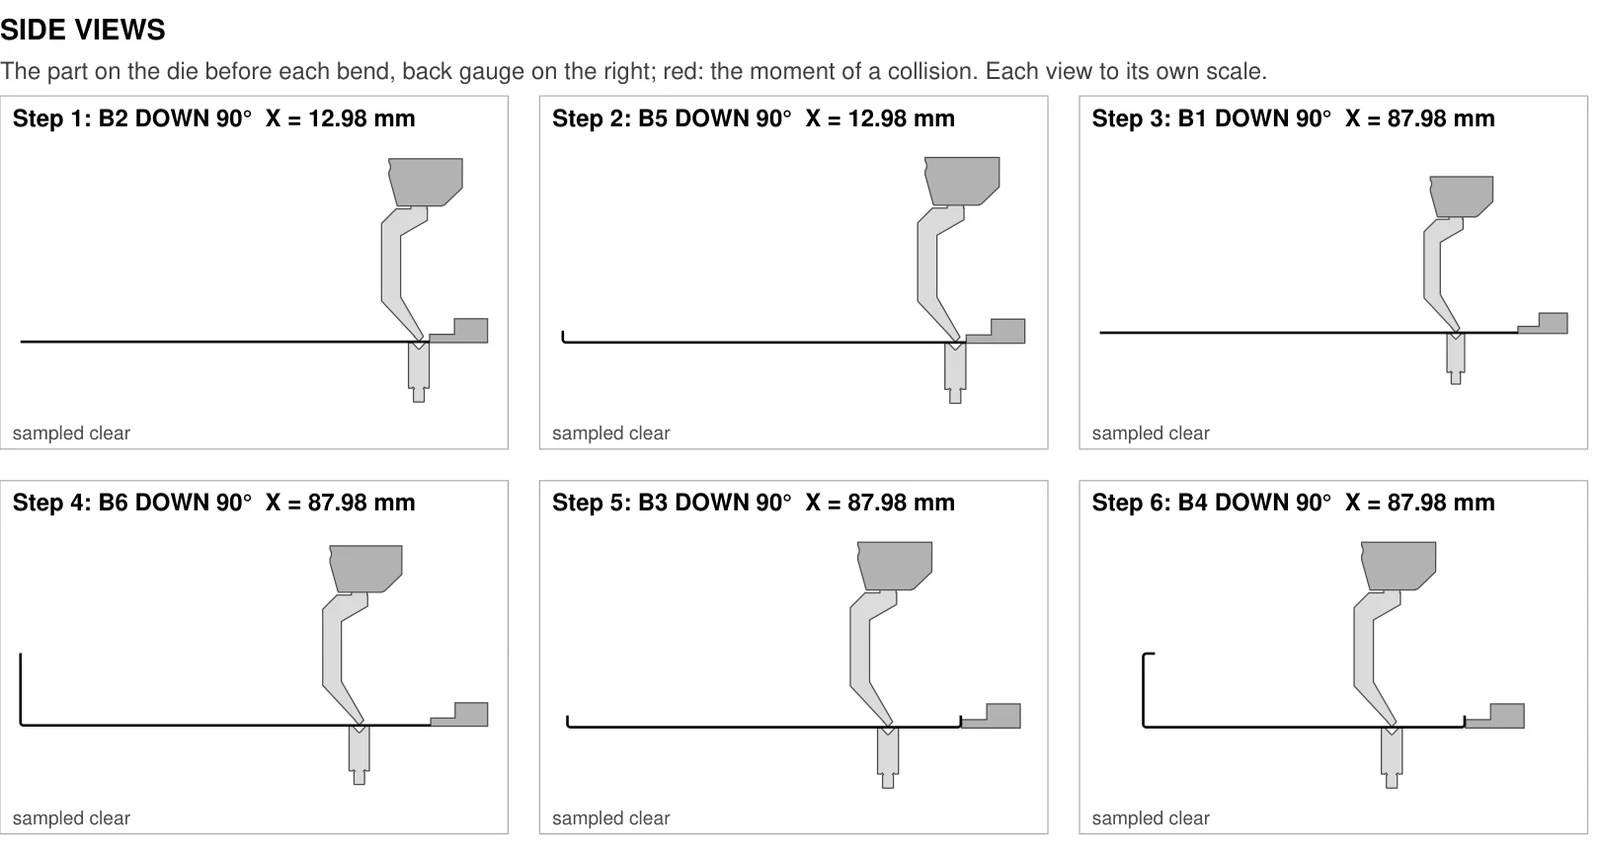
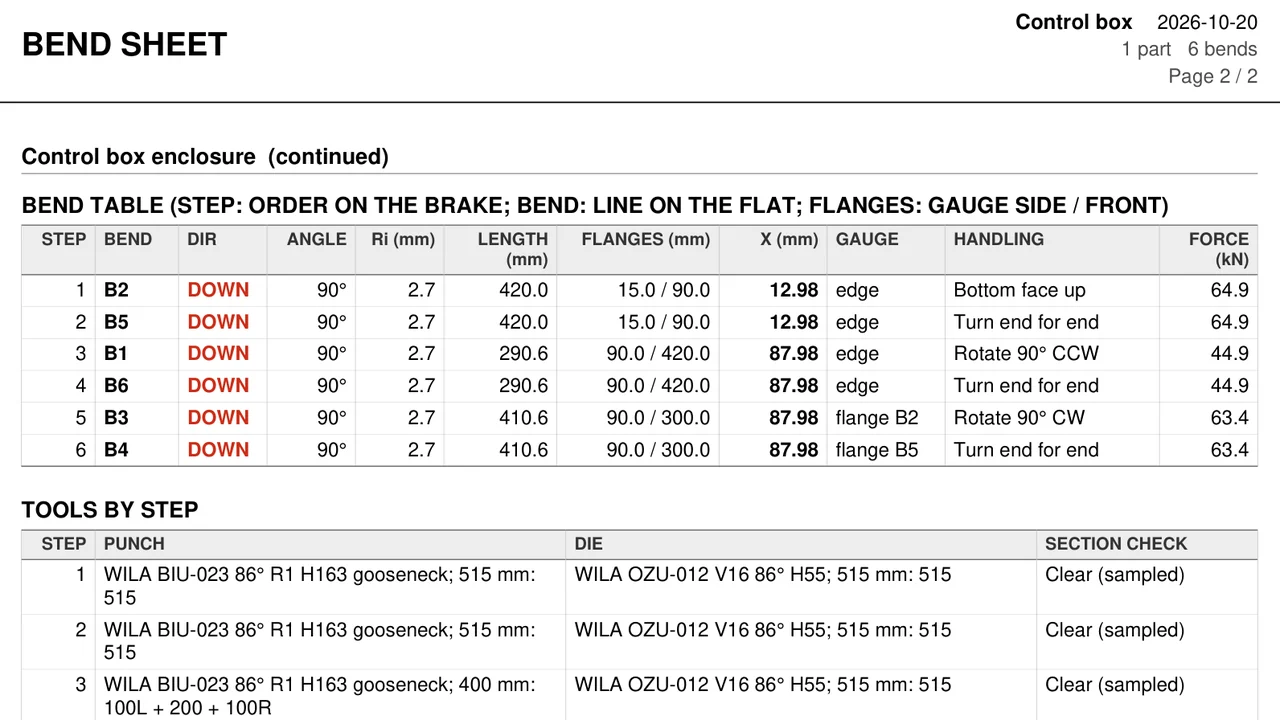
Six side views of the enclosure's bend sheet: the part on the die before each bend under the 163 mm gooseneck punch, the die, the upper beam and the back-gauge finger, each step marked sampled clear
Page two: the six steps of the enclosure.

The punch and die station of every step

Enter a punch or die as the sectioned set your shop owns, horns included. For each step Bend Sheet builds the station as press-brake controllers do: over the bend line, clear of the bends already formed, with the fewest pieces and a horn at each end that faces a wall. In the tray below, the 410.6 mm bend line between the end walls gets 100L + 150 + 20 + 40 + 100R.
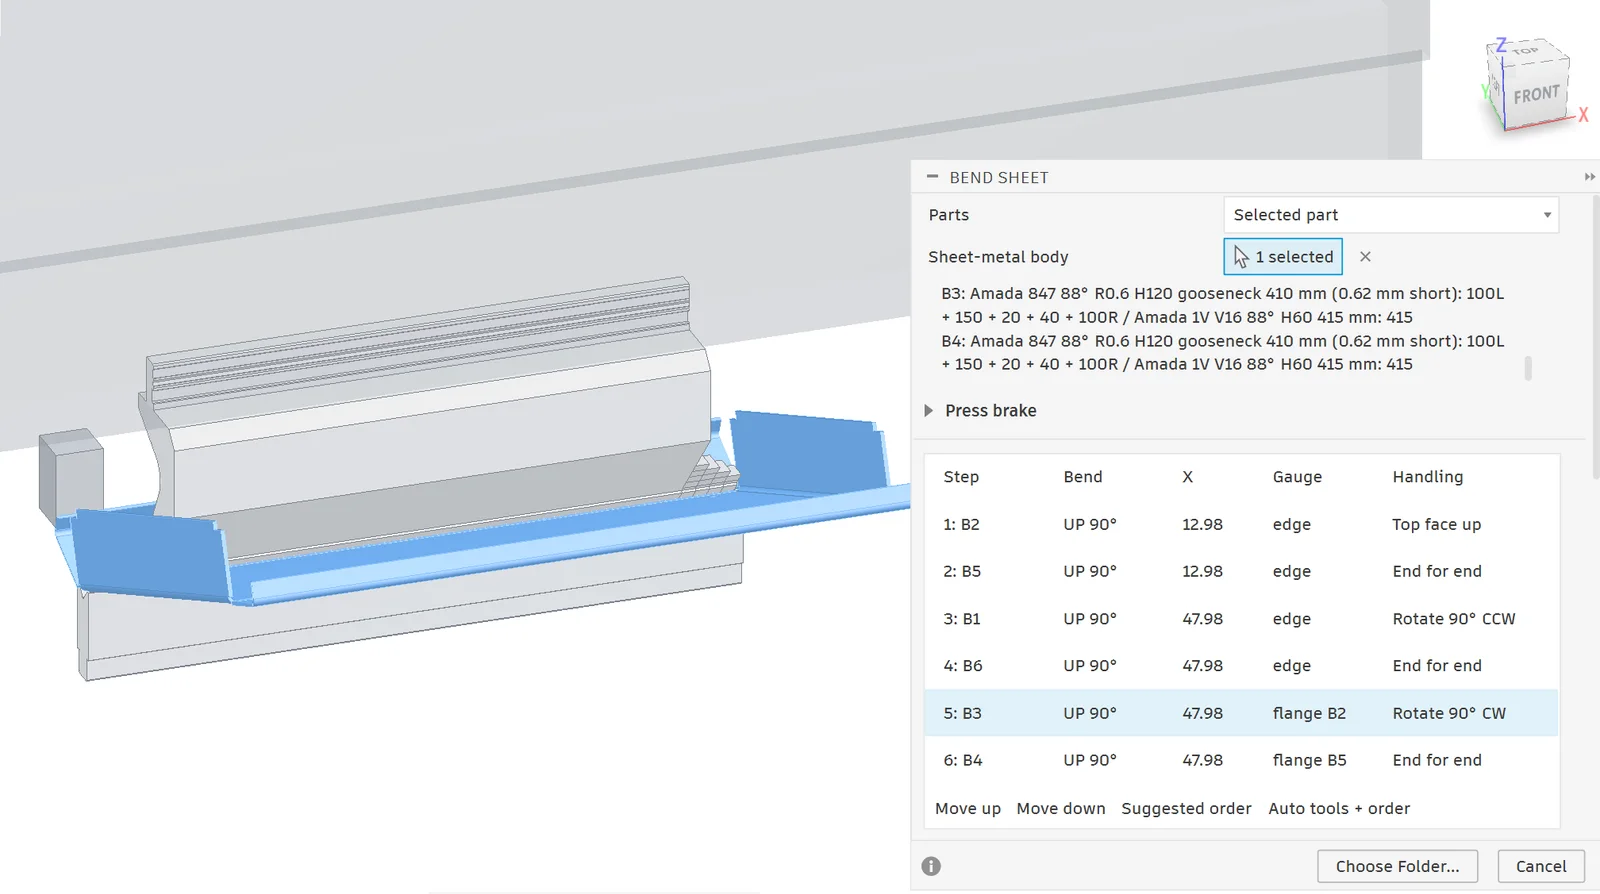
The Bend Sheet dialog in Autodesk Fusion with a 2 mm steel tray on the die at step 5, half way through the bend: the AMADA 847 gooseneck punch stands between the two end walls of the tray, its right horn relief beside the wall; the dialog lists the station of bends B3 and B4 as 410 mm, 0.62 mm short: 100L + 150 + 20 + 40 + 100R
Step 5 of a 50 mm deep tray at mid-stroke: the 410 mm station between the end walls.

How a part is planned

Order, back gauge and handling

01

Suggested order

Outer flanges first, bends in the same direction grouped, short bends before long ones. Move a step up or down, or straight to its new place; the plan is checked again at once.

02

Back-gauge X

Measured for every step on the side view of the part with the earlier bends formed: from the edge or from a formed flange, on the side with the shorter X that fits the back-gauge range. Turn front to back puts the other side to the gauge.

03

Handling

Between steps the sheet says whether to flip the part over, turn it end for end or rotate it, with the angle and direction.

04

Pre-bends

A bend the tools would meet at its full angle, such as a short offset or a bead between two walls, is made in two hits: bent to 45° while the part is open, then finished in the die, without the back gauge, after the bends next to it.

Hems, offsets and large radii

Two hits for a hem, one for a joggle, many for a radius

Each hit is a step with its tools, X, force and checks, shown in the 3D view. The pictures: 1.5 mm steel, with machines and tools of the starter library.

Hems: a pre-bend, then flattened

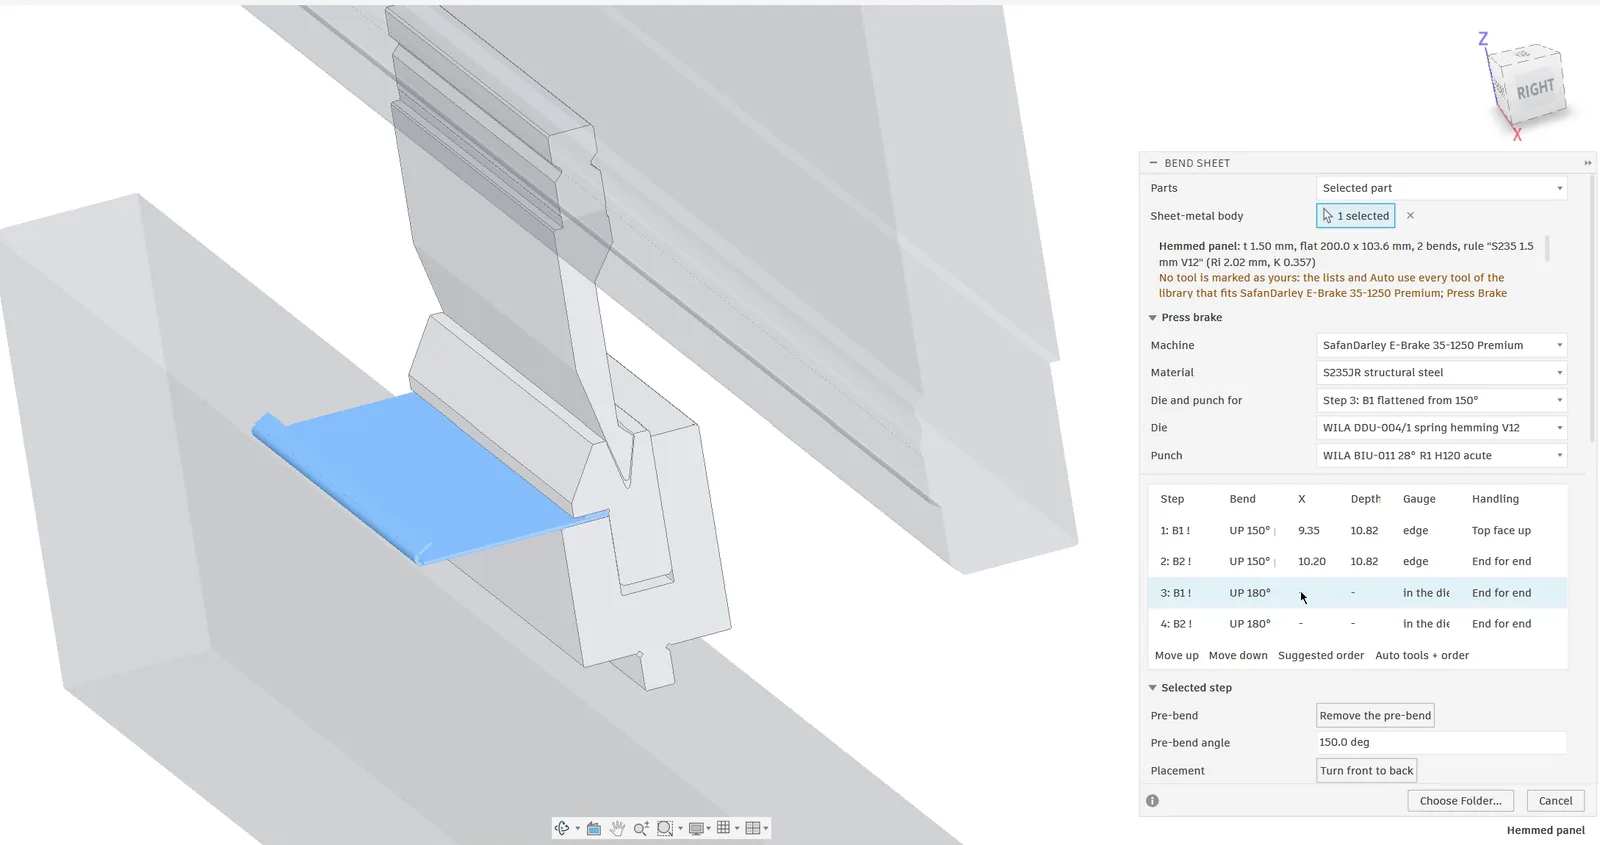
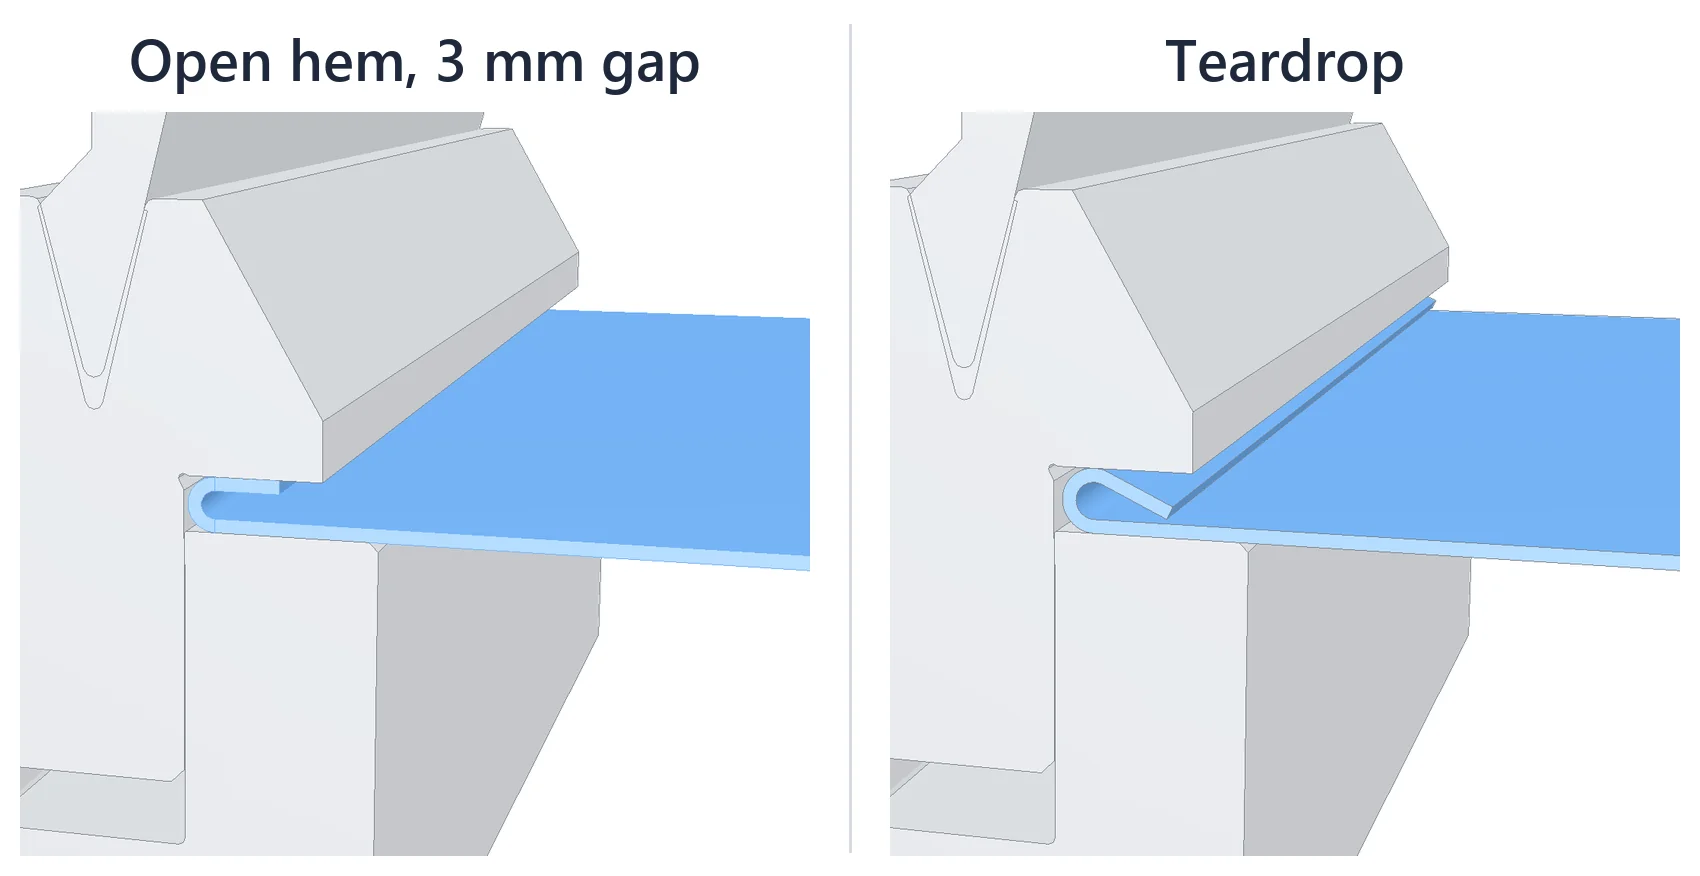
A bend past 170° is a hem: a pre-bend to 150°, then the flattening. The suggested order and Auto add the pre-bend and pick the tools; open hems are pressed to their gap and teardrops on their loop, and later bends gauge on the outside of the fold.

A spring hemming die makes both hits without a tool change: the pre-bend in its V with the die pressed shut, then the hem pushed into its jaw and pressed by the pad. The starter library has WILA's DDU dies for 1, 1.5 and 2 mm sheet.
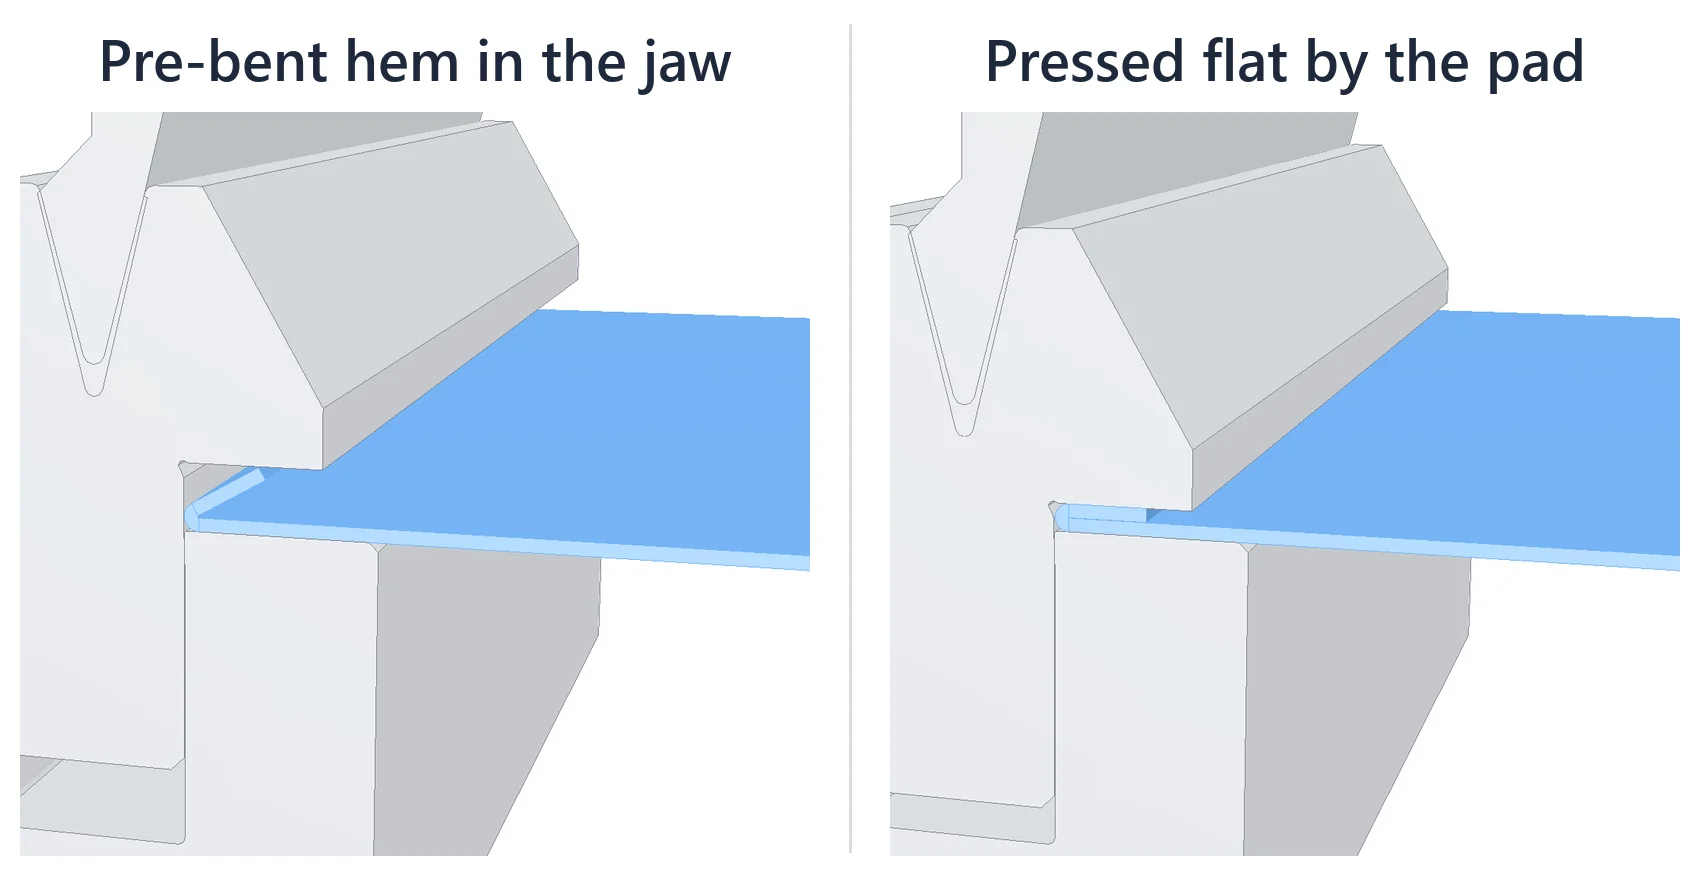
Bend Sheet's 3D view of the jaw of a WILA DDU-004/1 spring hemming die, in two panels: at the start of the flattening the 1.5 mm hem, pre-bent to 150 degrees, lies in the open jaw under the pad; at its end the hem is pressed flat, the pad pushed down by the punch sitting in the V
The second hit on the WILA DDU-004/1: the pre-bent hem in the jaw, then pressed flat by the pad.
Two close views of the jaw of the WILA DDU-004/1 at the end of the flattening: an open hem with a 3 mm gap inside its fold, and a teardrop hem pressed on its loop
An open hem pressed to a 3 mm gap, and a teardrop, shown as its swept section.

Bump bending for a large radius

A radius too large for the die is made in small hits: set Bumps under Selected step. The hits lie at equal pitch across the bend's allowance, each a step with its own X, and the flat stays the same. They run from the end farthest from the back gauge toward it, so the sheet behind the punch stays flat on the fingers; Play all steps slides the part over to the next X between hits, and Turn front to back turns the whole series.
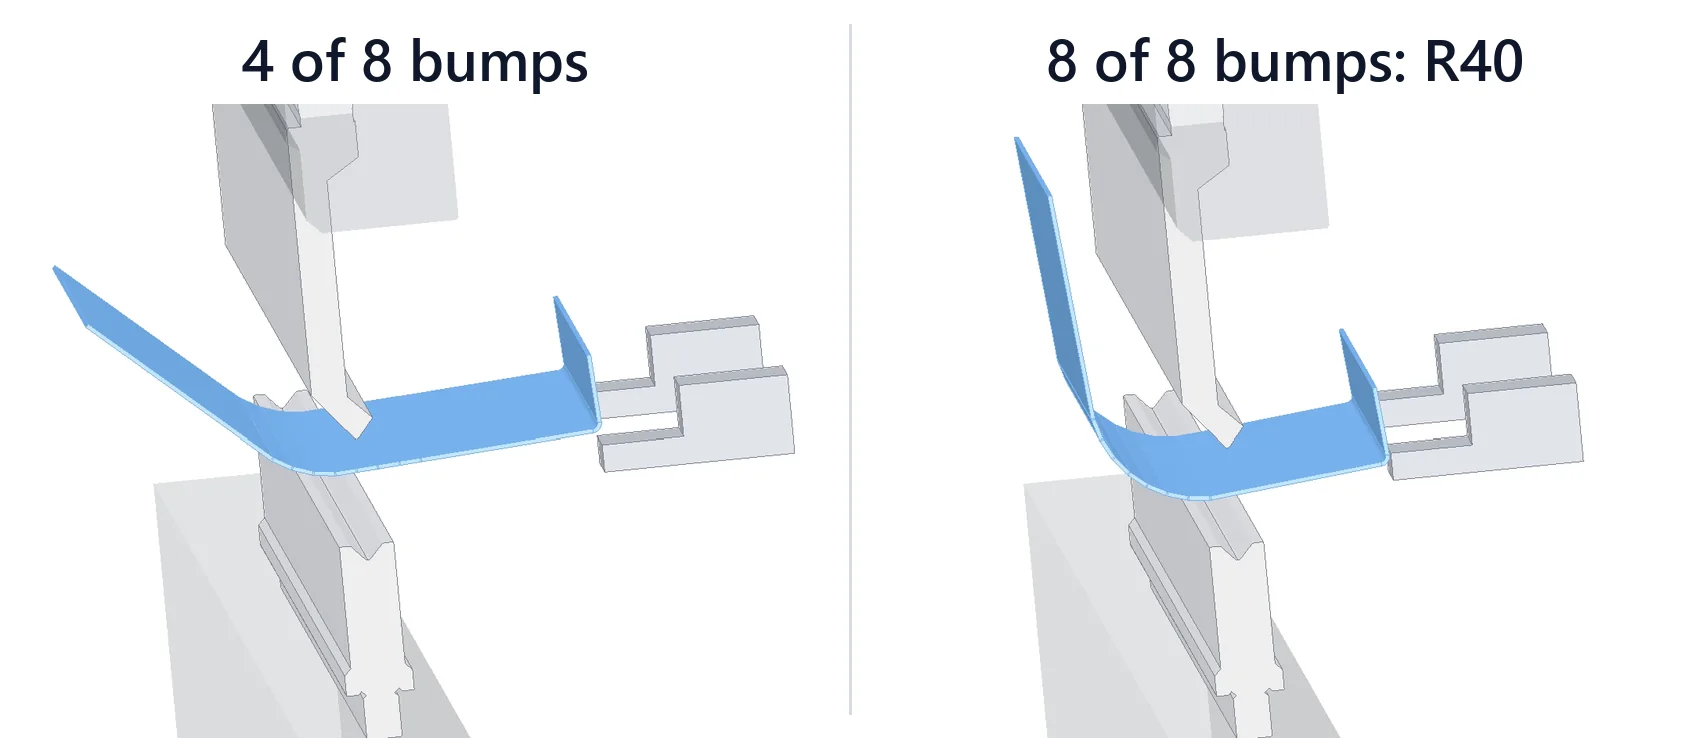
Bend Sheet's 3D view of a 1.5 mm part whose 40 mm radius is bump bent on a WILA V12 die, the far end first, in two panels: at the 4th of 8 hits the front half of the radius is formed while the sheet behind the punch lies flat, its flange against the back-gauge fingers; at the 8th the front flange stands at 90 degrees on the finished R40
R40 in 8 bumps on a WILA V12 die, the far end first: hit 4, then hit 8.

Offset hits: a joggle in one stroke

An offset punch and die make both bends of a joggle in one stroke: select the first bend and click Make an offset hit. X is measured from the tool axis, the force is three times an air bend's, and the tools are drawn to the part's offset. Add your offset punch and die to the library: a name, tooling system and height are enough.
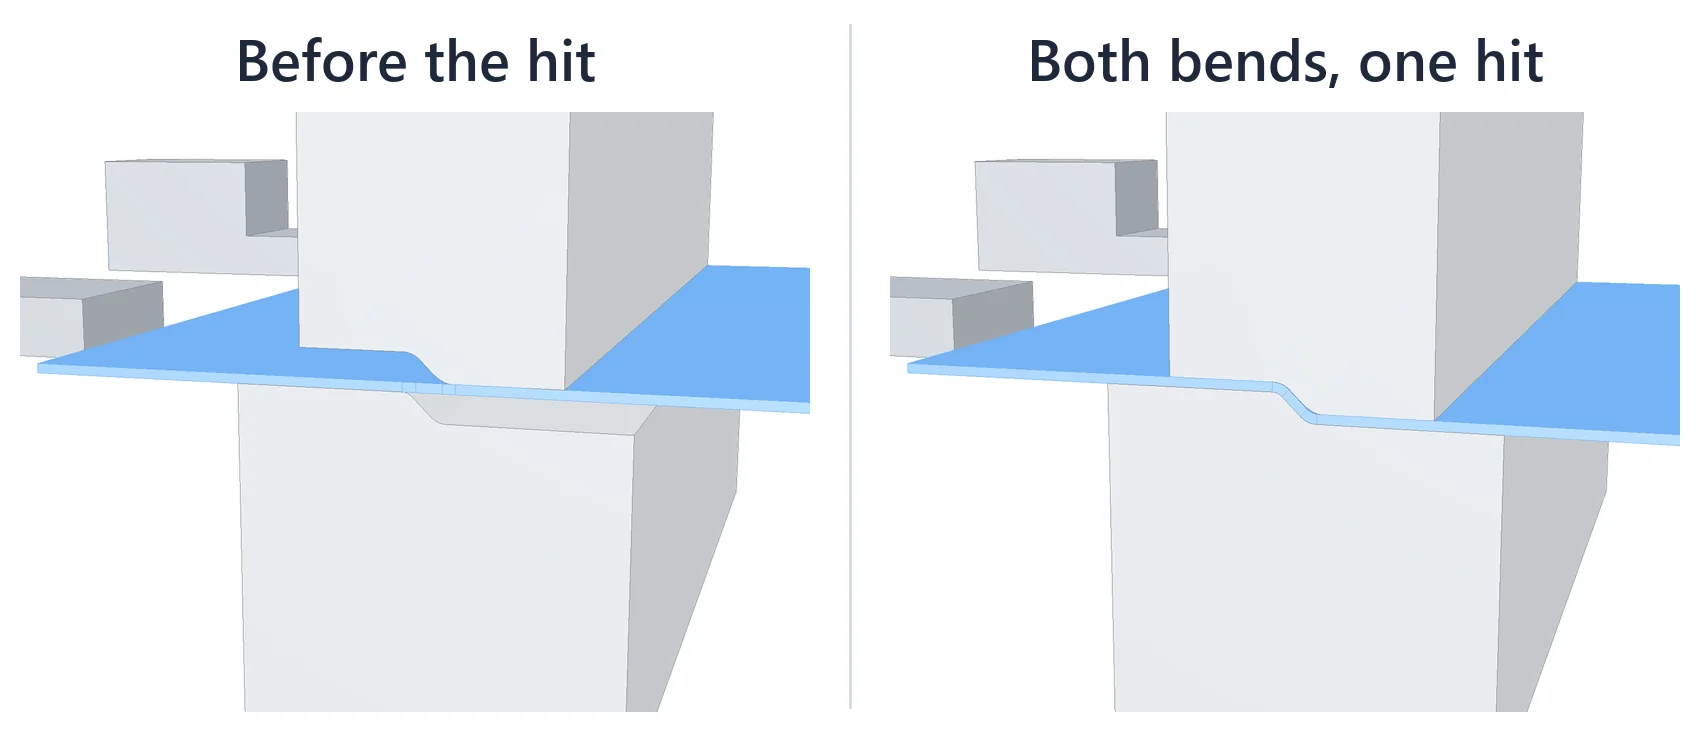
Bend Sheet's 3D view of an offset hit on a 1.5 mm sheet, in two panels: before the hit the flat sheet lies over the stepped offset die under the offset punch, the back gauge behind; at the end of the hit both 45 degree bends of the joggle are formed between the two tools
A joggle of two 45° bends with a 4 mm web: before the hit, and both bends at its end.

Bottoming and coining

Bend method under Selected step: bottoming at 5 times the force or more, coining at 10 times or more. The force check and Auto take that force, and the checks say when the die's angle, the V or the punch radius does not suit.

Checks

Problems found before the first hit

Besides collisions, every step is checked against the setup. Errors and warnings go on the sheet with the step and the bend; a check that could not run is listed as not checked.

Flange too short

A flange shorter than 0.7 × the die opening falls into the die. Checked on both sides of every step, with the earlier bends formed. In air bending, a flange that loses its support on a shoulder of the V die during the stroke, overbend included, is a CHECK naming the side and the angle.

Angle, force and machine

A bend sharper than the die or punch angle needs acute tools: the check names the machine's tools that make it, and the 3D view stops the sheet where the tool does, in red. Force per metre is checked against the die and punch ratings, the total against the machine; the part length against the bed and X against the back-gauge range.

Holes and radius

A hole or cut-out closer to a bend line than 2.5 × thickness + radius is flagged, and so is an inside radius below the material minimum for that thickness.

Flat against the brake

When the flat uses another K-factor or radius than the die and punch give, the sheet says so and OK offers their bend rule.

Forms near a bend

A form in a bend zone is an error; one closer than 3 t + R to where a bend starts is a warning. Each form rides on its flange through the section check.

Sectioned and horn ratings

A station made of pieces, or with a horn, is checked against the lower ratings the makers publish for them.

Bend rules and test bends

A flat pattern that matches your brake

A flat is only right when its bend allowance matches the tooling that bends it: the radius and K-factor come from the die you bend with, or from your own test bend.

Apply Bend Rule

The inside radius follows the die opening (or a larger punch radius) and the material, the K-factor DIN 6935. Apply Bend Rule shows the bend allowance, bend deduction, minimum flange and force, then makes a Fusion sheet-metal rule named after the setup, such as S235 2 mm V16, the part's active rule. Bend Sheet offers the same rule when the part has another.
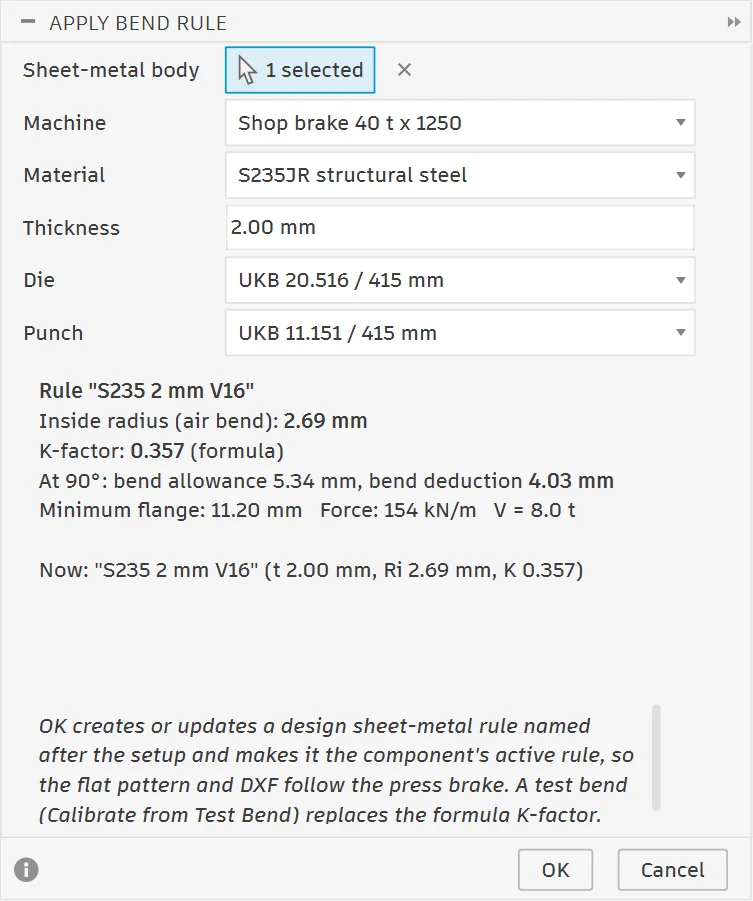
The Apply Bend Rule dialog in Fusion: machine, material, thickness, die and punch, and the resulting rule S235 2 mm V16 with inside radius 2.69 mm, K-factor 0.357, bend allowance, bend deduction, minimum flange and force
Apply Bend Rule for the enclosure.

Calibrate from Test Bend

Bend one strip and measure its flat length, outside legs and angle: the add-in stores the real bend deduction and K-factor for that material, thickness, die and punch, and that setup uses them from then on.
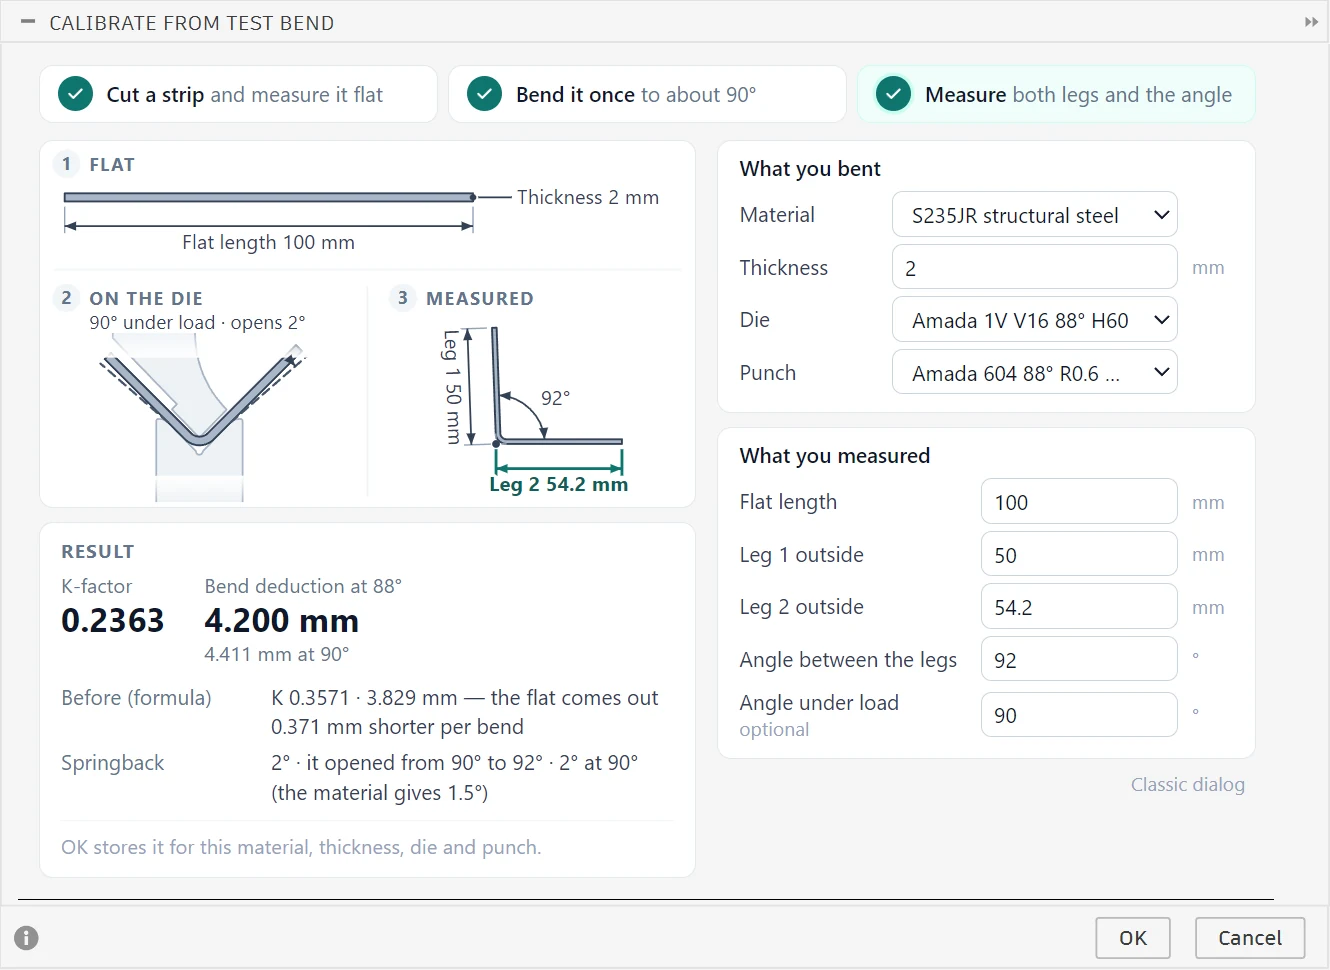
The Calibrate from Test Bend page in Fusion: the three steps ticked, the test strip drawn flat, on the die and measured with its sizes beside the values typed (S235JR 2 mm on an Amada V16 die, flat 100 mm, legs 50 and 54.2 mm, angle 92° and 90° under load), and the result: K-factor 0.2363, bend deduction 4.200 mm, the formula's values before and 2° of springback
Each measured value on a drawing of the test bend, and what it gives beside the formula.

Press Brake Library

Tooling data from real catalogues, every tool with its outline

Published values, each with its source, so a first bend sheet needs no typing; what a maker does not publish is left empty, never guessed.
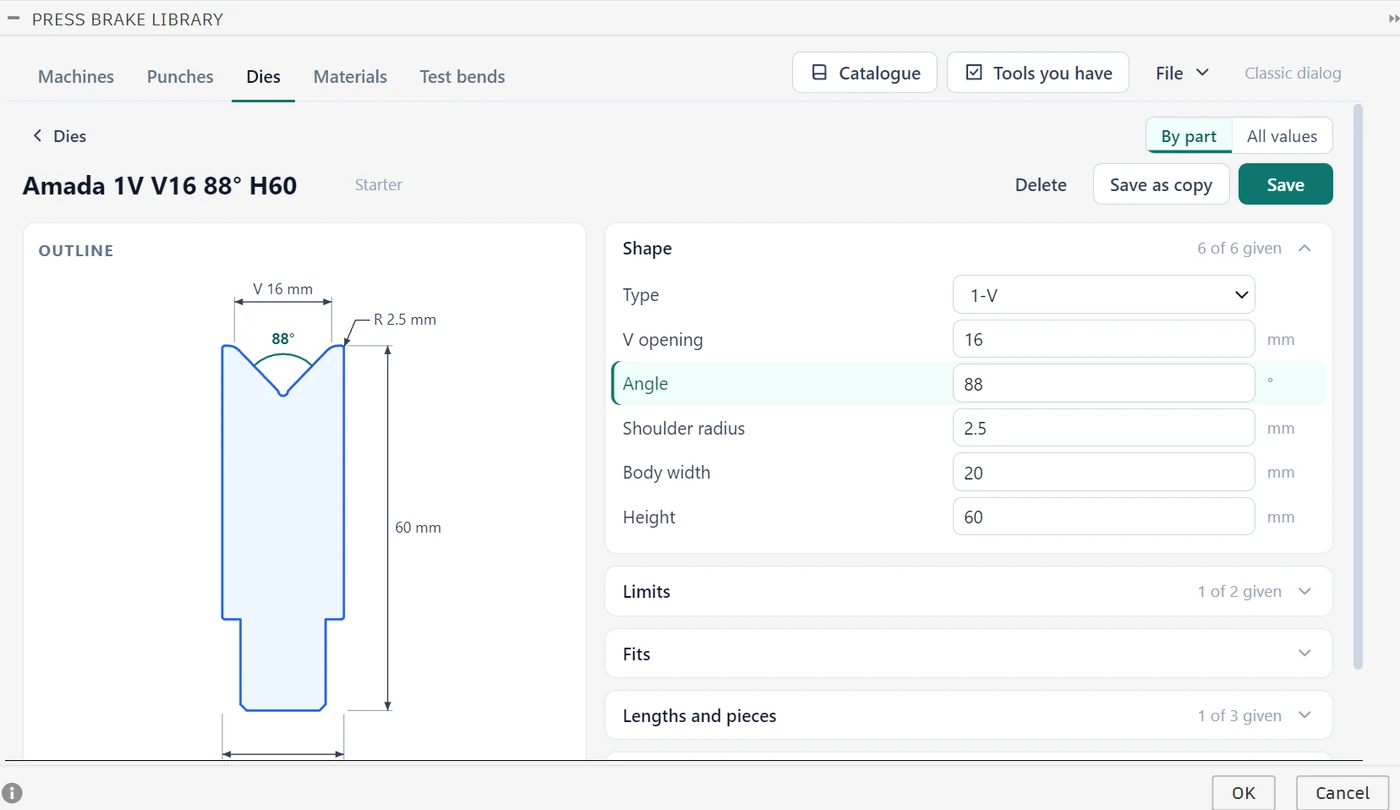
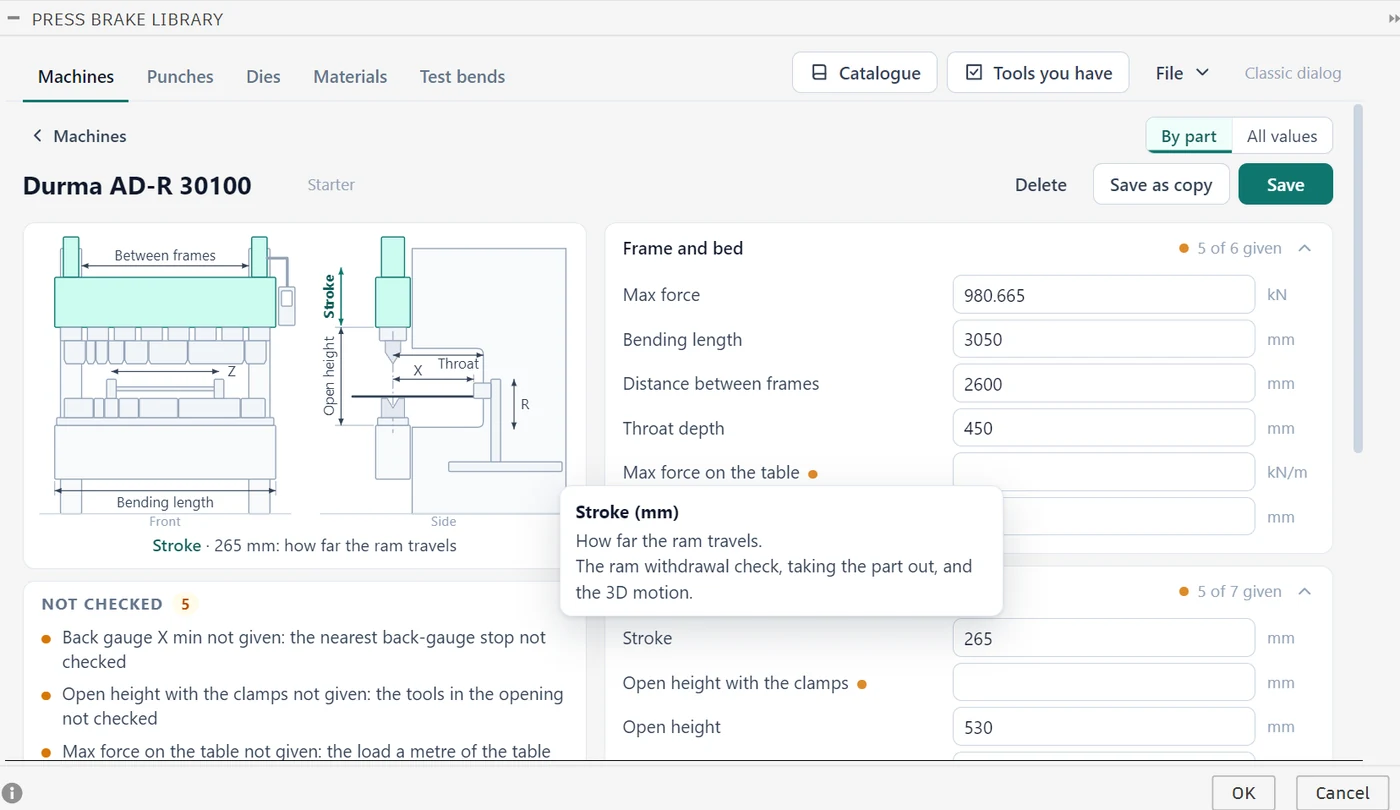
  • ✓8 machines from TRUMPF, Bystronic, Amada, Durma, SafanDarley, Langmuir and Harsle, each with its clamp, beam and back-gauge finger.
  • ✓38 punches and 90 dies from AMADA, Wilson Tool, Langmuir, WILA and UKB, WILA's DDU spring hemming dies among them, each with an outline, most from the makers' own drawings.
  • ✓Sectioned sets as AMADA, WILA, Wilson Tool and Langmuir sell them, to edit to the pieces your shop owns.
  • ✓23 materials with tensile strength and minimum bending radius by thickness (EN, ASTM, SSAB and Outokumpu data).
  • ✓1,440 more punches and dies and 419 press brakes in the catalogue (Durma, TRUMPF, Bystronic, AMADA, SafanDarley, LVD, HACO, Baykal, Prima Power): find one by size, style or part number and tick it to add it.
  • ✓Every value where it belongs: a machine's values on a drawing of the press brake, a tool's on its outline with its sizes, what each one is used for in its tooltip.
  • ✓The tools you have: tick them once, and each machine's tool lists and Auto use only those that fit it.
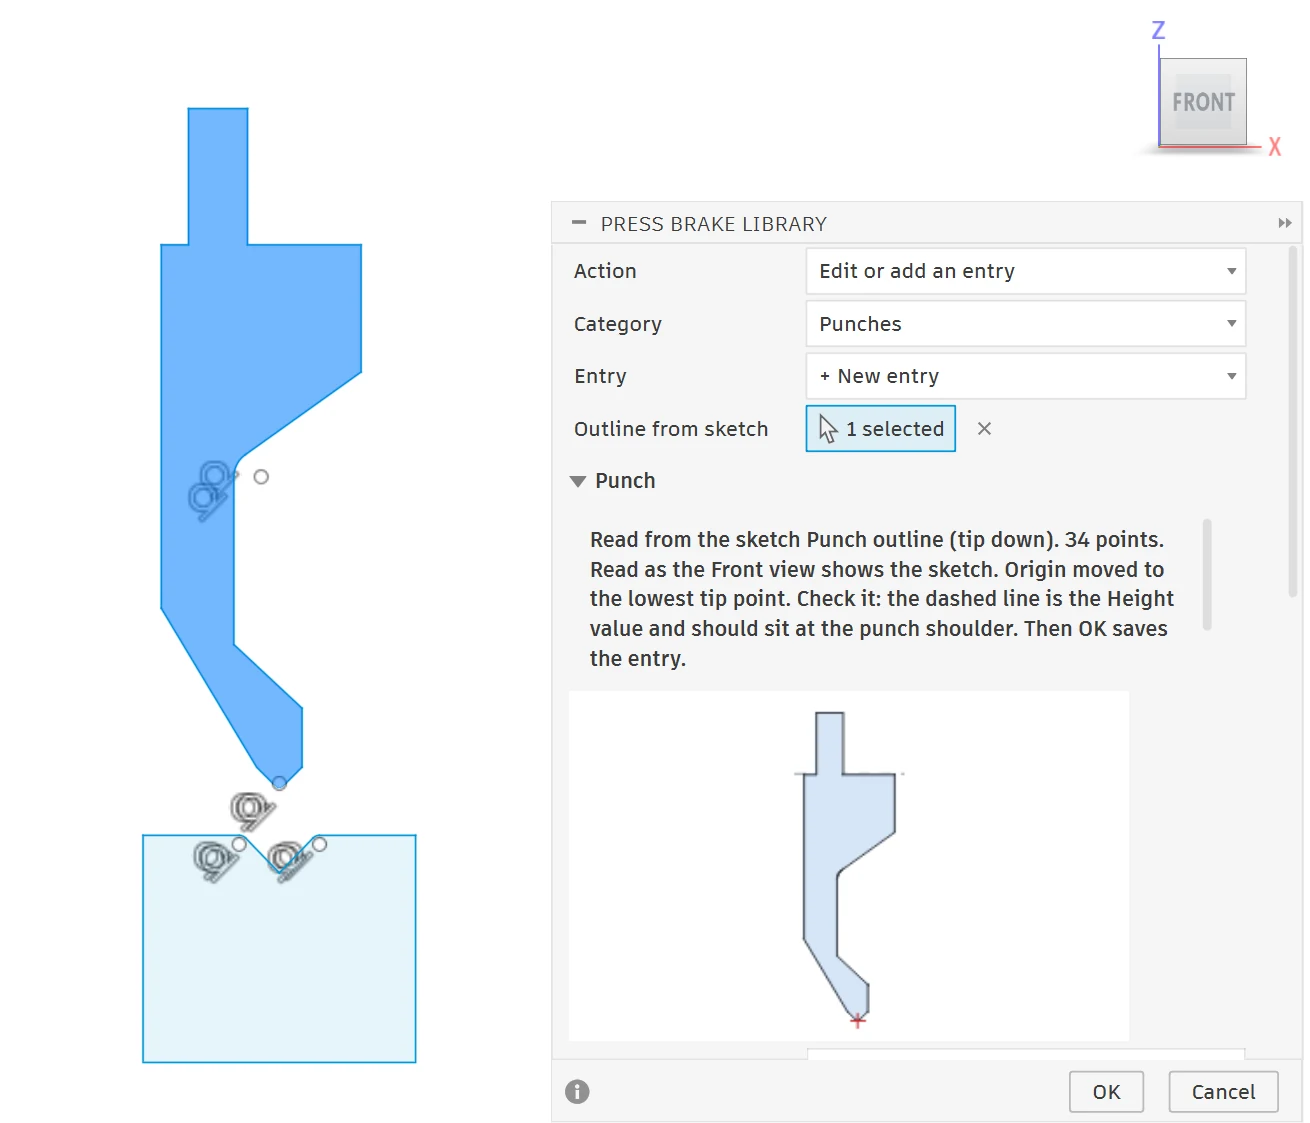
  • ✓Your own tools from a Fusion sketch, a DXF drawing or a few values: an outline fills in what it shows (a punch's height, tip angle and radius, a die's V, angle and shoulder radius), and the form asks only for what the tool type needs. Import and export the library as JSON.
  • ✓Updates: new starter tools arrive by themselves; Restore the starter entries keeps your own entries and ticks.
Tool sources and CAD outlines
The Amada 1V V16 88° H60 die in the Press Brake Library in Autodesk Fusion, drawn on its outline with its V, angle, shoulder radius, height and width; the 88° on the drawing and the Angle box lit together
A tool's sizes on its outline: point at a size and its value lights up.
The Press Brake Library in Autodesk Fusion on the Durma AD-R 30100: a front and a side drawing of the press brake with the ram lit while Stroke is pointed at, its tooltip saying the ram withdrawal check, taking the part out and the 3D motion use it, and the values grouped as Frame and bed and Ram, each group saying how many are given
Each machine value on a drawing of the press brake: point at Stroke and the ram lights up; the tooltip says what it is used for.
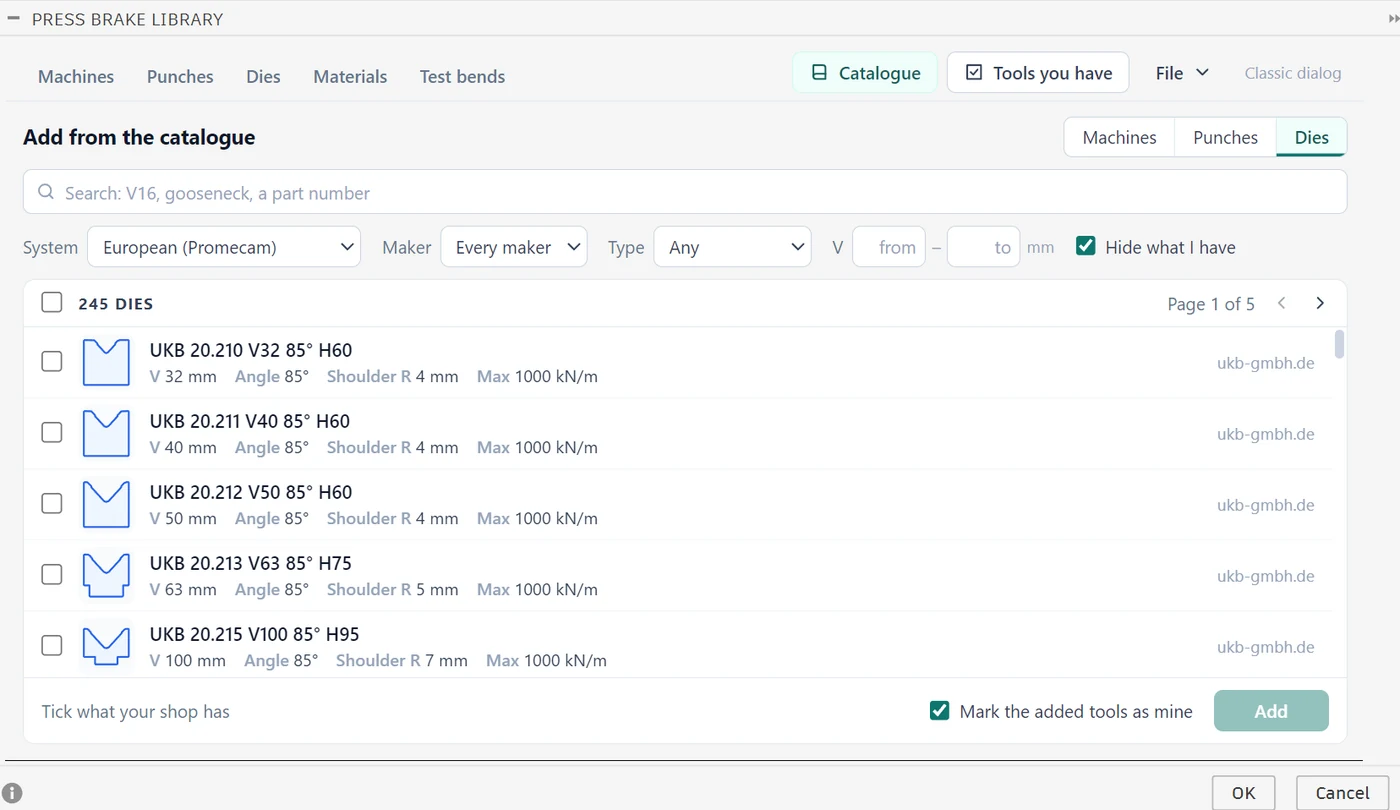
Add from the catalogue in the Press Brake Library: 245 European (Promecam) dies with their outlines, V, angle, shoulder radius, rating and source, filters for maker, type and V, and Mark the added tools as mine
The catalogue opens on your machine's tooling system: tick what your shop has.
Autodesk Fusion in the Front view: a gooseneck punch drawn tip down in a sketch above a die sketch, the punch region selected; beside it the Press Brake Library dialog with Outline from sketch, 1 selected, the note that 34 points were read as the Front view shows the sketch with the origin moved to the lowest tip point, and the punch outline drawn in the dialog
Draw your own punch in a sketch and click inside it: the library reads its outline, the origin on the tip.
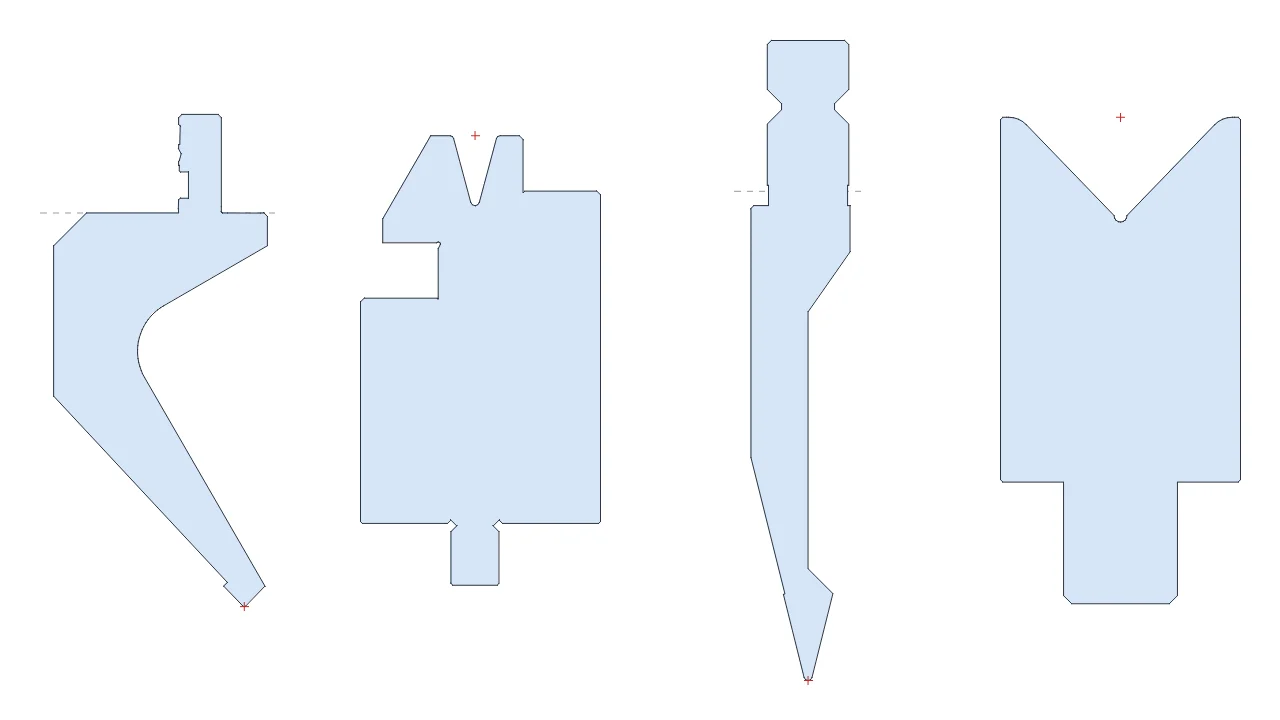
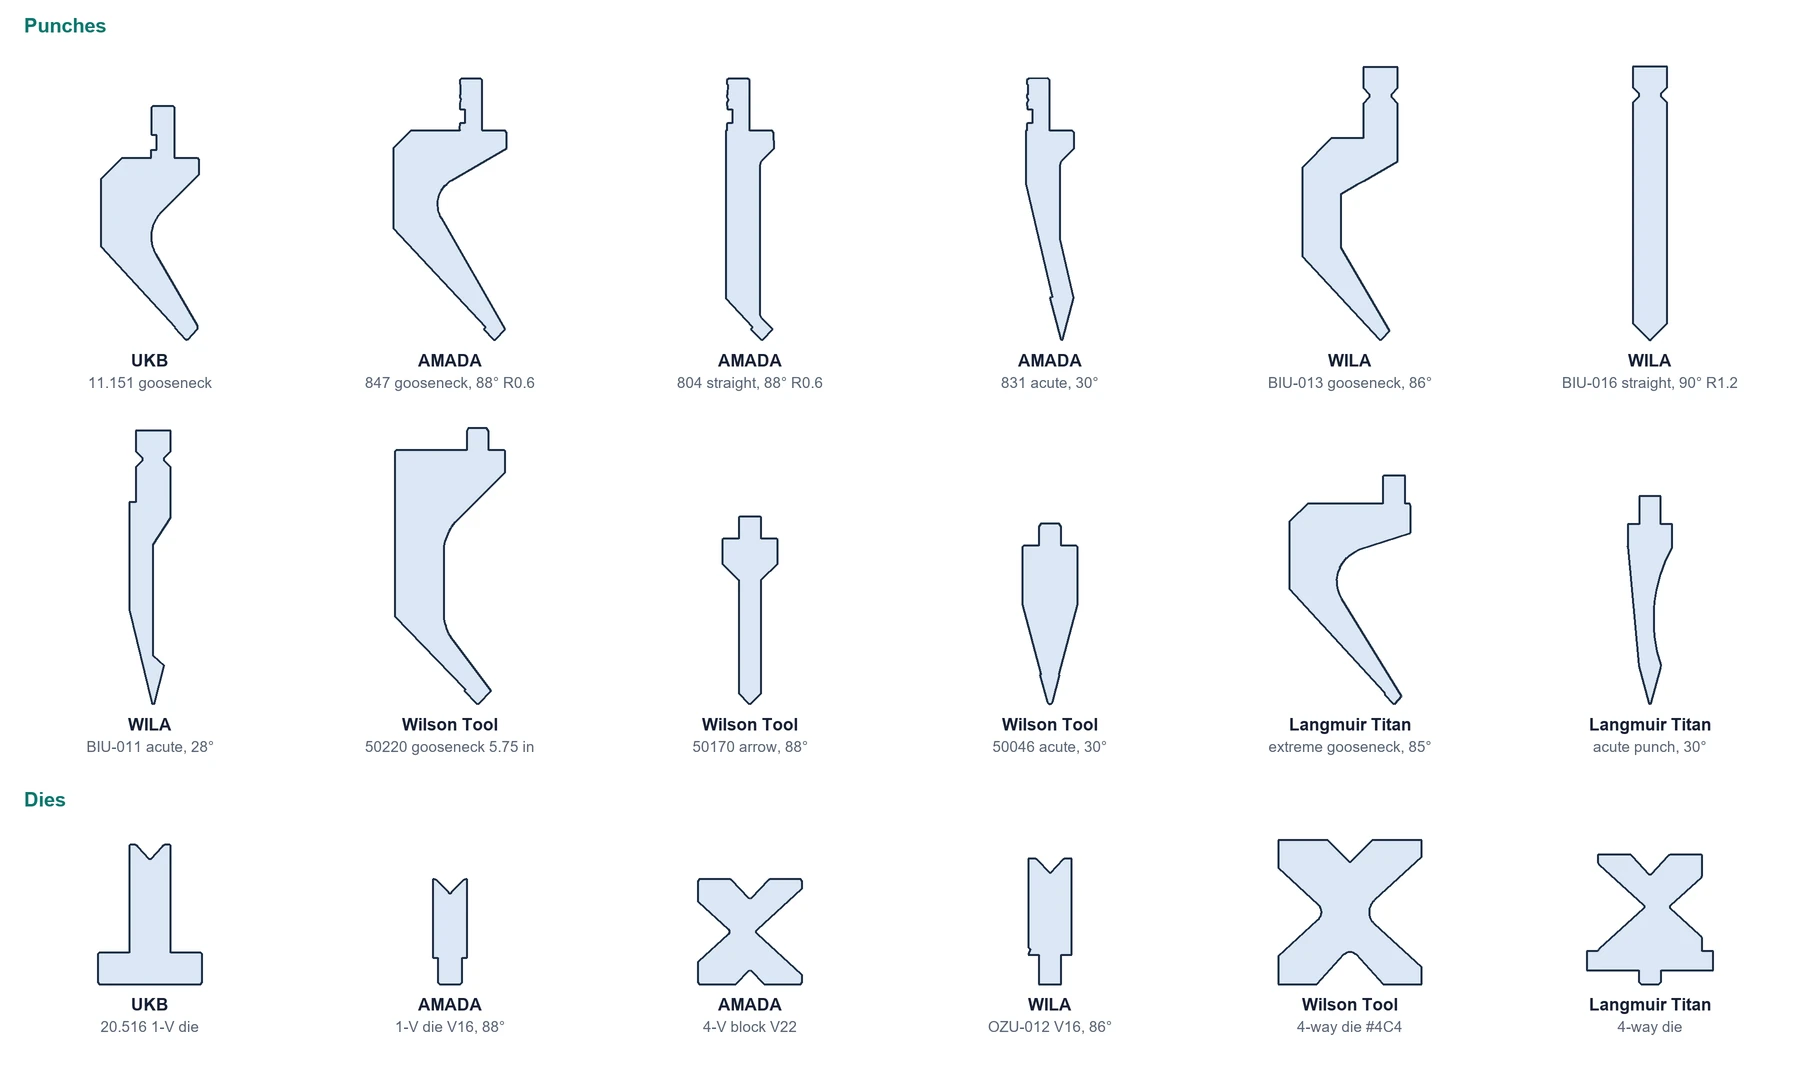
Twelve punch outlines and six die outlines from the starter library drawn to one scale: UKB, AMADA, WILA, Wilson Tool and Langmuir Titan gooseneck, straight, acute and arrow punches with their tangs, and 1-V dies, a 4-V block and 4-way dies
Some of the starter tools, drawn to one scale from their makers' drawings: the outlines the collision checks use.

Forms

Louvers, knockouts and beads, placed on the sheet

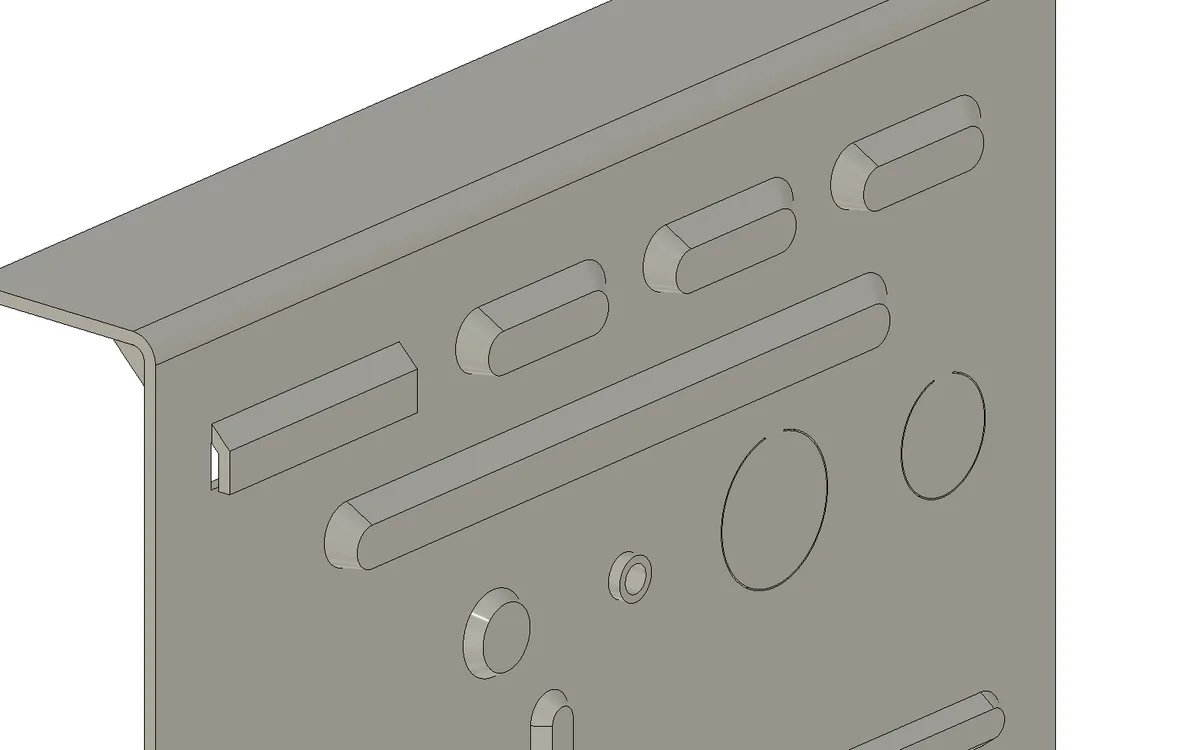
Louvers, lances, dimples, embosses, bridges, knockouts, extruded holes, beads and gussets, made on a sheet face from presets or your own tools. Louvers, bridges and lances are the sheet itself, formed, with their lanced edges open.
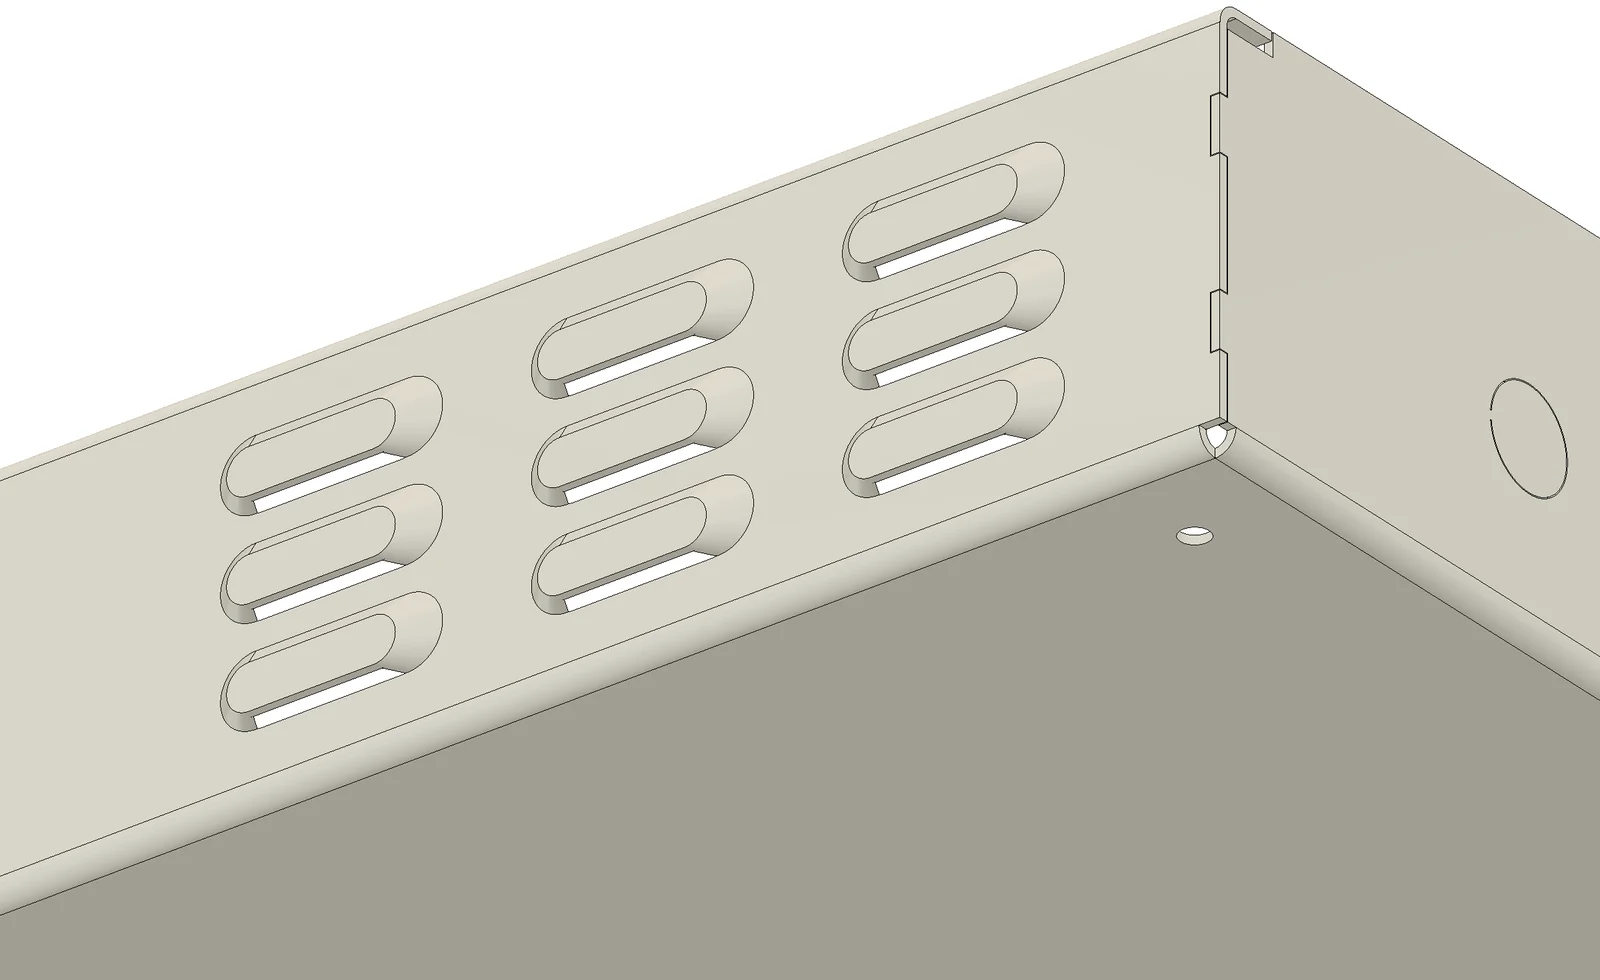
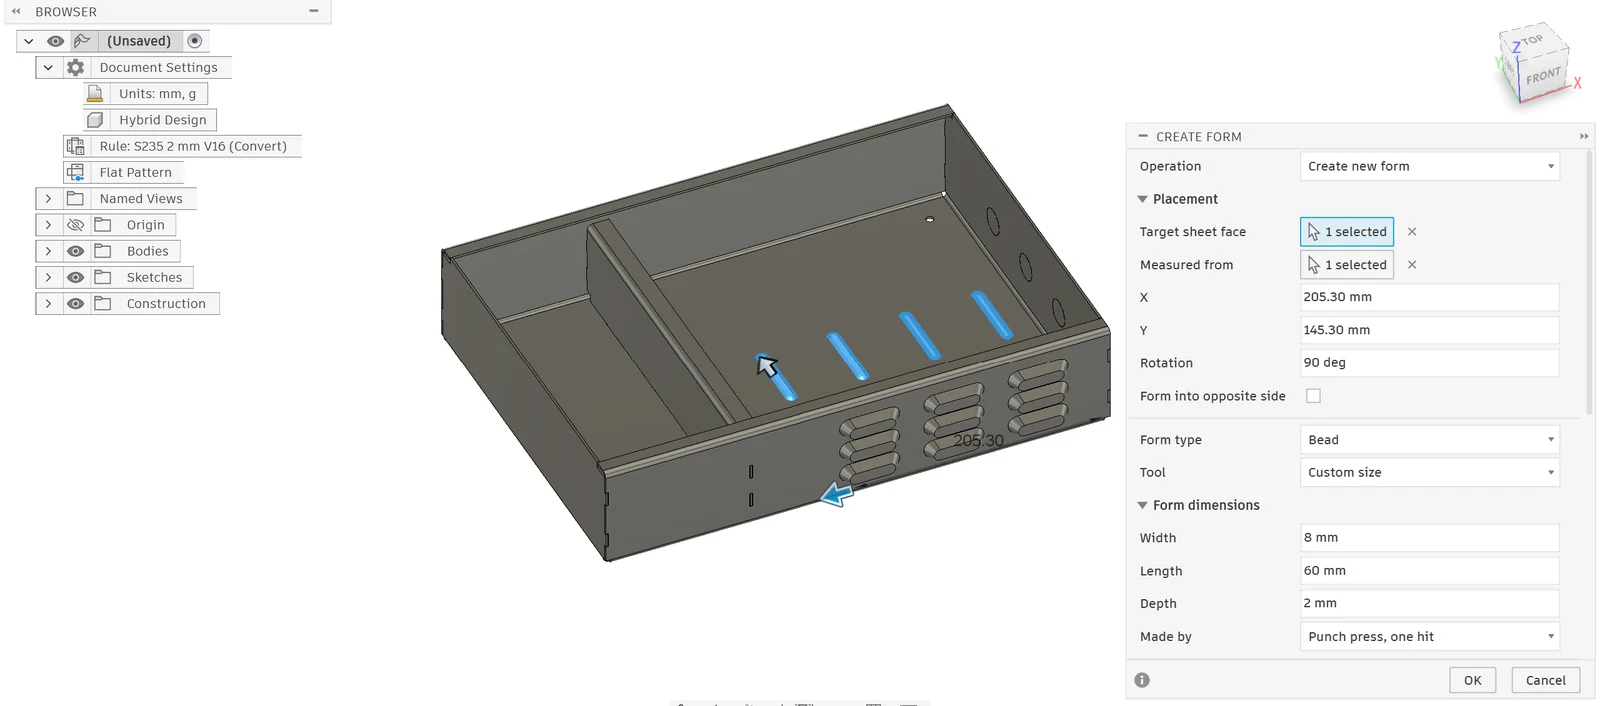
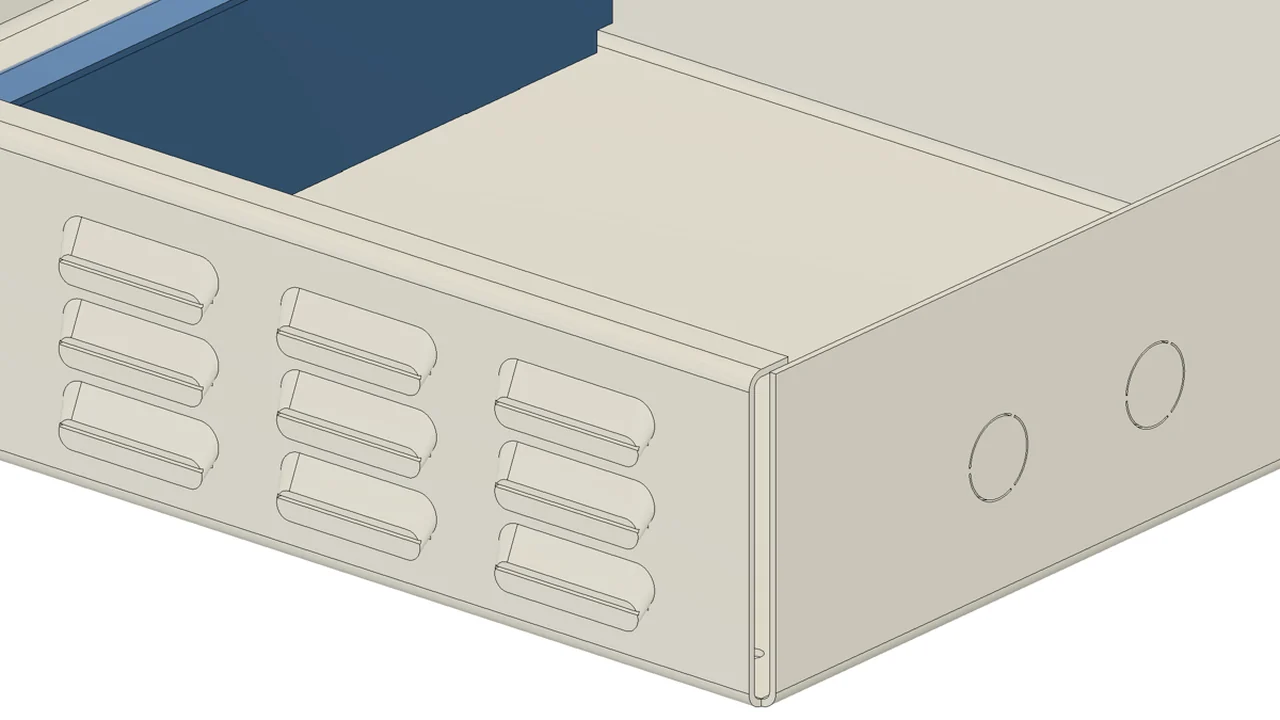
The front wall of the enclosure seen from below: three columns of three louvers, each a hood formed out of the wall with its open front facing down, and a cable knockout with break-out tabs in the end wall
Seen from below: nine louvers in the front wall, each open where the sheet was lanced, and a cable knockout in the end wall.

Placed with a preview, kept with a record

  • ✓Click the face: the form is placed from the nearest corner, with X and Y to type or drag, from your shop's tools or your own sizes.
  • ✓One form, a row, a grid, a circle, or a sketched region filled with louvers around holes and keep-outs.
  • ✓A preview of every form before it is made, and Show the forming tool with its punch and die closing on the sheet.
  • ✓Select a form to move, resize, re-pattern or delete it: each keeps its tool, position and checks.
The Create Form dialog in Fusion: Operation Create new form; Placement with the target sheet face, the corner it is measured from, X 205.30 mm, Y 145.30 mm and rotation 90°; Form type Bead with Custom size, 8 mm wide, 60 mm long, 2 mm deep, made in one hit on the punch press; four beads previewed in blue on the base of the enclosure, with the X arrow from the corner
A row of four beads on the base, measured from the corner of the face and previewed.
Stroke 0 to 100 %: the die comes down onto the louver and the punch rises into it.

Made the way shops make them

  • ✓Louvers with closed or open ends, in one hit, progressively for any length, or in a press-brake die.
  • ✓Knockouts by NEMA trade size, the ties and cut gap filled in.
  • ✓Extruded holes for threads, sized from Mate's table for the tap.
  • ✓Beads in one hit, nibbled or rolled along a sketch path, or pressed by a press-brake rib die.
  • ✓Gussets across a bend, a body of their own, so the flat stays as it is.
Close view of a 2.5 mm steel panel: an open-end louver made in a press-brake die, three closed louvers, a long progressive louver, two knockouts with their ties, an M6 thread extrusion and a dimple
Open-end, closed and progressive louvers, NEMA knockouts, an M6 thread extrusion and a dimple.

Checked against the tool makers' limits as you edit

The Checks box shows what Mate, AMADA, Conic, TRUMPF, Wilson Tool, NEMA and Protocase publish for the form while you place it: height against thickness, angles, pre-holes and ties, and the distance to edges, other forms and bends. They are warnings, kept with the form and measured again by Audit Forms.
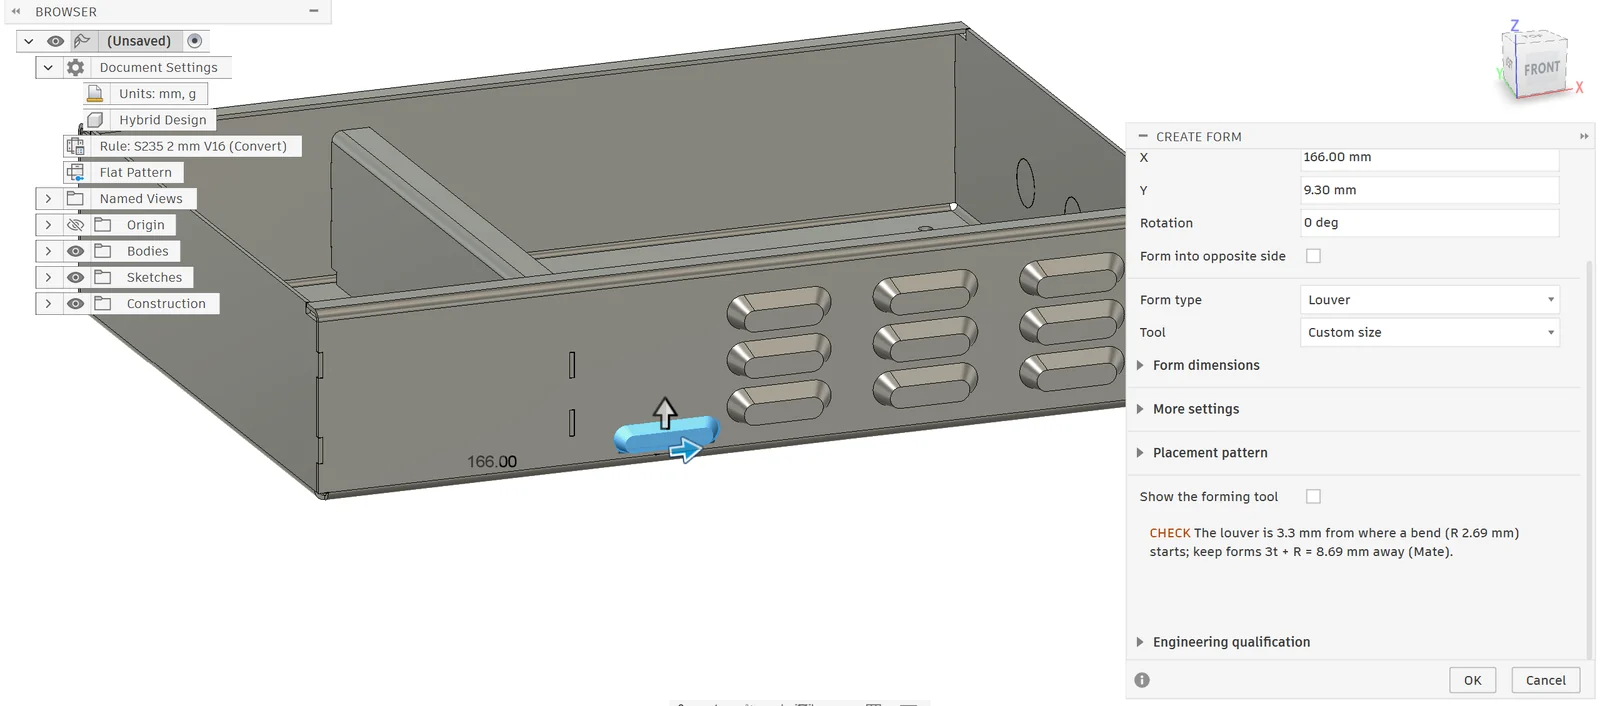
The Create Form dialog in Autodesk Fusion placing a louver near the lower bend of the enclosure's front wall, beside its nine louvers, X 166 mm and Y 9.3 mm from the corner of the face; the Checks box at the foot of the dialog warns that the louver is 3.3 mm from where a bend (R 2.69 mm) starts and to keep forms 3t + R = 8.69 mm away (Mate)
A louver too close to a bend: Mate's minimum distance before it is made.

Your shop's forming tools, each drawn with its sizes

Forming Tool Library keeps the tools your shop owns: a form type with its sizes, the tool code, rotation and side, and the evidence it is qualified by. Create Form lists the ones of the form type that fit the sheet.
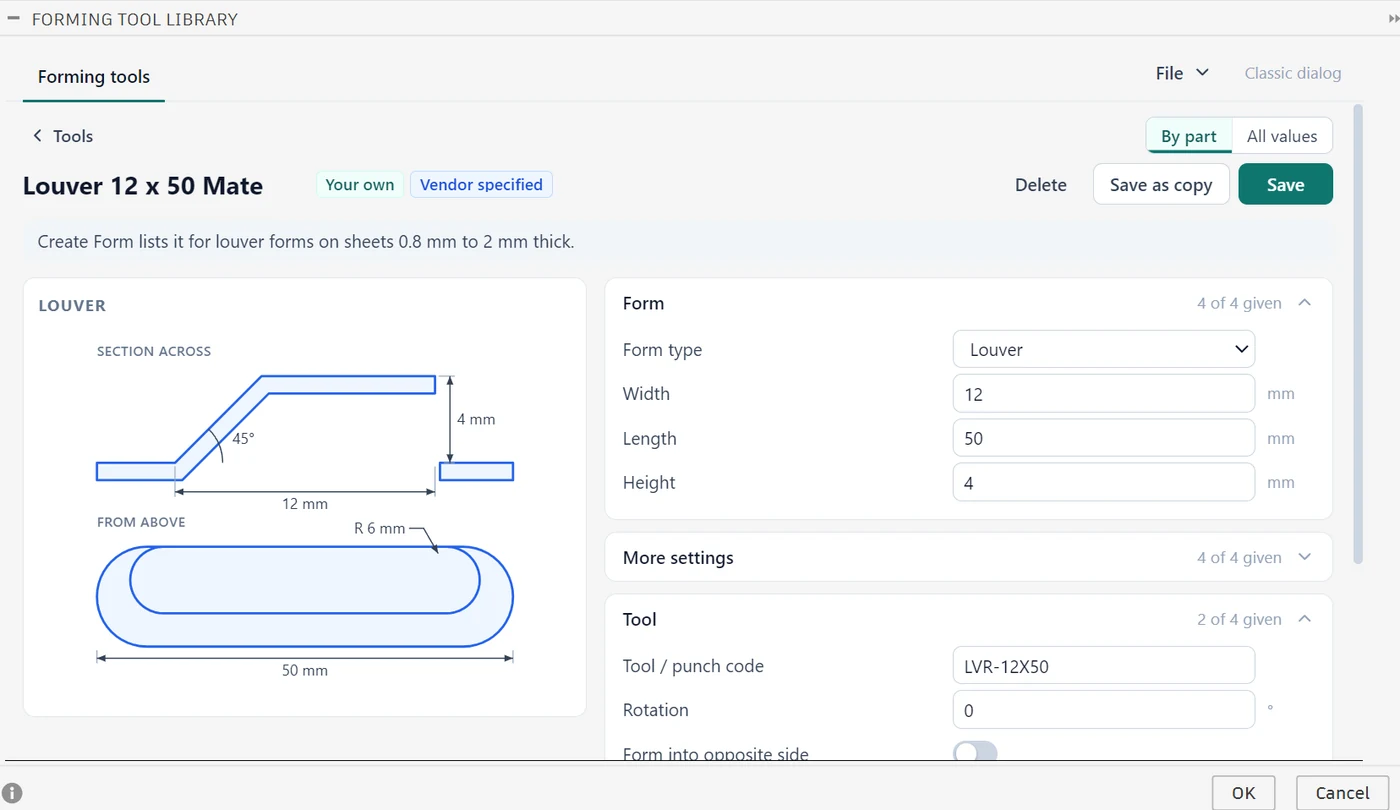
  • ✓Each tool drawn in section and from above: point at a size and its value lights up, and the other way round.
  • ✓Vendor specified or shop qualified: a tool changed after its evidence was recorded says so, and its forms are marked as not qualified.
  • ✓Ten reference tools to start from; import and export the library as JSON.
The Forming Tool Library page in Autodesk Fusion on a shop's Louver 12 x 50 Mate, marked Your own and Vendor specified, listed by Create Form for sheets 0.8 mm to 2 mm thick: its section across with the 12 mm width, 4 mm height and 45 degree form angle, its view from above with the 50 mm length and 6 mm end radius, beside the Form and Tool groups of its values
A louver of the shop's, its maker's evidence for 0.8 to 2 mm, drawn with its sizes.

Punch press

From the forms to the turret

Manufacturing Export turns the forms into a plan for the turret: the blank as loaded, each form up or down, the hit order (cuts, forms up, forms down) and auto-index stations, in a handoff PDF, a CUT/FORM DXF, an SVG and the Punch Map.
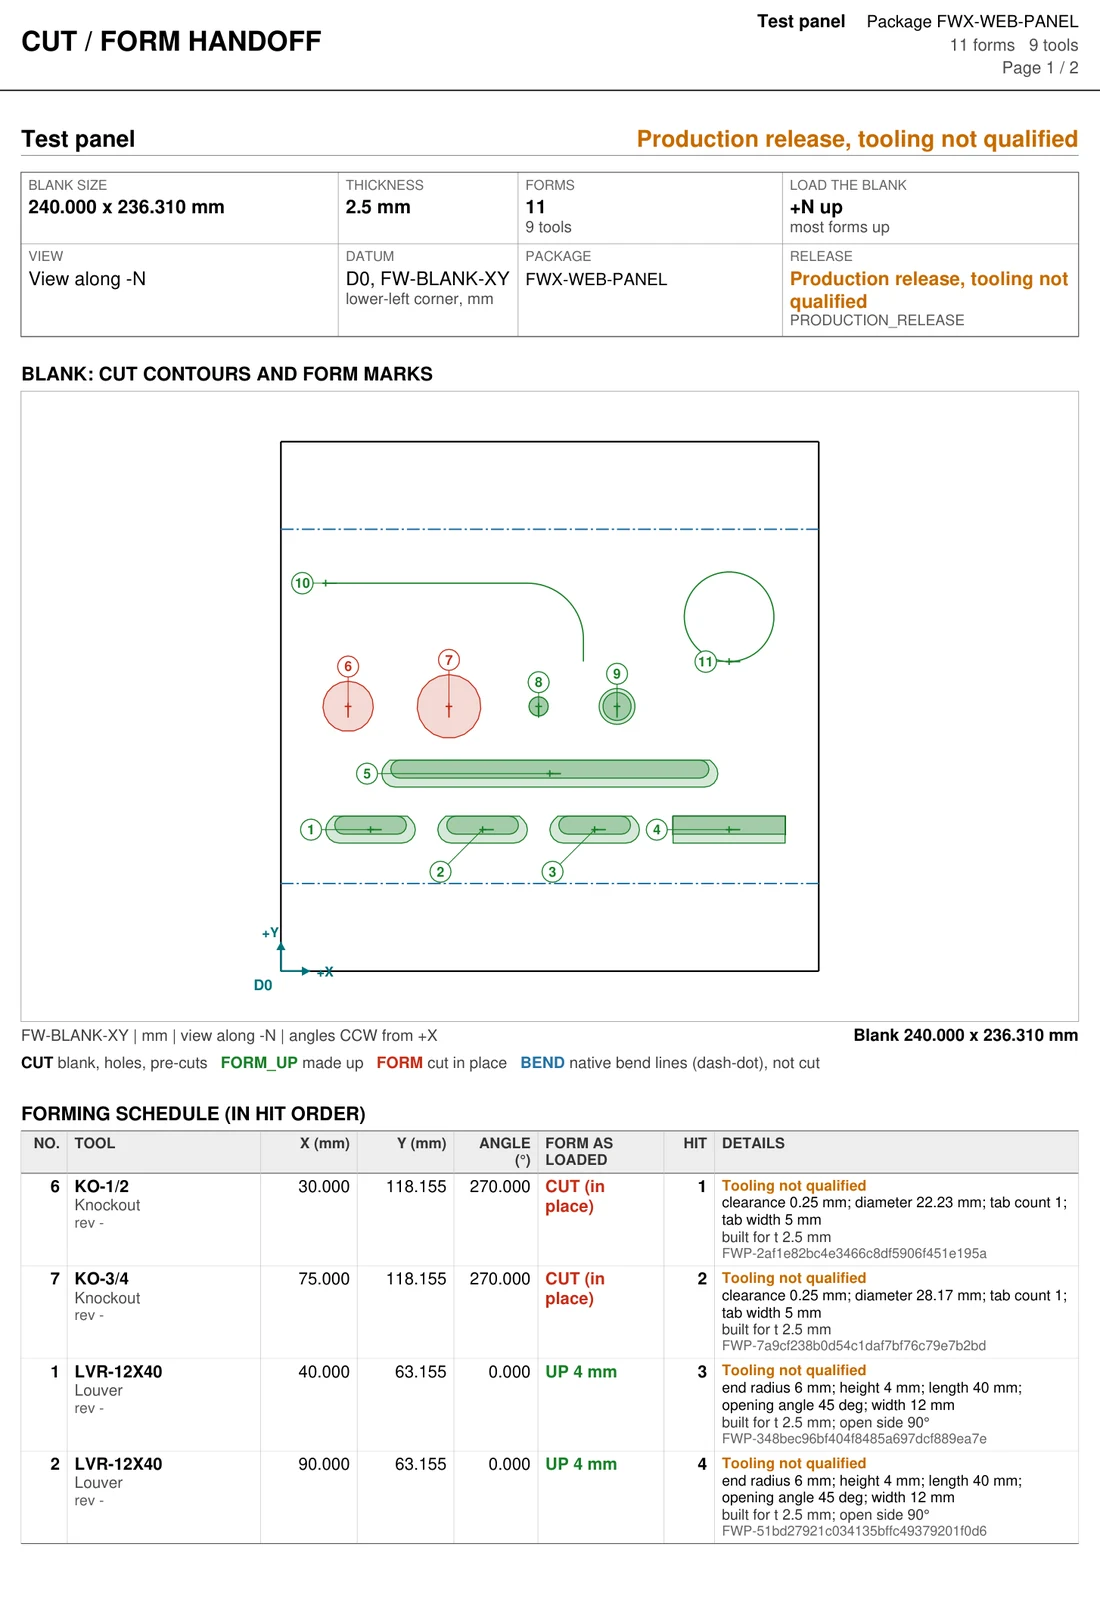
A shop plan for the punch press

  • ✓Load the blank on the face you choose, or Auto, which puts most forms up.
  • ✓Tooling that is not qualified for production is a warning, marked in every file.
  • ✓A louver or bead made in a press-brake die comes after the punch-press hits.
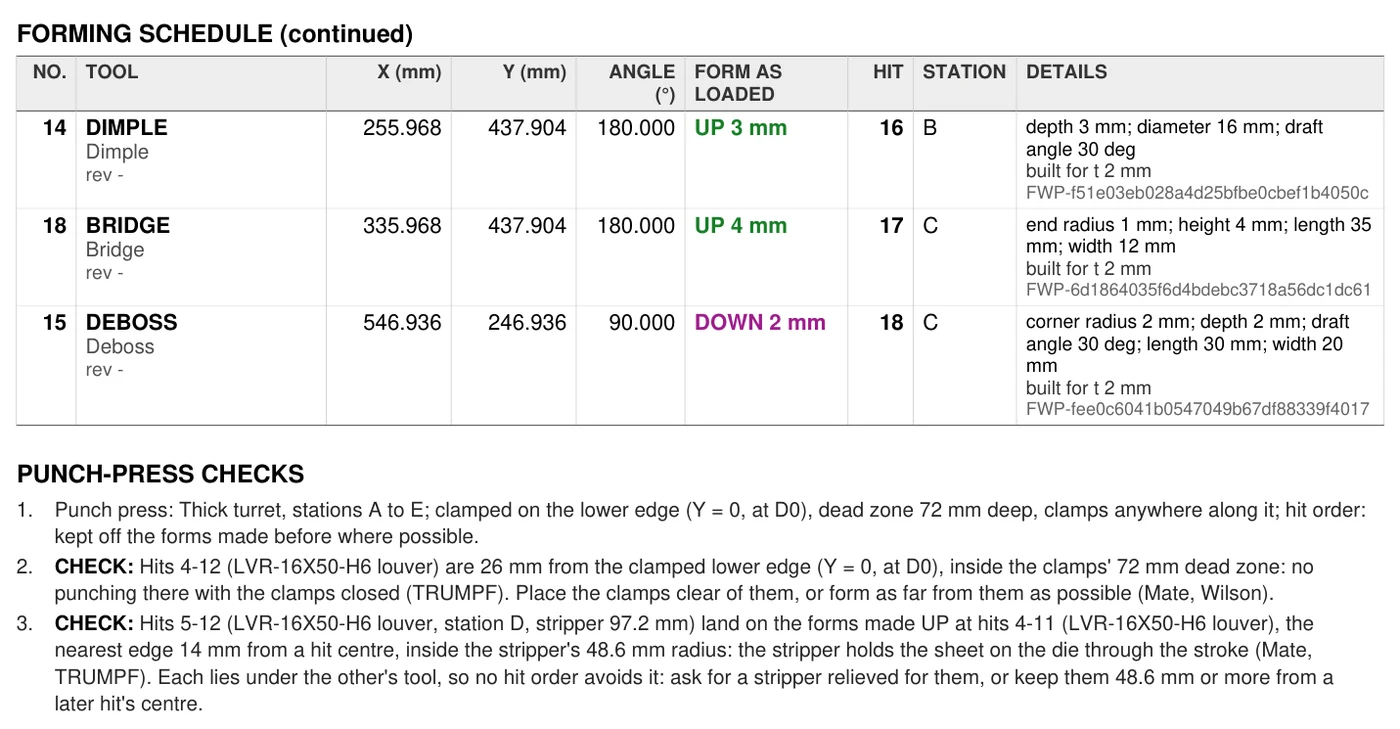
The end of the enclosure's forming schedule, with the station of each hit, and its PUNCH-PRESS CHECKS: the setup, a thick turret with stations A to E clamped on the lower edge with a 72 mm dead zone; the louvers at hits 4 to 12, 26 mm from the clamped edge, inside the dead zone; and hits 5 to 12, station D with a 97.2 mm stripper, landing on the louvers made up before them, 14 mm from a hit centre
PUNCH-PRESS CHECKS in the enclosure's handoff PDF.
Page one of the test panel's handoff PDF: the part block with the release marked Production release, tooling not qualified, in amber; the blank with its cutting contours and each form's footprint in green, made up, or red, cut in place, with its number; and the forming schedule in hit order, the two knockouts first, every form marked Tooling not qualified
Page one of a handoff PDF: its tooling is not qualified, so every form says so in amber.

The punch-press job, checked hit by hit

The stripper holds the sheet on the die at every hit, so a later hit can press a form flat. Manufacturing Export checks the job in hit order and lists what it finds in the handoff PDF, the SVG and the Punch Map, as warnings.

  • ✓A station for every tool: the smallest that takes it, on a thick turret or with TRUMPF tool sizes.
  • ✓Forms under a later hit, and forms in the clamps' dead zone.
  • ✓Avoid crushing, the default, makes a hit before the form its tool would land on, where such an order exists.
  • ✓Show the job in 3D steps through the hits beside the model.
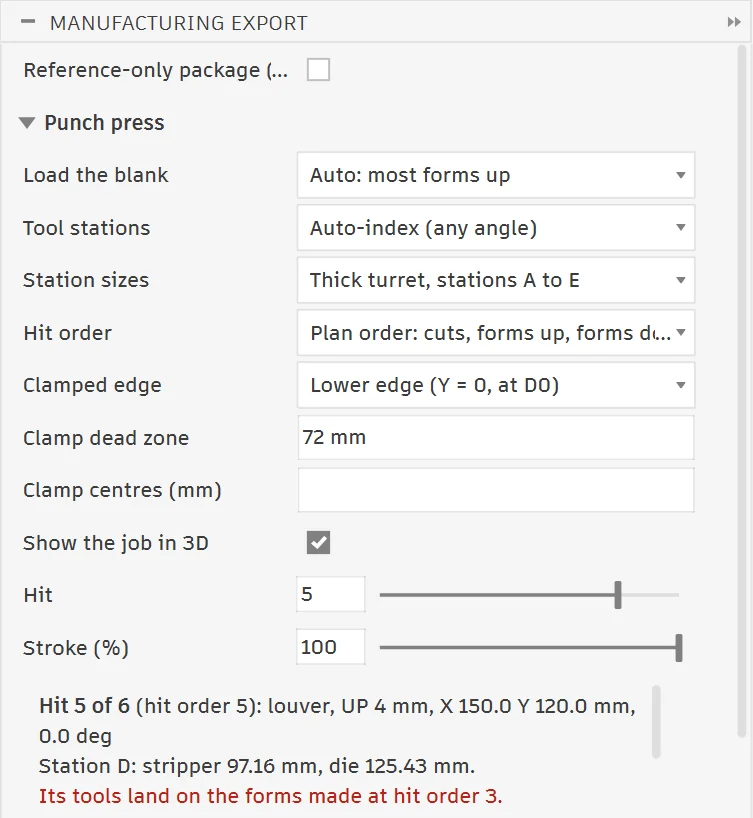
Hit 5's stripper lands on the dimple made at hit 3: both turn red.

The punch and die of every form, as STEP solids

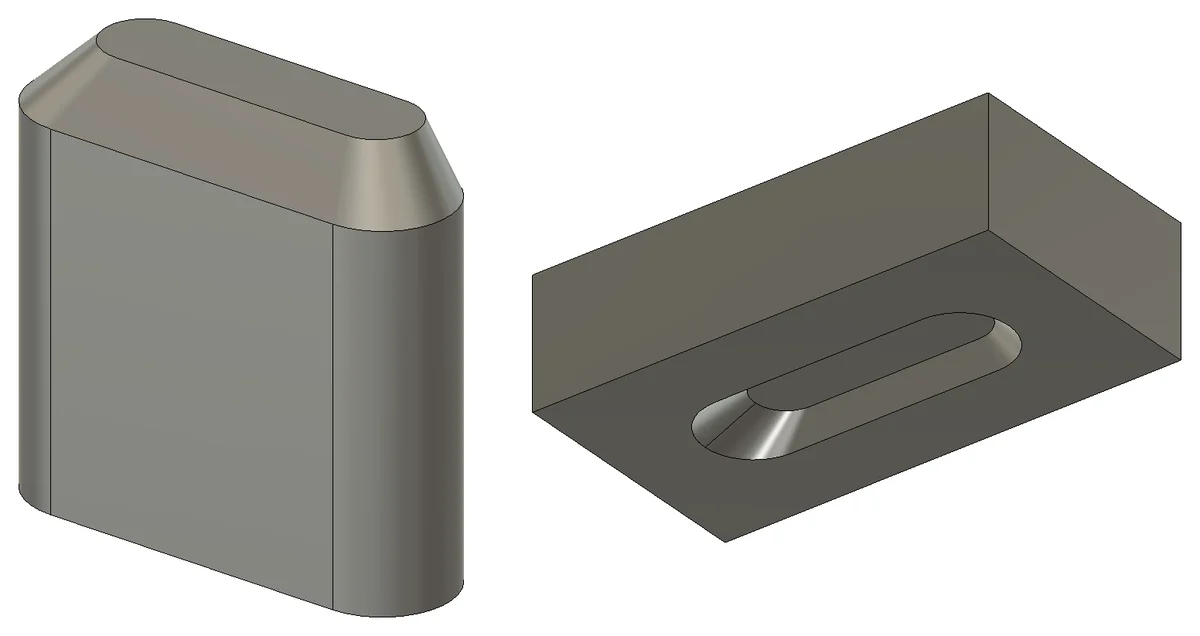
For a stamping die or a turret tool of your own, Manufacturing Export writes the punch and die of the forms as STEP solids at the bottom of the stroke, and opens them in a new Fusion design.
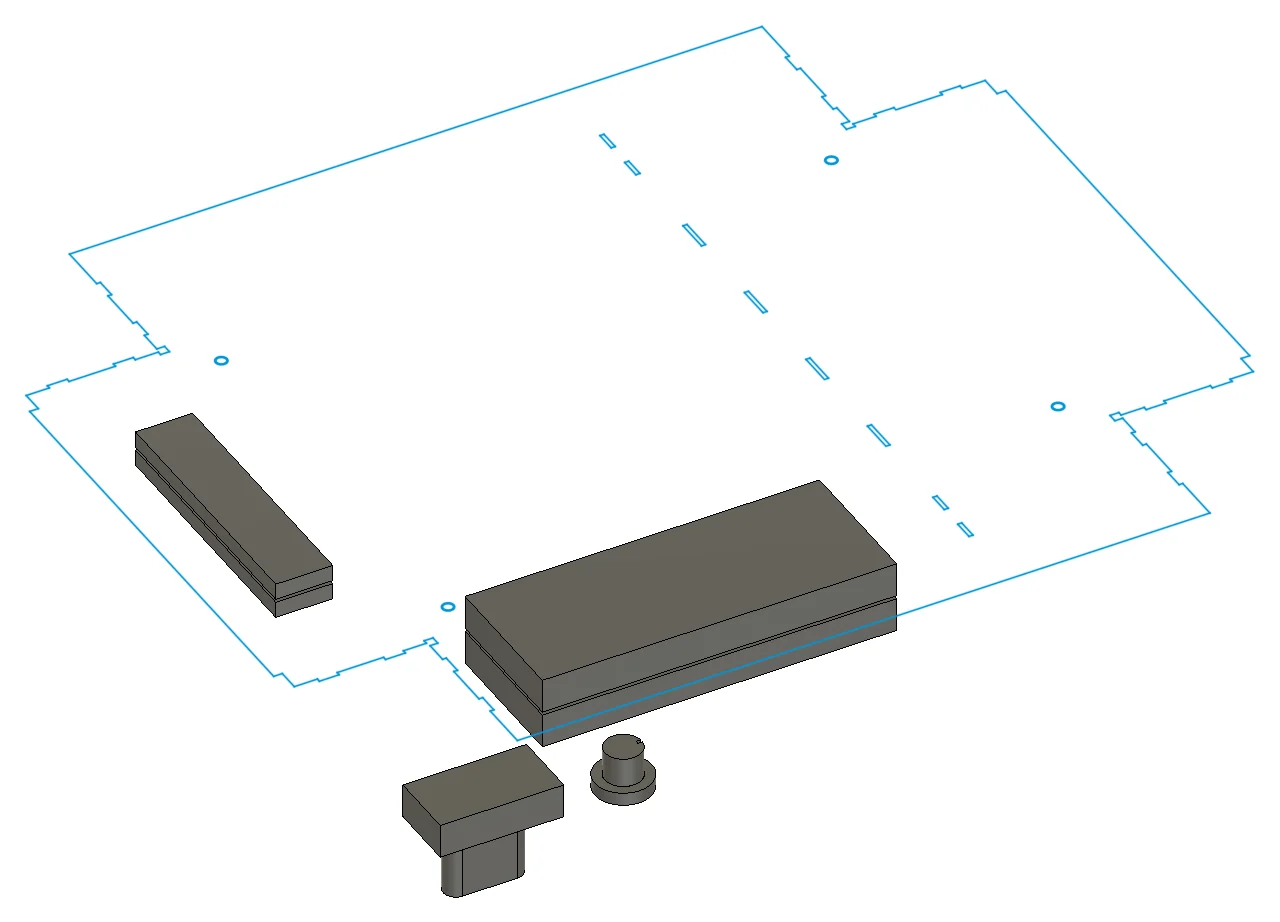
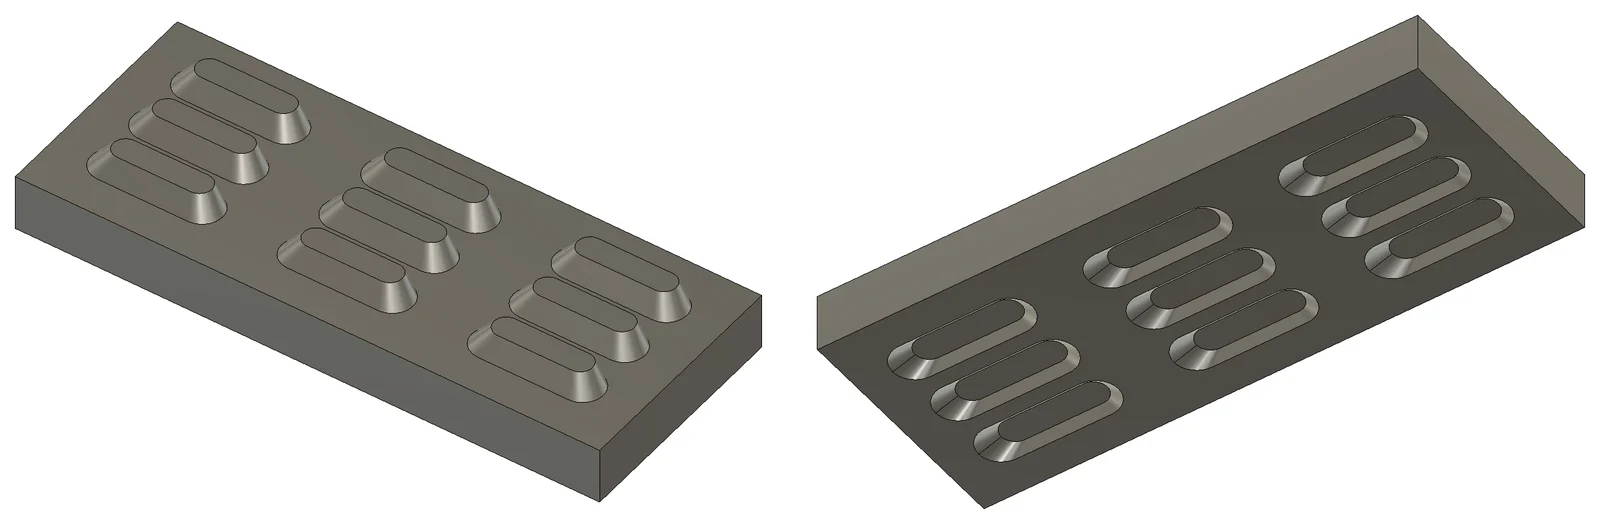
  • ✓One set per tool: each tool once, its punch and die centred on the form.
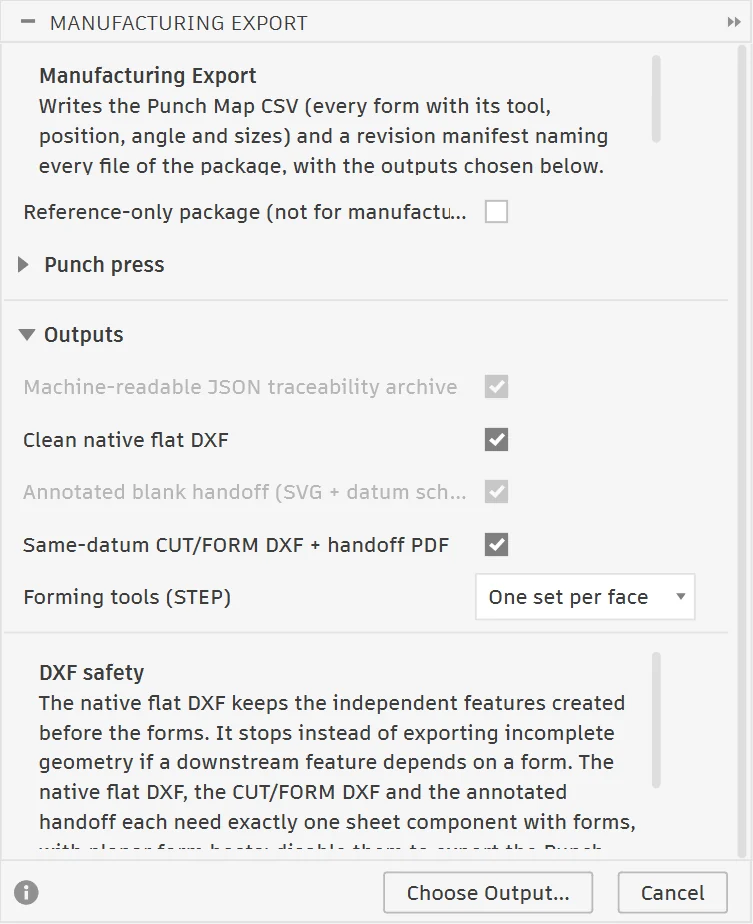
  • ✓One set per face: every form of a flat face in its place, an upper and a lower block in the blank's datum.
  • ✓Beads along a path and gussets have no one-hit tool and are left out; holders and springs are yours to add.
The forming tools of the enclosure in a new Fusion design: the blank's outline as loaded with its slots and corner tabs, an upper and a lower die block over the front wall's nine louvers and over the three knockouts of the end wall, and in front of the blank the louver's punch and die and the knockout's punch and die
Both sets for the enclosure: a die set per face, and one set per tool in front of it.
The front wall's die set taken apart: on the left the lower block with the nine louver punches standing out of it, on the right the upper block seen from below with the nine louver cavities cut into it
The front wall's die set: the punches in the lower block, the cavities in the upper.
The louver's own tool: the punch with its sloped back and drawn ends, and the die block seen from below with the louver's cavity
One set per tool: the louver's punch and die.
The Manufacturing Export dialog in Autodesk Fusion with the Punch press group open: Load the blank Auto, Tool stations Auto-index, Station sizes Thick turret, stations A to E; Hit order Plan order; Clamped edge Lower edge (Y = 0, at D0); Clamp dead zone 72 mm; no clamp centres; Show the job in 3D ticked, Hit 5, Stroke 100 percent; below, hit 5 is the louver at station D and, in red, its tools land on the forms made at hit order 3
The punch-press settings behind the clip, at hit 5.
The Manufacturing Export dialog in Autodesk Fusion with its Outputs open and Forming tools (STEP) set to One set per face; the annotated blank handoff is then ticked and greyed, as the per-face sets need it
Forming tools (STEP) in Manufacturing Export.

Tab and Slot

Parts that locate themselves before welding

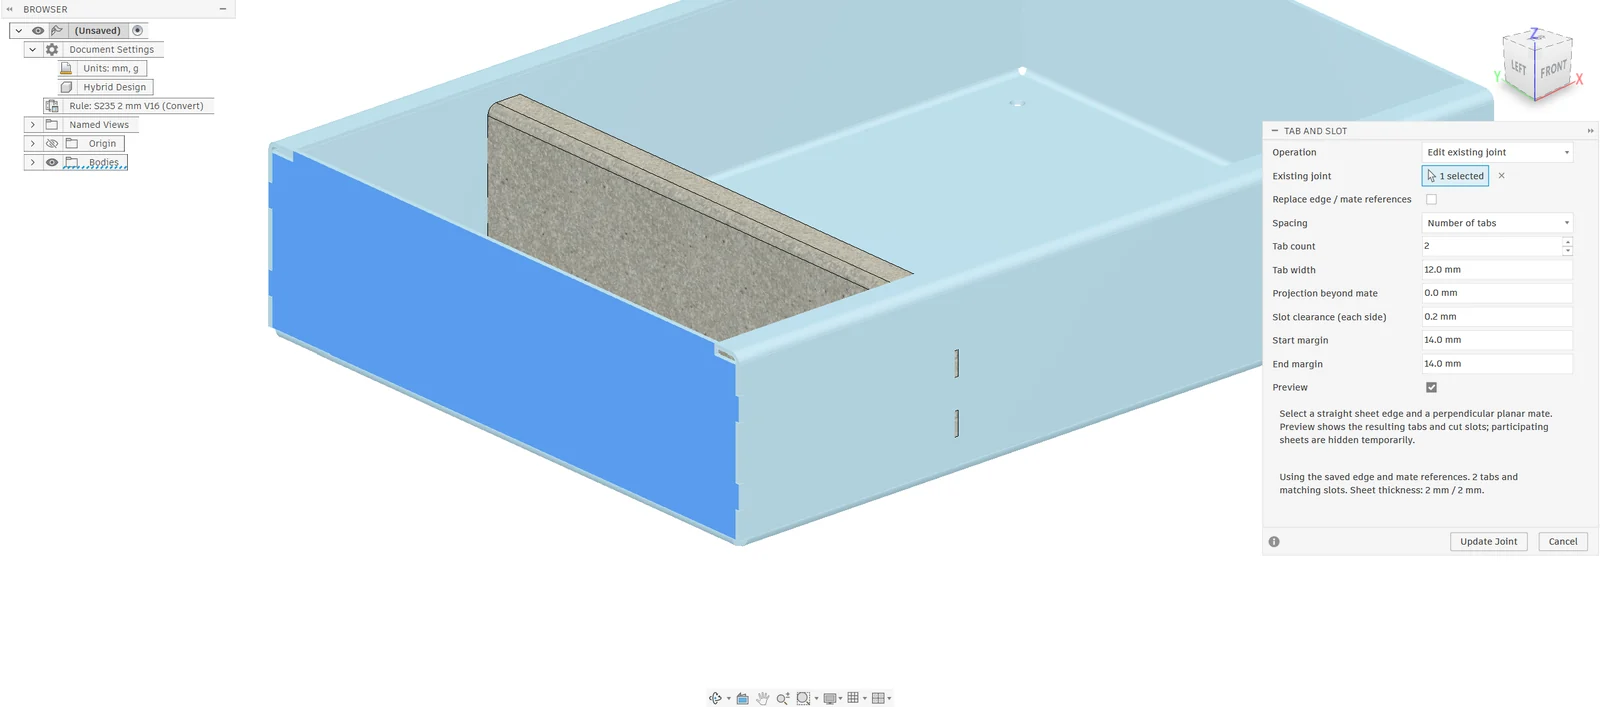
Tab and Slot adds locating tabs to the edge of one sheet and cuts matching slots, with clearance, in the sheet it meets at 90°, by count or by pitch, with a preview. Each joint can be edited at any time, also after forms; the slots stay in the flat pattern and the DXF.
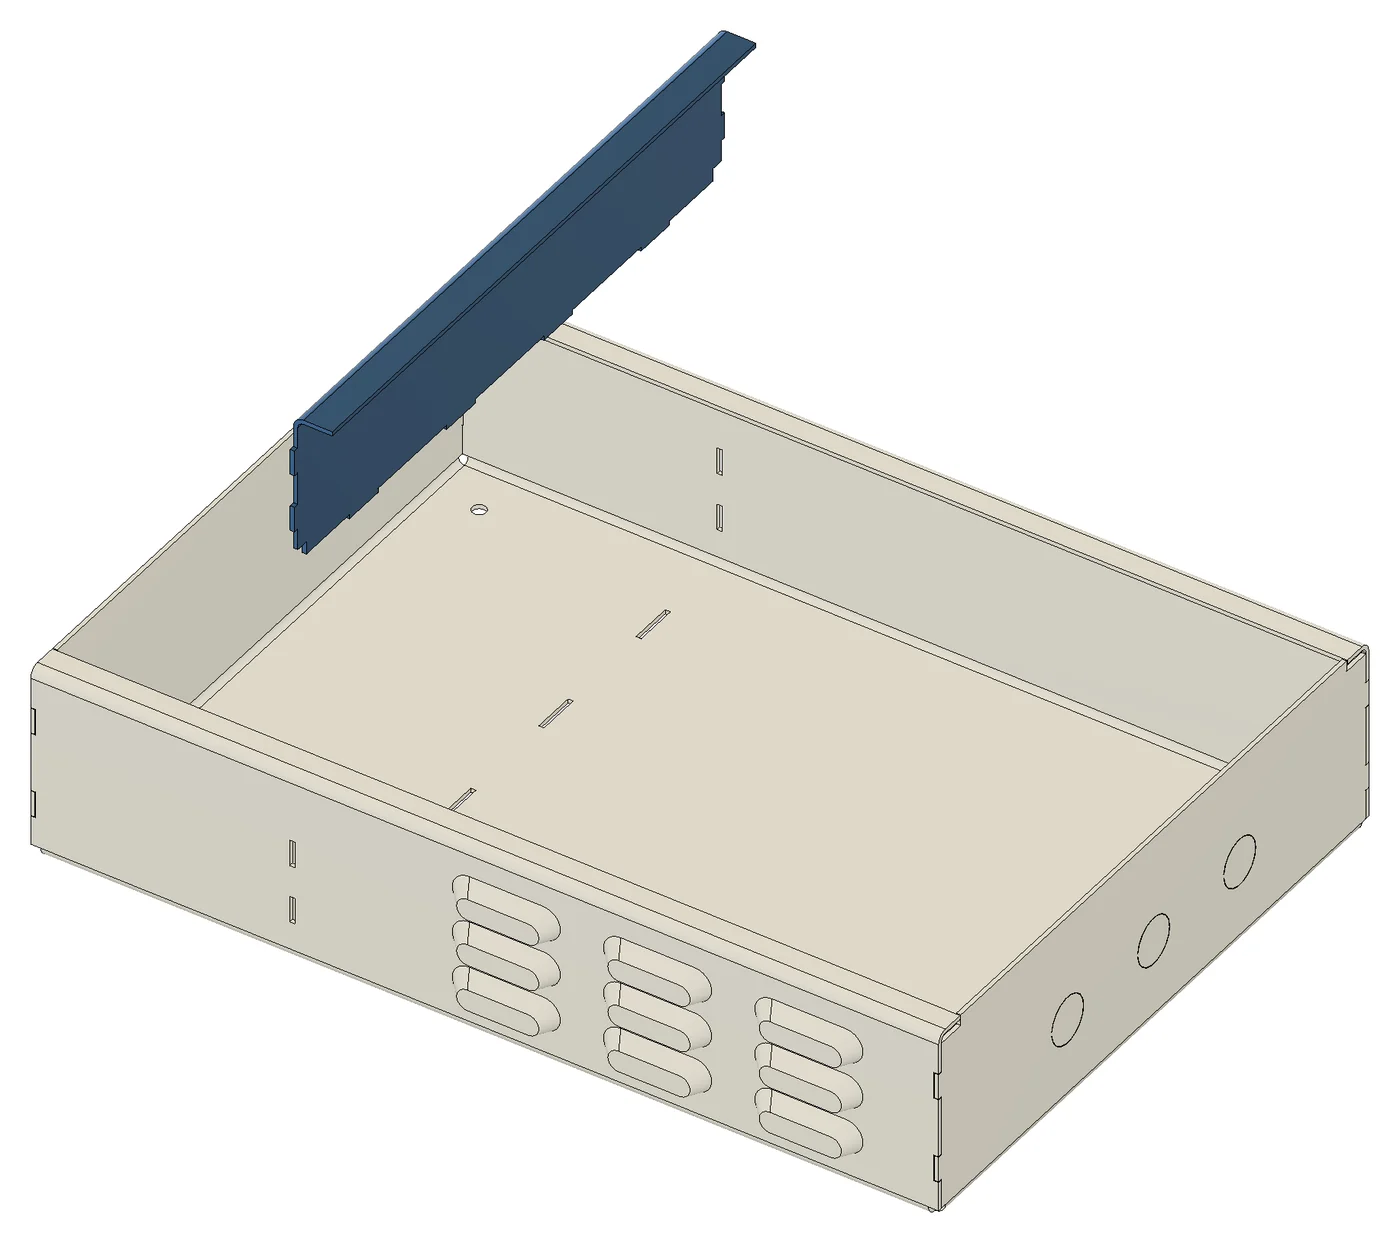
The enclosure with its blue mounting plate lifted out: the tabs along the bottom and both ends of the plate, and the matching slots in the base, the back wall and the front wall
The mounting plate lifted out of the enclosure: its tabs and the slots they fit.
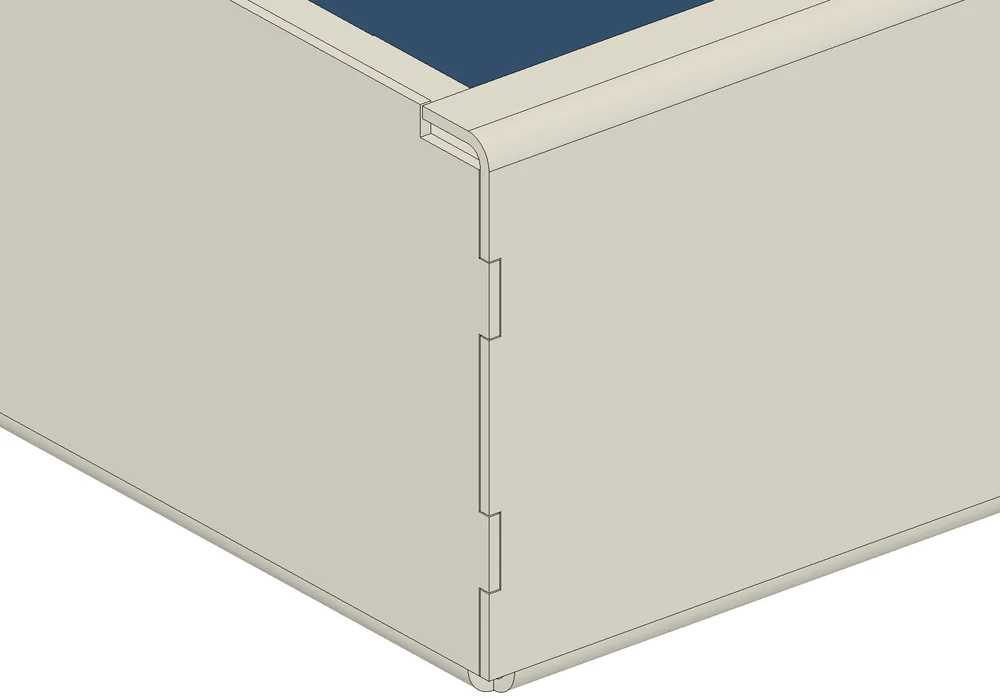
A closed corner of the enclosure: two tabs on the end wall pass through slots at the end of the long wall, flush with its face, under the return flange
A closed corner: two tabs on the end wall lock it through the end of the long wall.
The Tab and Slot dialog in Fusion editing a corner joint of the enclosure: tab count, tab width, projection, slot clearance and margins, with the preview of the tabs on the end wall and the slots at the end of the long wall
Tab and Slot editing a corner joint, with the preview.

Example parts

Parts where the order and the punch decide

Two more parts, each checked in the order its bends were drawn and with Auto tools + order, on an example 40-tonne brake. Under each: its flat and the step where the punch matters, from its own bend sheet.
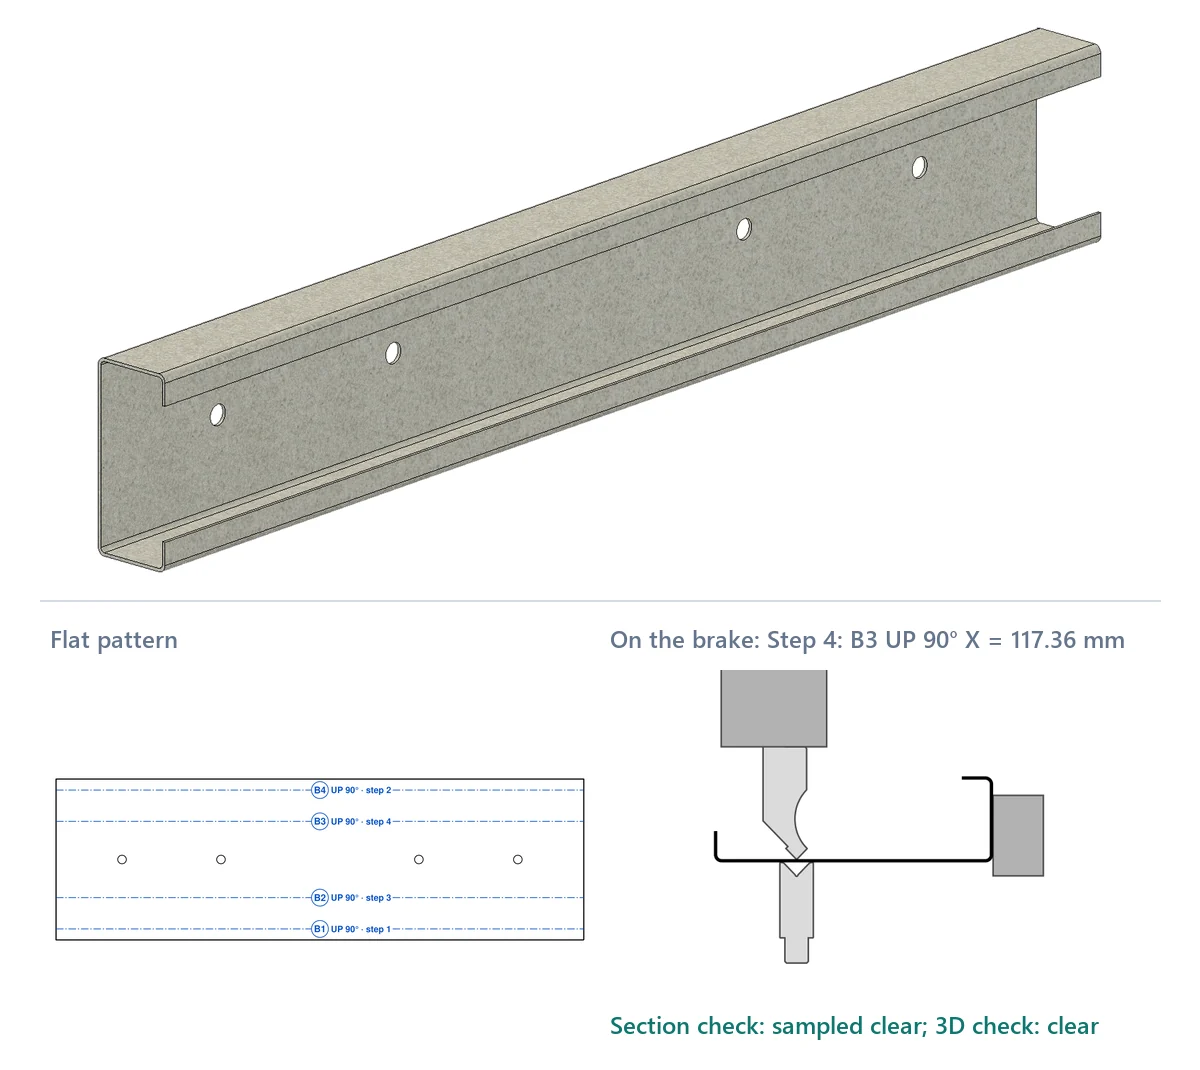
A galvanized lipped C channel in Fusion; under it the flat pattern with four numbered bends and step 4 from its bend sheet: the C on the die under the AMADA 604 straight punch

Lipped C channel

S235JR steel, 2 mm · 800 mm long · 4 bends

In the order drawn

With the UKB 11.151 punch the dialog started with, the third bend swings the flange and its lip into the punch and the beam at 82°; with that punch no bend order clears the part.

Auto tools + order

Auto changes to the AMADA 604 and its V16 die and bends both lips first: 31 plans in 2.1 s, every step clear in 3D.

Bend sheet (PDF)
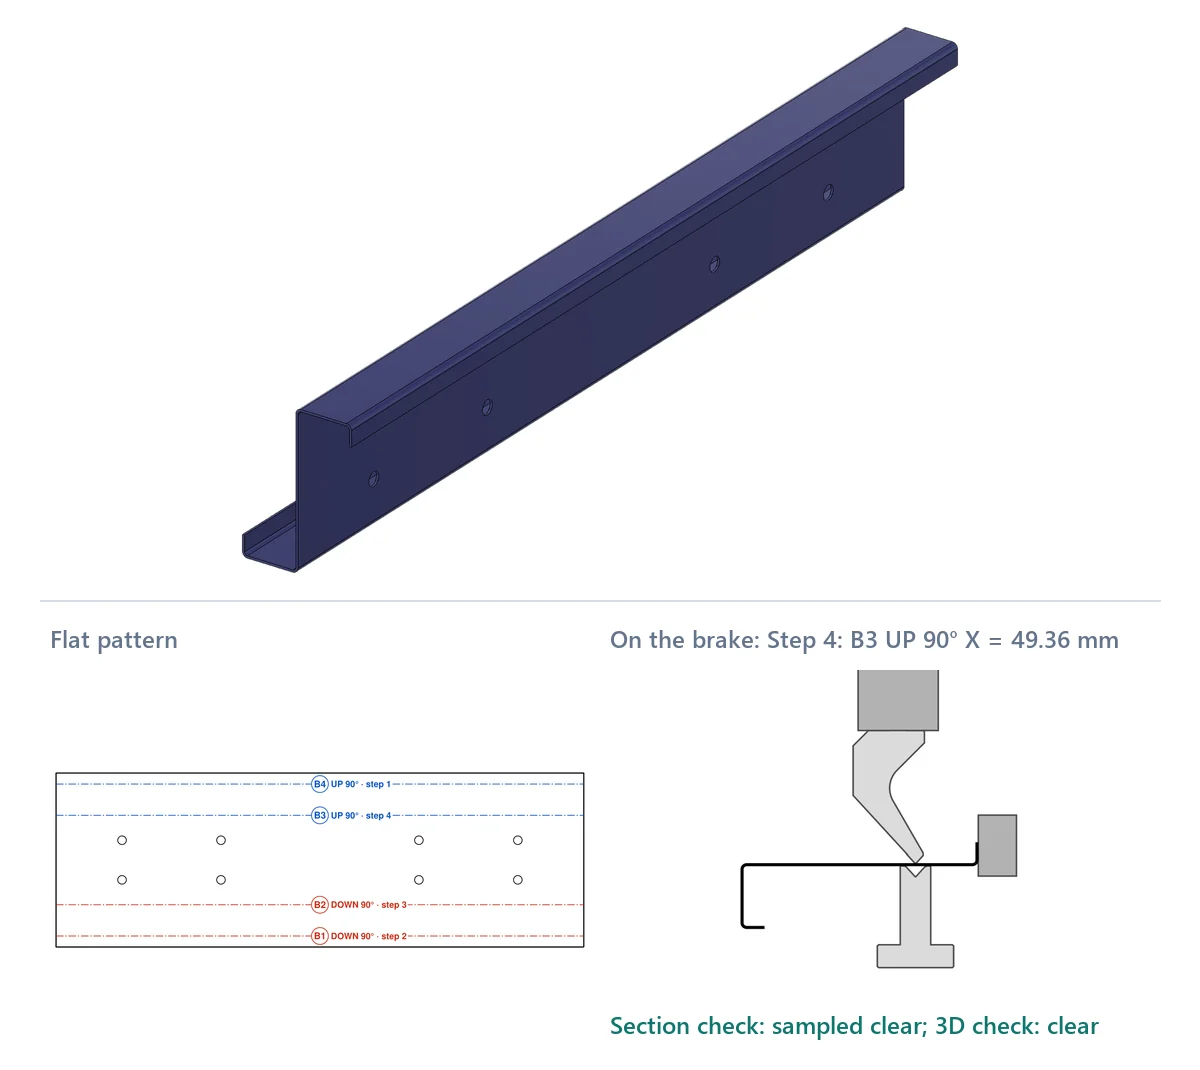
A blue Z section with lips in Fusion; under it the flat pattern with bends marked up and down, and step 4 from its bend sheet: the part on the die under the gooseneck, gauged on the formed lip

Z section with lips

S235JR steel, 2 mm · 800 mm long · 4 bends, two up and two down

In the order drawn

With the top lip bent last, the formed part meets the upper beam 2° into that bend.

Auto tools + order

The top lip first, the part flipped over between the lips and the web bends, all with the UKB 11.151: 4 plans in 1.3 s, clear in 3D.

Bend sheet (PDF)

Ten commands

In the Sheet Metal tab, panel Press Brake

The most used commands sit on the ribbon; the panel menu holds all ten.

The Sheet Metal tab of the Fusion Design workspace with the Press Brake panel at its right end
Bend Sheet tool illustration

Bend Sheet

Bend order, tools, back-gauge X and checks for every hit, the 3D view, and the bend sheet PDF, CSV and DXF.

Apply Bend Rule tool illustration

Apply Bend Rule

The radius and K-factor of your die and punch as a Fusion sheet-metal rule.

Calibrate from Test Bend tool illustration

Calibrate from Test Bend

Bend deduction and K-factor from one measured test strip.

Press Brake Library tool illustration

Press Brake Library

Your machines, tools, materials and calibrations, and the catalogue.

Create Form tool illustration

Create Form

Forms on a sheet face, checked against the tool makers’ limits; it edits them too.

Forming Tool Library tool illustration

Forming Tool Library

Your shop’s own forming tools, each drawn in section with its sizes and evidence.

Tab and Slot tool illustration

Tab and Slot

Locating tabs and slots where two walls meet at 90°.

Manufacturing Export tool illustration

Manufacturing Export

Punch Map, punch-press plan and checks, flat DXF, and the forms’ punch and die as STEP.

Audit Forms tool illustration

Audit Forms

Checks the saved forms before you release the part.

About Sheet Metal and Press Brake tool illustration

About Sheet Metal and Press Brake

Help, version, license status and support.

Sheet Metal & Press Brake · Windows and macOS

Plan your next part for the brake

US$89/year or US$12/month per user, with a 3-day trial. Subscribe on the Autodesk App Store (a Windows listing that installs the add-in for you; its subscriptions need PayPal) or by card through Lemon Squeezy with the email of your Autodesk account. Either one licenses that account for the Windows and the macOS build, and both builds also download below with the same email.

Contact support

Read the guide first

The user guide covers each command, the library, the checks and the limits.

Download

Download the current build

With a license (a purchase or a license from us), download the newest Windows or macOS build here with the email of your Autodesk account, or from inside the add-in (About › Download latest version). The add-in checks your license when it starts, so the file is only useful with a license.

No license yet? Buy on Autodesk App Store. Then install it with the installation guide.

Latest build

The same add-in runs on Windows and macOS. Pick the machine you will install on.

Checking…

Available with an App Store or publisher-granted license. We check your email against license records and log downloads. See our privacy policy.

Install, update or uninstall an add-in →

Adding the ZIP by hand? In Scripts and Add-Ins › +, select the folder that contains the .manifest file, not the file: on Windows, the Contents folder inside the .bundle.

Updating or switching versions? Clear Run on Startup for the old add-in, Stop it and close Fusion before replacing files. Restart Fusion before you Run the new version.

Before you start

Sheet Metal & Press Brake FAQ

Does it change the Fusion flat pattern?

No, it reads it. Only the part’s sheet-metal rule (inside radius and K-factor) is ever changed, by Apply Bend Rule or when you accept Bend Sheet’s offer, so that the flat and its DXF match your brake. Undo takes it back.

How does this compare to Inventor Bend Order or offline press-brake CAM?

Inventor numbers the bends on a flat pattern; offline CAM writes controller code on a separate PC. This add-in plans a collision-checked bend order with its tools, back-gauge X and handling inside Fusion, on your model and tooling, and writes a setup sheet PDF, a CSV and a DXF, not controller code. See the comparison table

Which parts can it read?

Fusion sheet-metal parts, one per component, one part or every part of the design. A part without a flat pattern gets one from the largest flat face. Bends up and down at any angle are planned, hems included. See the current limitations

Do I need my own tool data first?

No. The starter library has published values for 8 machines, 38 punches, 90 dies and 23 materials, every punch and die with its outline, so a bend sheet works at once. Add your own tools from the catalogue, a sketch, a DXF or a few values. See the Press Brake Library

Is the collision check a machine simulation?

No. It checks the part against the punch, die, beam and back-gauge outlines in 2D on every plan and in 3D when you run it; springback and tool or machine deflection are not modelled, and a step that could not be checked stays incomplete. Try unusual parts on the machine. See the current limitations

Does it work with inch designs?

Yes. Lengths and the back-gauge X follow the design units, with three decimals in inches. For an inch design, American tooling and ASTM materials are offered first.

What is in the bend-program CSV?

One row per step: part, step, bend, angle, direction, die, punch, back-gauge X, gauge reference, handling, force and the problems found. Type it into the controller or keep it with the job; it is not a program file for a specific CNC controller.

Are the forms native Fusion forming tools?

No. A form is modelled geometry with a saved manufacturing record, checked against the tool makers’ published limits as warnings. The supplied presets are examples until you qualify your own tool. See the form checks

Is there a free trial, and which systems are supported?

There is a 3-day trial that starts the first time you run a protected command while signed in and online; opening About alone does not start it. It runs in Fusion on Windows and macOS. The Autodesk App Store listing is for Windows; a subscription there or by card on this page unlocks both builds, and the macOS build downloads from this page with the email of your Autodesk account.

Supported scope

Current limitations

Check these before you rely on a result.

Section and 3D checks

The section check sees the part as folded flat panels and bends; forms on a wall formed across the bend and bend lines short of the edges are left to Check all steps in 3D. Springback and tool or machine deflection are not simulated. A hem made in one hit and a teardrop are not refolded in 3D, and bottoming and coining change the force, not the motion.

The clamp and back gauge of your machine

Makers rarely publish their back-gauge fingers, and some no clamp: those machines take an equivalent maker's clamp and a typical finger, listed under Assumed. Enter, sketch or import your own where they differ.

A bounded tool search

Auto tools + order has one 40-second budget for searching and checking, 3D included, and keeps the best plan it found; its own pre-bends are a bounded set of trials, not every sequence. With a large library or a hard part it may stop short: finish the steps it marks by hand, or keep only your machine's tools in the library.

One K-factor per part

Each bend radius is read from the flat with the K-factor of the part's rule. Check bends that have their own unfold settings in Fusion.

One part per component

Fusion keeps one flat pattern per component, so Bend Sheet reads one part per component; another sheet-metal body is listed with the steps to give it a component of its own.

Forms and joints in one component

Forms are made on the sheet that owns the flat pattern, with no strain or springback calculated, and the tool makers' limits are published values, not a qualification of your tools. Tab and Slot joins straight 90° edges in one component. The punch-press checks take each tool as a disc of its station, and the exported forming tools are forming shapes, not a die design.

Read the detailed limits

More for Autodesk Fusion (Fusion 360)

Combine with other VanThanBK fabrication & assembly add-ins

Compare all 7 add-ins →
Steel Frame & Weldments Pro

Tube folding, welds and frame analysis in Fusion

Tube & Pipe Routing

From tube routes to fabrication packages

Assembly Hole Series

Bolted-joint holes through every part, linked files too

Auto Backup & Export

Local backups of your Fusion cloud designs
Caliper – Measure and Report

Measure in Fusion, save the values, print a report